Category: info

  • How Long Before You Can Build on a New Concrete Slab?

    How Long Before You Can Build on a New Concrete Slab?

    Key Takeaways

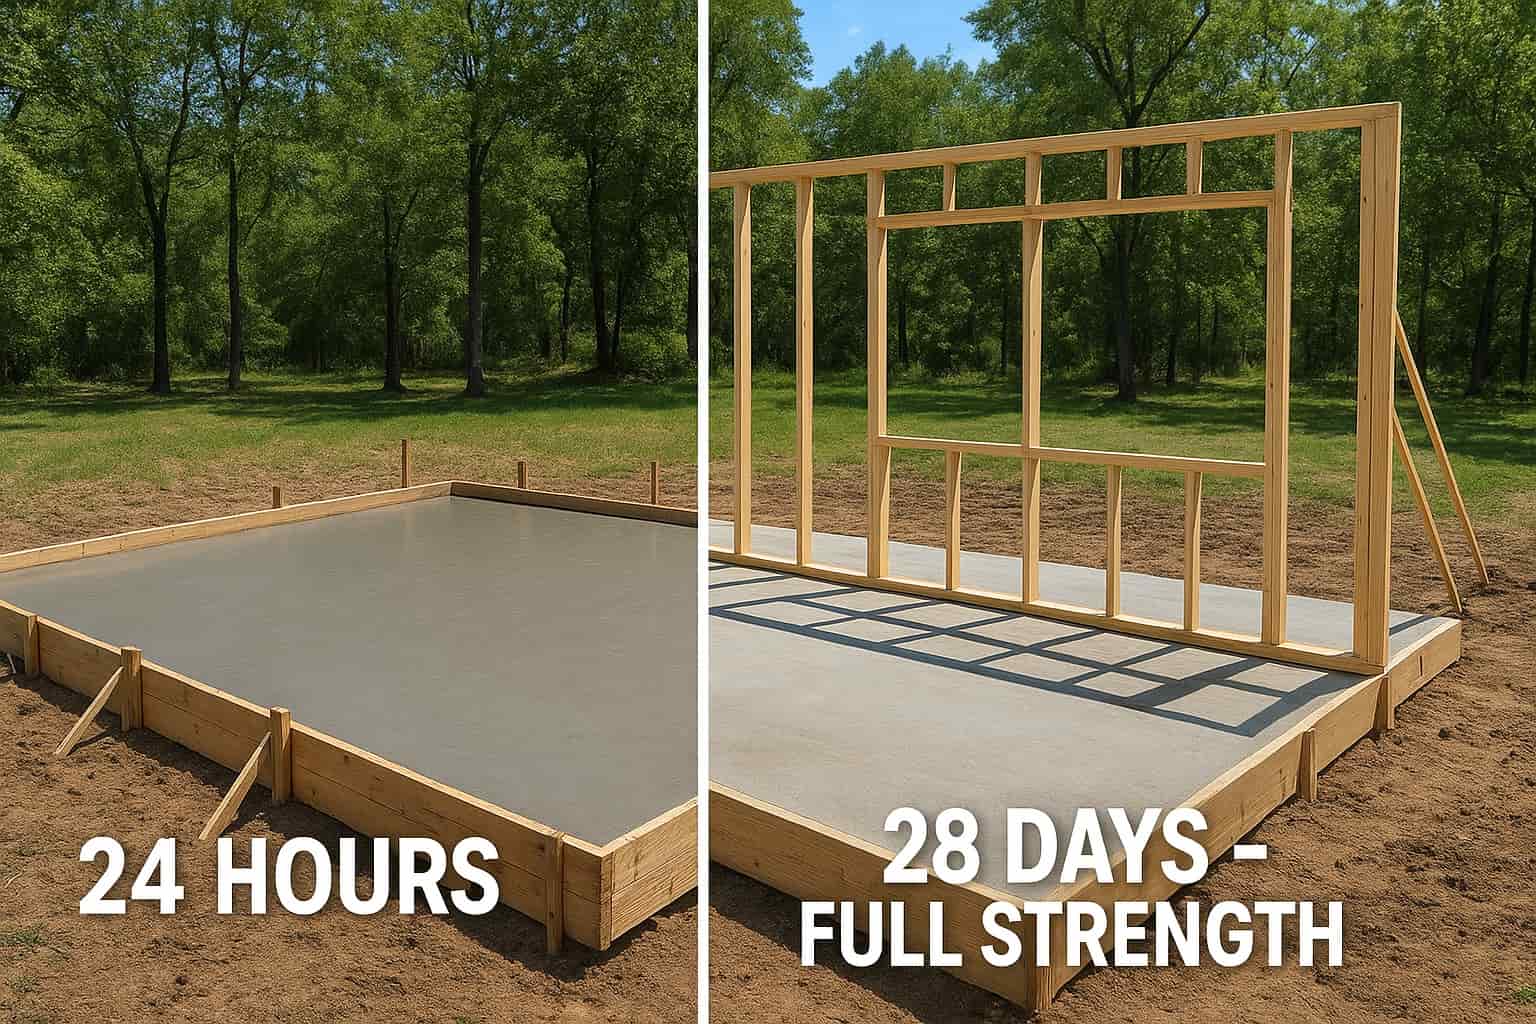
    • Wait at least 7 days before starting light construction work like wood framing on a new concrete slab, when the concrete reaches approximately 70% of its design strength
    • Allow the full 28-day curing period for maximum strength and durability before placing heavy equipment, permanent fixtures, or finished flooring on your slab
    • Arkansas homeowners face unique timing considerations due to temperature fluctuations and humidity levels that can significantly affect concrete curing rates
    • Professional testing of concrete strength through field-cured cylinders provides the most accurate determination of when your specific slab is ready for building loads
    • Proper curing methods during the first 7 days are essential to achieving the specified strength your construction project requires

    Understanding When You Can Build on a New Concrete Slab

    For most standard residential concrete slabs, you should wait at least 7 days before starting light construction activities such as wood framing, while waiting the full 28 days before applying heavy loads or installing finished flooring provides maximum strength and long-term durability. The time required before building depends fundamentally on understanding the difference between concrete “setting” and “curing,” along with the specific requirements of your construction project.

    Understanding concrete strength development over time helps homeowners and contractors make informed decisions about when it’s safe to proceed with construction while avoiding costly mistakes from premature loading. Concrete gains approximately 70% of its ultimate strength within the first 7 days under proper curing conditions, with the remaining 30% developing gradually over the next three weeks.[1] This strength timeline directly impacts your project schedule and determines when various construction activities can safely begin on your new slab.

    Time After PourConcrete StrengthPermitted ActivitiesRestrictions
    24-48 hoursInitial set completeCareful foot traffic, formwork removalNo vehicle traffic, no construction loads
    3-7 days65-75% of design strengthLight wood framing, basic constructionAvoid heavy equipment, concentrated loads
    28 days100% of specified strengthAll construction activities, heavy loads, flooring installationNone – full strength achieved

    The Science Behind Concrete Curing and Strength Development

    Setting Versus Curing: Critical Differences

    Concrete gains strength through a chemical process called hydration, which requires moisture and time rather than simply drying out. Setting is the initial hardening that typically occurs within 24 to 48 hours after placement, when concrete can support foot traffic without leaving permanent marks.[2] During this initial period, bleed water rises to the surface as the concrete mixture settles, and the material transitions from a plastic state to a solid form.

    Curing represents the much longer process where concrete develops its full compressive strength and durability through continued hydration. This chemical reaction involves water molecules binding with cement particles to form a dense, crystalline matrix that gives concrete its remarkable strength characteristics.[3] The curing process is generally considered complete at 28 days for standard concrete mixes, when the material reaches its full specified strength for design purposes.

    How Concrete Gains Strength Over Time

    After concrete is placed, it increases in strength very quickly during the first 3 to 7 days of the curing period. Concrete that is properly moist-cured for 7 days develops approximately 50% more strength than uncured concrete placed under identical conditions.[4] The strength development follows a predictable pattern that construction professionals use to schedule subsequent building activities.

    At the 3-day mark, concrete has developed approximately 30% to 40% of its 28-day strength, which remains too early for most structural loads.[5] By day 7, properly cured concrete typically reaches about 65% to 70% of its final strength, making it suitable for light construction activities.[6] The remaining strength continues developing gradually, with concrete reaching about 95% to 99% of its ultimate strength by 28 days and continuing to gain small amounts of strength for months or even years afterward.

    Recommended Waiting Periods for Different Construction Activities

    Light Construction and Wood Framing (7 Days Minimum)

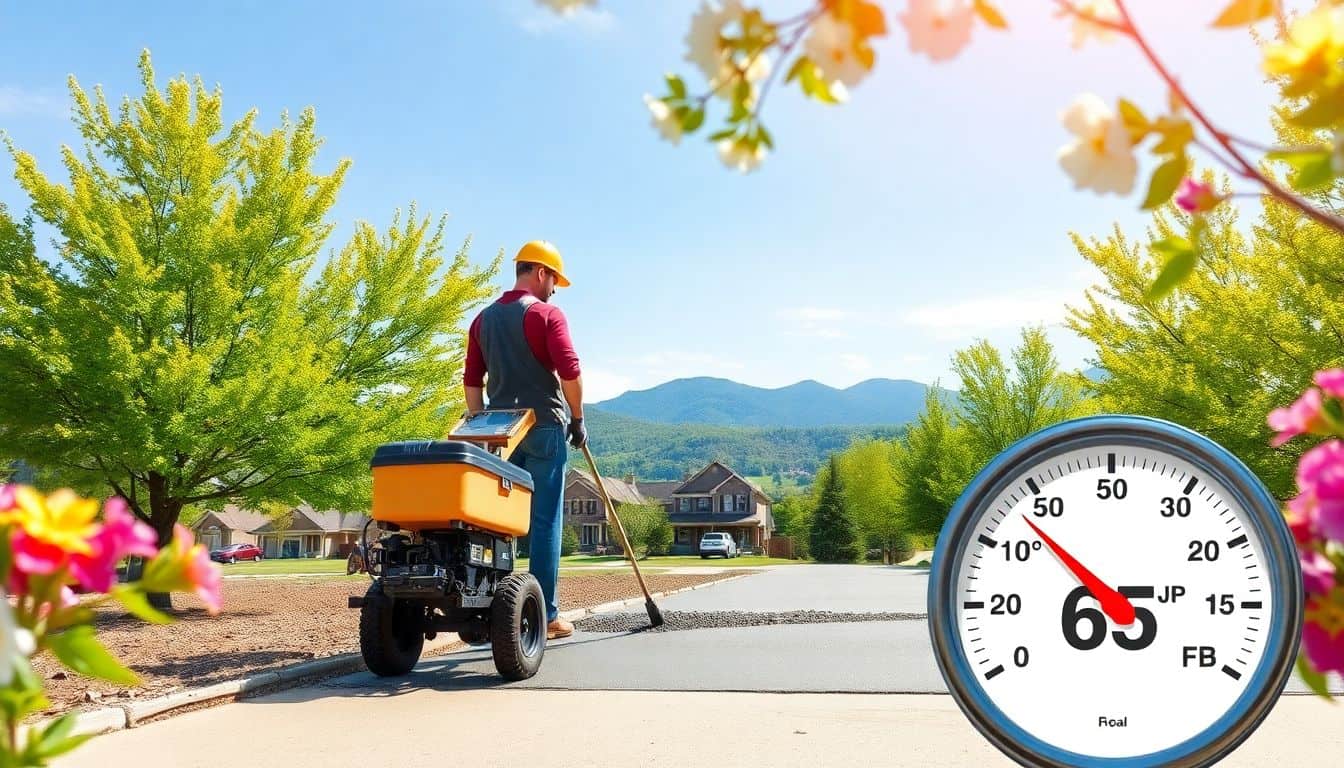
    For homeowners planning residential construction in Fayetteville, the 7-day milestone represents when light-frame construction activities can typically begin safely. At this point, concrete has reached approximately 75% of its cured strength, providing sufficient support for wood stud walls and basic framing operations without risking structural damage.[7] However, contractors should still avoid placing heavy equipment or concentrated loads on the slab during this period.

    Light construction activities appropriate for the 7-day period include setting treated bottom plates on concrete slabs, constructing wood-framed walls, and beginning basic carpentry work. Northwest Arkansas contractors commonly use this timeline for residential projects, allowing construction to proceed while minimizing schedule delays. The specific timing may vary based on concrete mix design, curing conditions, and project requirements, making consultation with your concrete supplier or structural engineer essential for project-specific guidance.

    Heavy Equipment and Machinery Placement (14-28 Days)

    Heavy construction equipment, concentrated loads, and permanent fixtures require waiting closer to the full 28-day curing period. Industrial slabs generally require concrete to reach a minimum compressive strength of 4,000 to 6,000 PSI before supporting heavy machinery and equipment loads.[8] For residential applications with typical 3,000 to 4,000 PSI concrete, the 28-day mark ensures the slab has developed sufficient capacity to handle significant weight without cracking or structural distress.

    Equipment like forklifts, scissor lifts, concrete mixers, and material storage racks create point loads that concentrate significant weight onto small footprint areas. These concentrated forces can exceed the capacity of partially cured concrete, causing localized failures or widespread cracking that compromises the slab’s long-term performance. Arkansas building codes and industry standards emphasize waiting for full strength development before subjecting slabs to such demanding conditions.

    Flooring Installation Timeline (28-90 Days)

    Installing finished flooring presents unique challenges that extend beyond basic strength considerations to include moisture management. Most flooring manufacturers specify waiting periods of 60 to 90 days after concrete placement before installing tile, hardwood, carpet, or vinyl flooring systems.[9] This extended timeline allows sufficient time for excess moisture within the slab to evaporate, preventing adhesive failures and flooring damage from trapped moisture vapor.

    Professional moisture testing using ASTM F2170 relative humidity testing methods should be conducted before any flooring installation to verify the slab has dried sufficiently. For glue-down flooring systems, concrete slabs should typically achieve relative humidity levels of 75% or lower, while non-glue-down systems may tolerate up to 85% relative humidity.[10] The Arkansas climate, with its humidity variations throughout the year, can significantly affect concrete drying times and may require extended waiting periods compared to arid regions.

    Factors That Affect Your Concrete Slab’s Curing Time

    Arkansas Climate Considerations

    Fayetteville’s climate presents specific challenges for concrete curing that directly impact how quickly your slab reaches sufficient strength for building. Concrete cures best between 50°F and 80°F, with temperature and humidity playing critical roles in the hydration process.[11] Hot, dry conditions common during Arkansas summers can cause concrete to dry too quickly and not cure properly, leading to a weaker slab with increased potential for cracking.

    Cold conditions during winter months significantly slow down the chemical hydration reaction, extending curing times and requiring protective measures to maintain appropriate concrete temperatures. At 50°F, concrete requires roughly 14 days to reach 70% strength, while at 70°F it takes only seven days to achieve the same strength level.[12] Northwest Arkansas experiences temperature fluctuations that demand careful attention to curing methods and timeline adjustments based on seasonal conditions.

    High humidity can slow evaporation rates and extend the time required for concrete to dry sufficiently for flooring installation, while low humidity increases surface evaporation and raises the risk of plastic shrinkage cracking. Arkansas contractors must account for these climate factors when scheduling construction activities and determining appropriate waiting periods for building on new slabs.

    Concrete Mix Design and Additives

    The specific concrete mixture used for your slab directly affects how quickly it gains strength and when construction can safely proceed. Some concrete mixes incorporate additives such as accelerators or high-early-strength cement that enable the concrete to reach adequate strength in a matter of hours or a few days.[13] These specialty mixes provide faster turnaround times for projects with tight schedules but require verification through strength testing rather than relying solely on standard timelines.

    Standard residential concrete in Fayetteville typically uses mixes designed for 3,000 to 4,000 PSI compressive strength at 28 days. The water-to-cement ratio affects both the rate of strength gain and the ultimate strength the concrete will achieve. Lower water-cement ratios generally produce stronger concrete but may require more careful curing to prevent surface cracking. Your concrete supplier can provide specific information about the mix design and its expected strength development curve for accurate planning purposes.

    Proper Curing Methods and Their Impact

    Maintaining appropriate moisture levels during the critical first 7 days dramatically affects concrete strength development and determines whether your slab will achieve its specified design strength. Proper curing methods include keeping the slab moist through water ponding, continuous wet burlap coverage, impermeable cover sheets, or application of liquid membrane-forming curing compounds.[14] These techniques preserve the water necessary for continued hydration reactions rather than allowing it to evaporate prematurely.

    Water curing by flooding the slab area or maintaining wet burlap for at least 7 days provides the most effective strength development. Some builders on tight schedules implement 3-day water curing, which achieves approximately 80% of the benefit of 7-day water curing, though extended curing remains preferable for maximum strength.[15] Arkansas contractors should plan concrete pours strategically, potentially scheduling placement at the end of the week to allow weekend water curing without disrupting the construction schedule.

    Professional Testing: The Definitive Answer for Your Project

    Field-Cured Cylinder Testing

    The most reliable method for determining when your specific concrete slab has achieved sufficient strength for construction involves testing field-cured cylinders poured at the same time as your slab. Professional testing laboratories cast cylindrical specimens from the fresh concrete during placement, cure them alongside the actual slab under identical conditions, and then test them at various ages to measure actual strength development.[16]

    Standard practice calls for testing cylinders at 7 days and 28 days, with the 7-day results providing early indication of whether the concrete is developing as expected. If 7-day strength is significantly below expectations, it serves as a red flag indicating potential problems with the mix design, curing conditions, or placement procedures. Through research and empirical data collection, projection of 28-day strength from 7-day test results provides estimated values very close to actual measured 28-day performance.[17]

    When to Consult Engineering Professionals

    Complex projects, unusual loading conditions, or situations involving heavy equipment placement warrant consultation with structural engineers or licensed design professionals. These experts can specify the required in-place concrete strength for safe formwork removal, construction load application, and permanent fixture installation based on actual project demands rather than general guidelines.[18] Their analysis accounts for factors like slab thickness, reinforcement details, soil conditions, and specific equipment weights.

    Projects involving post-tensioned slabs, elevated slabs, or specialty applications require professional oversight to ensure concrete has reached sufficient strength before stressing operations or construction loading begins. Your concrete supplier, structural engineer, or local building authority can provide specific requirements and recommend appropriate testing protocols to verify readiness for your intended construction activities. Investing in professional guidance prevents costly mistakes and ensures your project proceeds safely.

    Cost Considerations for Concrete Slab Construction in Arkansas

    Understanding the financial investment in your concrete slab helps homeowners plan appropriately for both the initial construction and the required waiting period before building activities can commence. Concrete slab costs in Fayetteville typically range from $6 to $12 per square foot installed, with a typical 30-by-30-foot slab for driveways or building foundations costing $5,400 to $10,800 on average in 2025.[19] These prices include materials, labor, site preparation, and basic finishing work.

    Thickness significantly impacts pricing, with 4-inch slabs suitable for light residential use costing less than 6-inch slabs required for heavier loads or garage floors. Northwest Arkansas contractors charge $3 to $5 per square foot for labor, which includes concrete form creation, site grading, concrete placement, finishing work, and basic curing procedures.[20] Additional costs arise from reinforcement materials like rebar or wire mesh, which strengthen the slab and reduce cracking potential.

    Proper planning that accounts for curing time can actually reduce overall project costs by preventing expensive repairs or premature replacement. Rushing construction activities before concrete achieves adequate strength often leads to cracking, spalling, or structural failures that require costly remediation. Investing in appropriate curing methods and adhering to recommended timelines protects your financial investment and ensures your slab performs as intended for decades of service.

    Arkansas-Specific Building Code Requirements

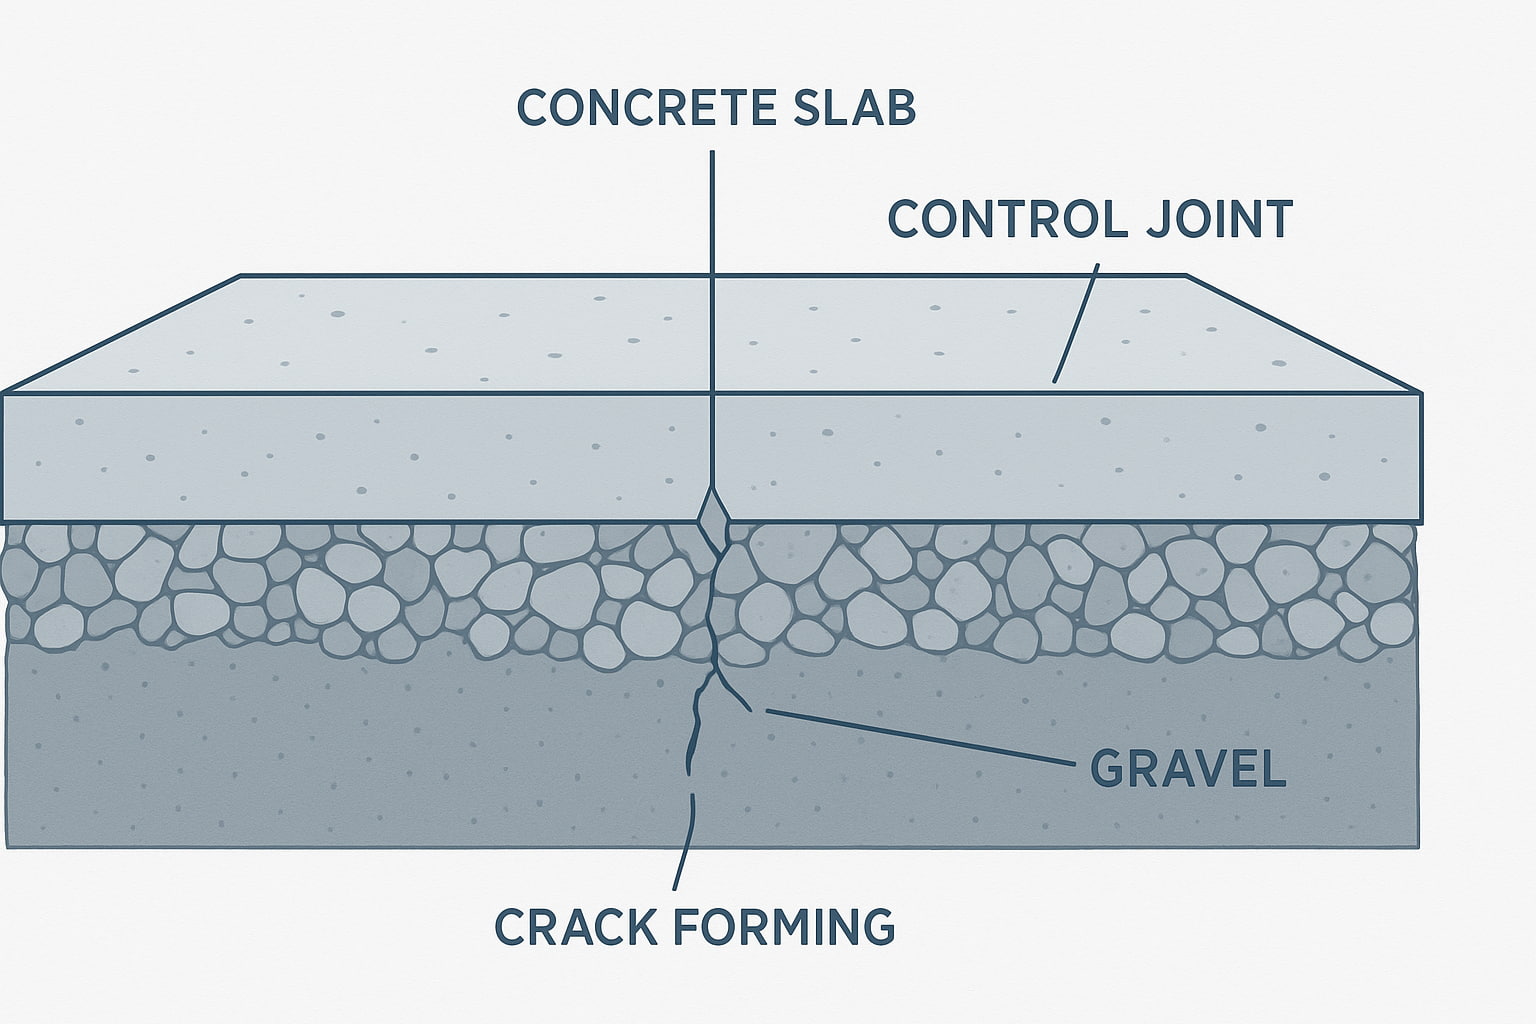
    Arkansas follows the International Residential Code (IRC) with state-specific amendments that establish minimum requirements for residential concrete slabs. While specific requirements can vary by municipality, most Arkansas jurisdictions require a minimum 4-inch thickness for residential concrete slabs and specify minimum compressive strength requirements.[21] For Fayetteville specifically, the city’s municipal code contains additional requirements regarding slab drainage, connection to structures, and proper reinforcement details.

    Building codes require concrete to be maintained above 50°F and kept moist for specified minimum periods, typically 7 days for standard Portland cement concrete. High-early-strength concrete mixes may permit reduced curing periods down to 3 days, provided testing confirms adequate strength development. The codes also address protection requirements for concrete placed during cold weather, when special measures must be taken to maintain appropriate curing temperatures and prevent freezing damage.

    Loading or use of concrete slabs should be delayed for a minimum of 48 hours after concrete placement according to building code provisions.[22] When slabs are used for material storage after this minimum period, contractors should exercise caution to prevent impact loading that could damage partially cured concrete. Compliance with local building codes protects both structural integrity and legal liability, making it essential to verify specific requirements with Fayetteville’s building department before construction.

    Concrete Strength (PSI)Typical ApplicationsWaiting Period for Light FramingWaiting Period for Heavy Loads
    3,000 PSIResidential slabs, patios, walkways7 days (70% strength)28 days (100% strength)
    4,000 PSIDriveways, garage floors, light commercial7 days (70% strength)28 days (100% strength)
    5,000+ PSIHeavy equipment, industrial applications5-7 days (70% strength)28 days (100% strength)

    Common Mistakes to Avoid When Building on New Concrete

    Starting Construction Too Soon

    The most common and costly mistake homeowners and contractors make involves beginning construction activities before concrete has developed adequate strength. Starting framing, equipment placement, or heavy material storage prematurely can lead to cracking, reduced slab strength, or compromised structural durability that persists throughout the building’s lifetime. These failures often don’t appear immediately but manifest over time as the structure experiences normal loads and environmental stresses.

    Pressure from construction schedules or project deadlines tempts contractors to accelerate timelines, but the consequences of premature loading far exceed any schedule savings. A manufacturing facility that initially underestimated dynamic loads and opted for minimal curing time experienced widespread slab cracking within months, necessitating costly repairs that could have been avoided by waiting the full curing period.[23] Arkansas contractors serving Fayetteville homeowners should resist schedule pressure and adhere to industry-standard curing periods.

    Inadequate Moisture Control During Curing

    Failing to maintain proper moisture levels during the initial curing period prevents concrete from achieving its specified design strength. When bleed water evaporates from the concrete surface faster than it rises from within the mixture, plastic shrinkage cracking occurs that weakens the slab permanently.[24] Arkansas’s variable humidity and temperature conditions make active curing measures essential rather than simply allowing concrete to cure naturally.

    Low humidity and high winds greatly affect surface evaporation rates, particularly during spring and summer months in Northwest Arkansas. To minimize plastic shrinkage cracking, contractors should keep concrete surfaces moist by applying moisture with fog sprayers until final curing methods can be applied.[25] Neglecting these moisture control practices during hot weather or windy conditions compromises long-term slab performance regardless of how long you wait before building.

    Ignoring Site-Specific Conditions

    Generic timelines provide useful guidelines, but every project involves unique factors that may require adjusted waiting periods. Soil conditions beneath the slab, local climate during the curing period, specific concrete mix used, and intended building loads all influence when construction can safely proceed. Poor soil compaction or inappropriate soil types can lead to differential settlement or instability regardless of how strong the concrete becomes.[26]

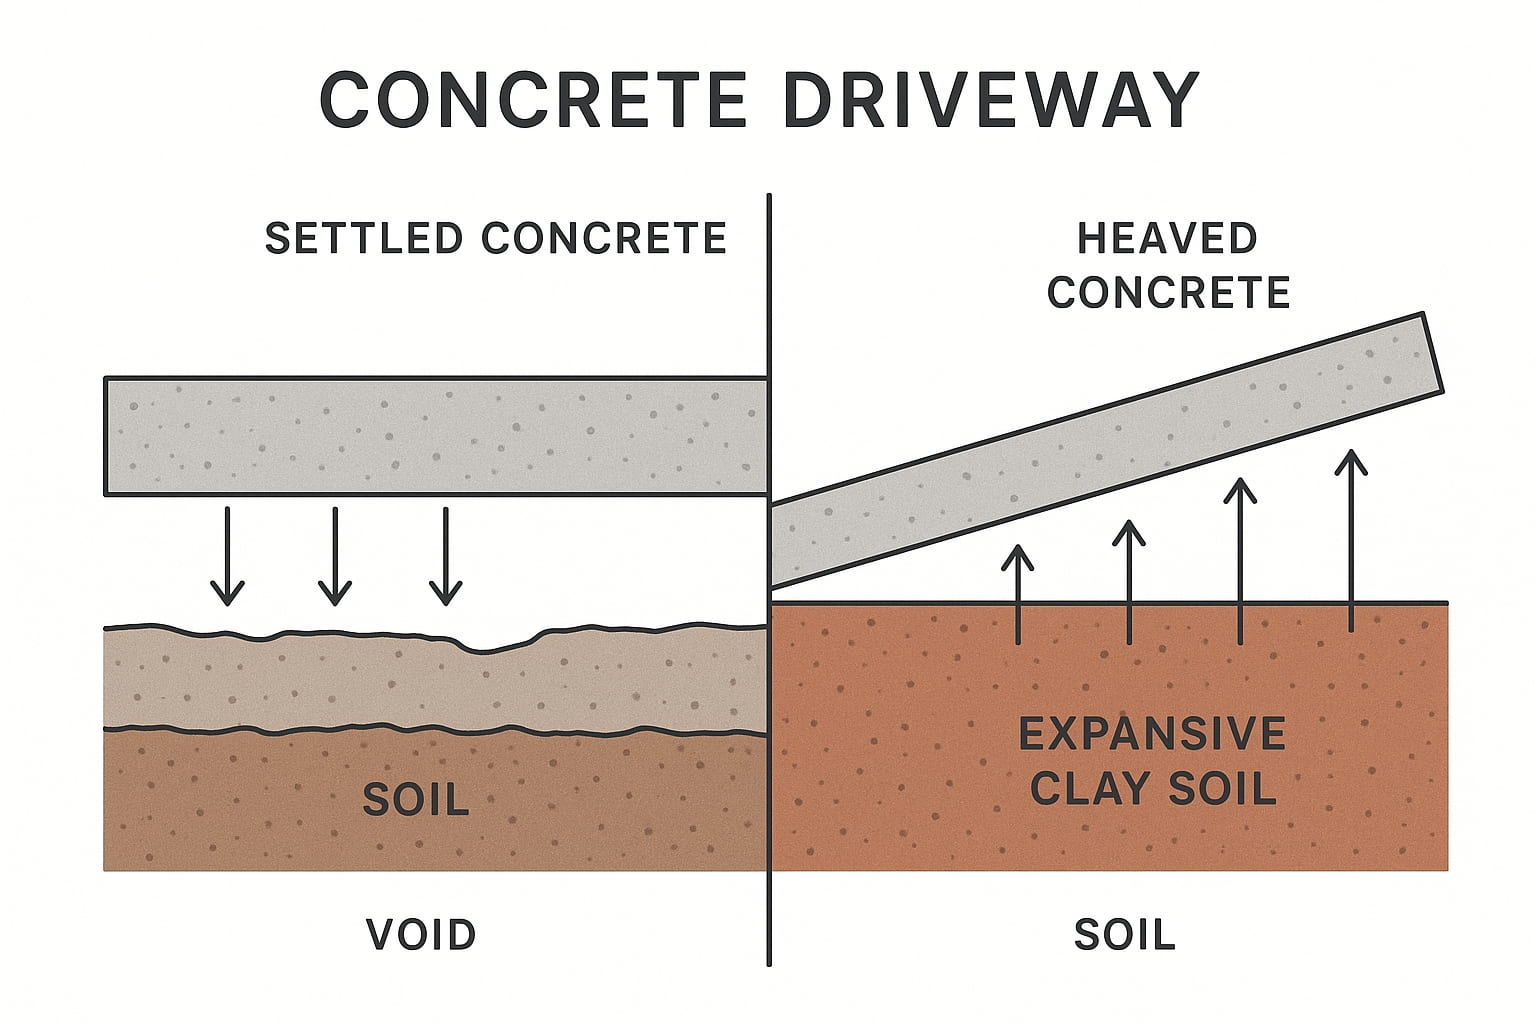
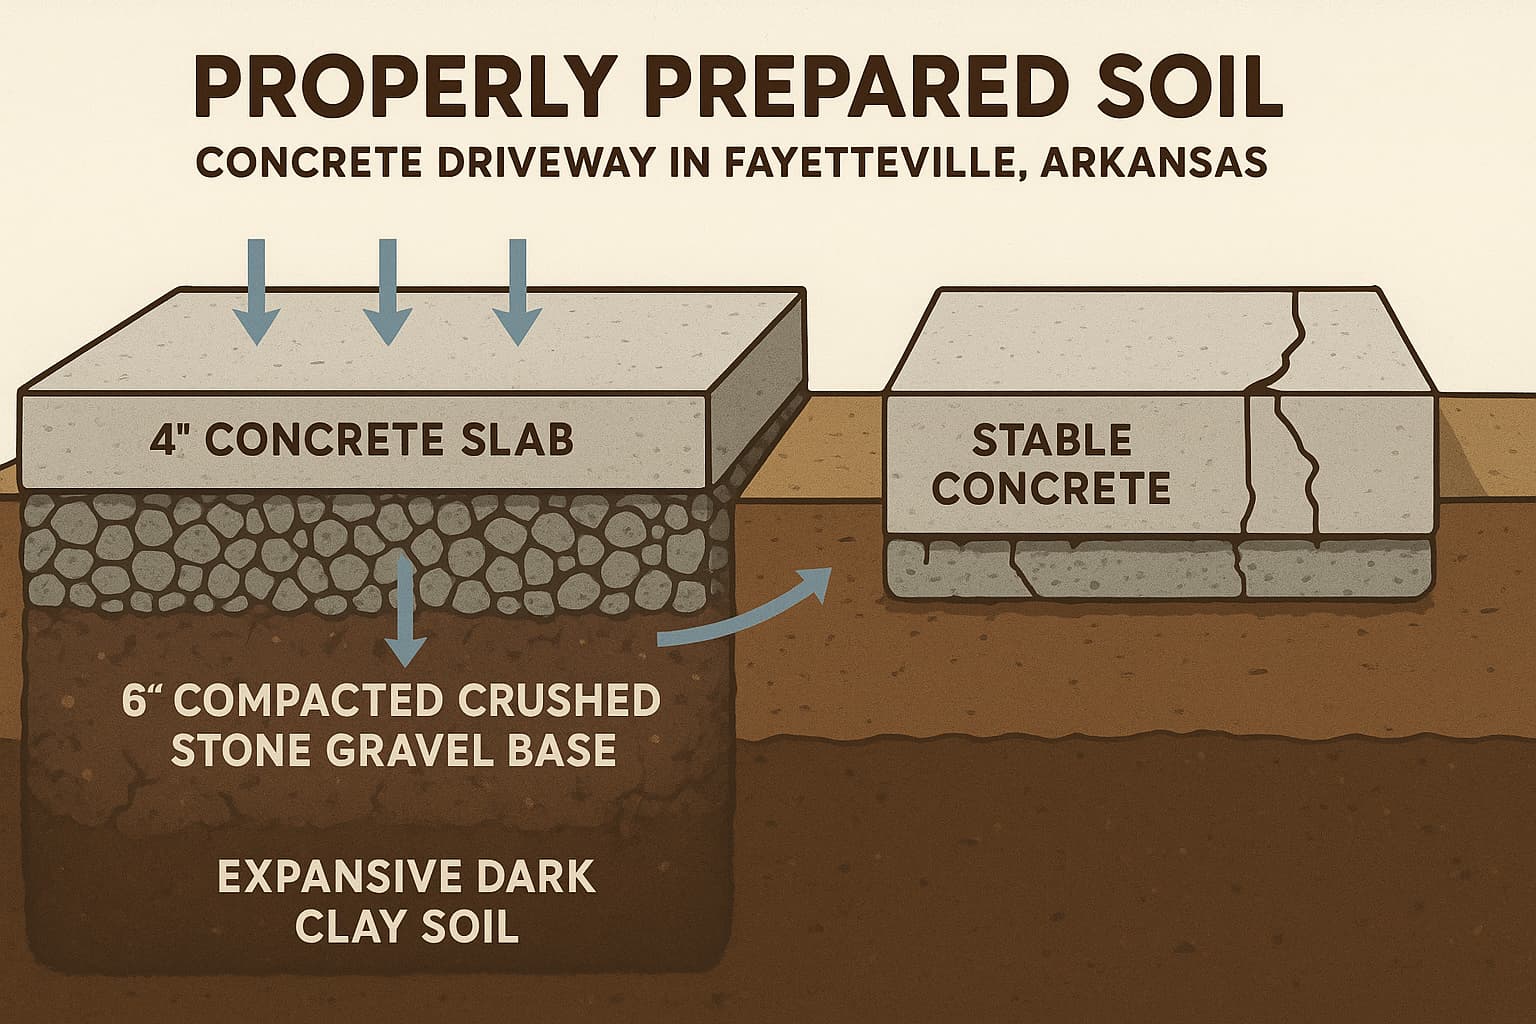
    Arkansas’s expansive clay soils, particularly the Porters Creek Clay formations common in Fayetteville, present special challenges for concrete slab construction. These soil conditions require thorough site preparation, proper drainage design, and potentially extended monitoring periods before heavy construction loads are applied. Consulting with local geotechnical engineers familiar with Northwest Arkansas conditions ensures your specific site receives appropriate treatment and timeline recommendations.

    Best Practices for Building on Your New Concrete Slab

    Document Everything

    Maintaining comprehensive records of concrete placement, curing procedures, test results, and timeline decisions protects both contractors and homeowners. Documentation should include placement date, weather conditions, concrete mix design, curing methods employed, cylinder test results, and dates when various construction activities commenced. This information proves invaluable if questions arise about construction quality or if warranty issues develop later.

    Arkansas building inspectors may request documentation demonstrating compliance with code requirements for curing times and strength achievement. Professional testing reports showing field-cured cylinder results provide objective evidence that concrete achieved specified strength before construction loads were applied. Digital photographs documenting curing methods and site conditions supplement written records and help resolve potential disputes about construction practices.

    Plan Your Construction Schedule

    Strategic planning that accounts for concrete curing time keeps projects moving efficiently while respecting necessary waiting periods. Consider scheduling concrete placement early in the week to allow weekend curing time, or at the end of construction phases to permit curing during periods when other activities can proceed. Northwest Arkansas contractors can work on site preparation, utility installation, or structural steel erection while concrete cures, maximizing productivity without compromising slab integrity.

    For projects involving multiple concrete pours, stagger placement dates to create a rolling schedule where some slabs are curing while construction proceeds on others. This approach maintains project momentum and worker productivity while ensuring each slab receives appropriate curing time before loading. Communication between concrete suppliers, framing crews, and project managers facilitates coordination that respects both schedule goals and quality requirements.

    Use Professional Contractors

    Experienced concrete contractors familiar with Arkansas construction conditions understand local soil characteristics, climate challenges, and building code requirements. Professional contractors implement proper curing procedures, conduct appropriate testing, and provide accurate guidance about when construction can safely proceed. Their expertise prevents costly mistakes and ensures your slab achieves its design strength and intended performance characteristics.

    AR Concrete Fayetteville specializes in residential concrete installation throughout Northwest Arkansas, with deep understanding of local conditions that affect curing times and construction scheduling. Our team conducts thorough site assessments, uses high-quality materials meeting ASTM standards, and provides transparent guidance about appropriate timelines for your specific project. By combining technical expertise with commitment to quality workmanship, we ensure your concrete slab provides reliable support for your building project.

    Conclusion

    Determining when you can build on a new concrete slab requires balancing project schedule demands with the physical realities of concrete strength development. The 7-day milestone provides a reliable starting point for light construction activities like wood framing, while waiting the full 28 days ensures maximum strength and durability for heavy equipment, permanent fixtures, and finished flooring installation. Arkansas homeowners face unique considerations due to local climate conditions, soil characteristics, and code requirements that influence optimal timing decisions.

    Professional testing through field-cured cylinders offers the most accurate method for determining your specific slab’s readiness, removing guesswork and providing objective data for construction planning. Proper curing methods during the critical first week, attention to moisture management throughout the process, and consultation with experienced professionals ensure your investment achieves specified performance standards. By understanding these factors and following industry best practices, Fayetteville homeowners can confidently proceed with construction at appropriate times while protecting their long-term investment in quality concrete work.

    How Long Before Building on Concrete Slab FAQs

    Can you walk on concrete after 24 hours?

    Yes, concrete is typically hard enough to walk on carefully after 24 to 48 hours when it has completed its initial set. However, you should avoid placing any construction loads, heavy equipment, or building materials on the slab during this period, as it has only achieved a small fraction of its ultimate strength and remains vulnerable to surface damage and cracking from premature loading.

    How long before you can drive on a new concrete driveway in Arkansas?

    You should wait at least 7 days before driving passenger vehicles on a new concrete driveway in Arkansas, when the concrete reaches approximately 75% of its design strength under proper curing conditions. For heavy vehicles like trucks or RVs, waiting closer to 14 days provides additional safety margin, while the full 28-day curing period ensures maximum durability for your driveway investment, particularly given Arkansas’s climate conditions and temperature fluctuations.

    Does hot weather speed up concrete curing time?

    Hot weather accelerates the initial chemical reactions in concrete, causing it to set faster, but this acceleration can actually reduce long-term strength if the concrete dries too quickly and hydration cannot proceed properly. High temperatures common during Arkansas summers require extra attention to curing methods such as fog spraying, wet burlap coverage, or curing compounds to maintain adequate moisture levels, as rapid drying can lead to weaker concrete and increased cracking potential despite the faster initial set.

    Can I install flooring immediately after concrete reaches 28-day strength?

    No, achieving 28-day strength addresses compressive capacity but not moisture content for flooring installation. Most flooring manufacturers require waiting 60 to 90 days after concrete placement and conducting ASTM F2170 relative humidity testing before installation to verify the slab has dried sufficiently, with acceptable moisture levels typically at 75% relative humidity or lower for glue-down systems, as excess moisture trapped in concrete can cause adhesive failures, warping, and permanent flooring damage.

    What happens if you build on concrete too soon?

    Building on concrete before it achieves adequate strength can cause cracking, surface spalling, reduced load capacity, and compromised structural durability that persists throughout the building’s lifetime. Premature loading creates stress concentrations that exceed the partially cured concrete’s capacity, resulting in damage that may not appear immediately but manifests over time as cracks propagate and structural integrity deteriorates, often requiring expensive repairs or even slab replacement to correct the underlying problems created by inadequate curing.

    How Long Before Building on Concrete Slab Citations

    1. HeatAuthority. (2024). “Concrete Curing Time Chart: Achieving Maximum Compressive Strength.” Available at: https://heatauthority.com/blogs/news/concrete-curing-time-chart-achieving-maximum-compressive-strength
    2. Concrete Network. (2010). “Concrete Curing Time: How Long Does Concrete Take To Dry?” Available at: https://www.concretenetwork.com/curing-concrete/
    3. Converge. (2023). “Can humidity affect concrete curing time?” Available at: https://www.converge.io/blog/concrete-humidity
    4. Concrete Network. (2010). “Concrete Curing Time: How Long Does Concrete Take To Dry?” Available at: https://www.concretenetwork.com/curing-concrete/
    5. Bangur Cement. (n.d.). “Strength of Concrete Timeline: 3, 7, and 28 Days Guide.” Available at: https://www.bangurcement.com/blog/concrete-strength-timeline-3-7-28-days
    6. HeatAuthority. (2024). “Concrete Curing Time Chart: Achieving Maximum Compressive Strength.” Available at: https://heatauthority.com/blogs/news/concrete-curing-time-chart-achieving-maximum-compressive-strength
    7. Powerblanket. (2025). “Concrete Curing Time: How Long & Best Practices.” Available at: https://www.powerblanket.com/blog/concrete-curing-time/
    8. Evenson Concrete Systems. (2025). “The Ultimate Guide to Industrial Slabs: Strength, Durability, and Performance.” Available at: https://www.evensonconcrete.com/news/industrial-slabs
    9. MFMA. (n.d.). “Concrete Slab Moisture Content.” Available at: https://www.maplefloor.org/en/concrete-slab-moisture-content/
    10. MFMA. (n.d.). “Concrete Slab Moisture Content.” Available at: https://www.maplefloor.org/en/concrete-slab-moisture-content/
    11. Express Concrete. (2025). “How Weather Affects Ready Mix Concrete Setting.” Available at: https://expressconcreteltd.com/how-does-the-weather-affect-the-setting-time-of-ready-mix-concrete/
    12. Express Concrete. (2025). “How Weather Affects Ready Mix Concrete Setting.” Available at: https://expressconcreteltd.com/how-does-the-weather-affect-the-setting-time-of-ready-mix-concrete/
    13. Advance Roofing. (2024). “Concrete Curing Charts for Managing Temperature, Moisture and Time.” Available at: https://advanceroofingllc.com/blogs/concrete-curing-temperature-chart-optimizing-strength-and-durability/
    14. UpCodes. (n.d.). “Concrete for Slabs – Florida Building Code.” Available at: https://up.codes/s/concrete-for-slabs
    15. Concrete Network. (2010). “Concrete Curing Time: How Long Does Concrete Take To Dry?” Available at: https://www.concretenetwork.com/curing-concrete/
    16. Cement Equipment. (2020). “28 days strength – Concrete.” Available at: https://www.cementequipment.org/main-category/concrete/28-days-strength/
    17. National Precast Concrete Association. (2023). “The 28-Day Myth.” Available at: https://precast.org/blog/28-day-myth/
    18. American Concrete Institute. (2016). “ACI 306R-16: Guide to Cold Weather Concreting.” Available at: https://www.concrete.org/Portals/0/Files/PDF/University/306R-16_excerpt.pdf
    19. HomeGuide. (2025). “How Much Does a Concrete Slab Cost? (2025).” Available at: https://homeguide.com/costs/concrete-slab-cost
    20. This Old House. (2025). “How Much Does a Concrete Slab Cost? (2025 Prices).” Available at: https://www.thisoldhouse.com/foundations/concrete-slab-cost
    21. ICCSAFE. (n.d.). “The Strength of Concrete.” Available at: https://shop.iccsafe.org/media/wysiwyg/material/9090S12-sample.pdf
    22. UpCodes. (n.d.). “Concrete for Slabs – Florida Building Code.” Available at: https://up.codes/s/concrete-for-slabs
    23. For Construction Pros. (n.d.). “Understanding Concrete Slab Load Capacity.” Available at: https://www.forconstructionpros.com/concrete/equipment-products/flatwork-accessories/article/22936789/steele-solutions-inc-understanding-concrete-slab-load-capacity
    24. Graniterock. (n.d.). “Weather And How To Minimize Its Effects On Concrete.” Available at: https://www.graniterock.com/technical_reports/weather-and-how-to-minimize-its-effects?category_id=89
    25. Graniterock. (n.d.). “Weather And How To Minimize Its Effects On Concrete.” Available at: https://www.graniterock.com/technical_reports/weather-and-how-to-minimize-its-effects?category_id=89
    26. For Construction Pros. (n.d.). “Understanding Concrete Slab Load Capacity.” Available at: https://www.forconstructionpros.com/concrete/equipment-products/flatwork-accessories/article/22936789/steele-solutions-inc-understanding-concrete-slab-load-capacity
  • What Causes Slabs to Heave or Settle?

    What Causes Slabs to Heave or Settle?

    Key Takeaways

    • Concrete slabs heave and settle primarily due to soil movement beneath the surface, triggered by moisture changes, temperature fluctuations, and soil composition
    • Arkansas homeowners face unique challenges from expansive Porters Creek Clay soils that can swell up to 10% when saturated
    • Settling occurs when soil loses its ability to support the slab’s weight, causing downward movement from poor compaction, erosion, or shrinkage
    • Heaving happens when forces push the slab upward, typically from expanding clay soils, frost action, or tree root growth
    • Professional repair methods like mudjacking ($3-$6 per square foot) and polyurethane foam leveling ($5-$25 per square foot) can restore slabs without full replacement
    • Prevention requires proper soil preparation, effective drainage systems, and understanding Northwest Arkansas’s specific climate patterns

    Understanding Concrete Slab Movement in Fayetteville

    Concrete slabs move in two primary directions: downward (settling) or upward (heaving). Both types of movement stem from changes in the soil beneath your concrete, and the direction depends on whether the soil is losing or gaining volume. Understanding the specific cause is vital because the solutions for heaving and settling differ significantly and require professional diagnosis.

    For Fayetteville homeowners, soil-related concrete issues are particularly common due to the region’s expansive clay soils and seasonal climate variations. The Porters Creek Clay formation, which outcrops in a continuous belt through parts of Arkansas, contains highly expansive soils that shrink and swell according to moisture content.[1] When these clays absorb water, they can expand significantly, and when they dry out, they contract, creating voids beneath concrete slabs.

    What Causes Concrete Slabs to Settle?

    Settlement is the downward movement of a concrete slab when the soil beneath it weakens, erodes, or compacts. This gradual sinking creates a concave appearance and often produces cracks that widen over time. Several factors contribute to slab settlement in Northwest Arkansas:

    Poor Soil Compaction Before Installation

    If the ground beneath your concrete patio or driveway wasn’t properly compacted before pouring, the soil will naturally consolidate over time under the slab’s weight. According to ACI 360R-10 guidelines, proper subgrade preparation can reduce settling by up to 30%.[2] The soil beneath must be mechanically compacted to achieve adequate density and prevent future consolidation.

    Professional contractors use plate compactors to achieve proper soil density, but inadequate compaction remains one of the most common causes of premature slab failure. Without this critical step, even well-designed concrete will eventually sink as the loose soil beneath compresses.

    Soil Washout and Erosion

    Poor drainage, heavy rainfall, or plumbing leaks can wash away the soil supporting your concrete slab, creating voids underneath. Fayetteville receives an average of 45 inches of rainfall annually, making proper drainage design essential for long-term concrete performance. When water channels beneath a slab, it carries soil particles away, leaving empty spaces that cause the concrete to lose support and settle.

    Arkansas’s rolling topography compounds drainage challenges. Without proper grading and water management systems, rainwater can pool near foundations and work its way beneath concrete surfaces, gradually eroding the supporting soil.

    Drying and Shrinking Soil

    During drought conditions, clay-rich soils—particularly the expansive clays common throughout Arkansas—shrink significantly. The Porters Creek Clay can lose substantial volume as it dries, creating gaps beneath slabs that allow them to settle.[1] This shrinkage is especially pronounced during hot, dry summers when soil moisture levels drop dramatically.

    Expansive soils like those in Fayetteville can experience volume changes exceeding 10% between wet and dry conditions.[3] This massive shift creates unstable support conditions for concrete, leading to differential settlement where some areas sink more than others.

    Heavy Loads and Excessive Weight

    Concrete slabs designed for light residential use can settle when subjected to loads they weren’t built to handle. Parking heavy equipment, RVs, or commercial vehicles on driveways designed for passenger cars compresses the soil beneath, accelerating settlement in areas not engineered for such loads.

    The American Concrete Institute recommends minimum slab thicknesses based on expected loads: 4 inches for standard residential driveways and 6 inches for areas supporting heavier vehicles.[4] When actual loads exceed design specifications, settlement becomes far more likely.

    What Causes Concrete Slabs to Heave?

    Heaving is the upward movement of concrete slabs caused by forces pushing up from underneath. This creates a convex shape or raised edges, often accompanied by sudden cracking. The movement can be more dramatic than settling, especially after freeze-thaw cycles or heavy precipitation.

    Expansive Clay Soils in Arkansas

    Soils with high clay content absorb significant amounts of water and expand considerably. The Porters Creek Clay of the Midway Group, which outcrops intermittently from Malvern to near Batesville in Arkansas, is highly expansive and can force concrete foundations to crack.[1] These clays contain minerals that allow water molecules to squeeze into their chemical structure, causing dramatic volume increases.

    Three feet of expansive soil can generate enough swell pressure to lift a 37-ton truck 2 inches.[5] This immense upward pressure easily pushes concrete slabs upward, creating serious structural problems. When clay soils in Northwest Arkansas become saturated during wet seasons, they can exert thousands of pounds per square foot of upward force on overlying concrete.

    Frost Heave in Northwest Arkansas

    While Arkansas doesn’t experience the extreme winter conditions of northern states, frost heave still occurs in Fayetteville. The city typically sees its first freeze around October 26th, with the last freeze occurring around April 16th.[6][7] During this period, freeze-thaw cycles can damage concrete through a process where water in the soil freezes and expands by nearly 9% in volume.

    When temperatures drop below freezing, water trapped in soil pores freezes and creates “ice lenses” beneath the surface that push concrete upward. As temperatures rise and the ground thaws, the slab may not return to its original position, leading to permanent damage and displacement. Because concrete is porous like a sponge, water absorbed into the concrete itself can also freeze and expand, causing the pores to “pop” and creating larger voids that accommodate more water in subsequent cycles.[8]

    Tree Root Growth and Pressure

    Growing tree roots searching for moisture can exert significant pressure on concrete slabs, causing them to lift and crack as the roots expand. Large trees planted too close to concrete installations create persistent upward pressure as their root systems grow and mature. This is particularly problematic during dry periods when roots aggressively seek water sources, often finding moisture beneath concrete slabs.

    Roots from trees like oak, willow, and poplar can extend two to three times the tree’s canopy width, making seemingly distant trees potential culprits in concrete heaving.

    Underground Water Accumulation

    Excess moisture from heavy rainfall, snowmelt, plumbing leaks, or poor drainage can saturate the soil and cause it to expand, pushing slabs upward. This is especially problematic in poorly drained areas or where water pools near concrete surfaces. Northwest Arkansas’s high humidity and substantial rainfall create conditions where moisture management becomes critical for concrete longevity.

    FactorSettling RiskHeaving RiskArkansas Impact
    Poor Soil CompactionHighLowCommon with rushed installations
    Expansive Clay SoilsMediumVery HighPorters Creek Clay widespread
    Frost-Thaw CyclesMediumMediumOct-April freeze period
    Poor DrainageHighHigh45″ annual rainfall
    Tree Root GrowthLowHighCommon in established neighborhoods
    Soil ErosionVery HighLowRolling topography increases risk

    Recognizing the Signs: Settling vs. Heaving

    Identifying whether your concrete is settling or heaving helps determine the appropriate repair approach. Settlement typically occurs gradually and creates characteristic downward displacement patterns, while heaving can be more sudden, especially after freeze-thaw cycles or heavy rain.

    Settlement Warning Signs

    Settlement creates a concave depression where the slab sinks below its original level. Cracks may widen progressively over time as the slab continues to drop. Water pooling on the surface indicates low spots where settlement has occurred. Gaps between the slab and adjacent structures, such as foundation walls or steps, signal that the concrete has moved downward. The movement is usually gradual and may be localized to specific areas or widespread depending on the underlying cause.

    Heaving Indicators

    Heaving produces a convex shape where the slab lifts upward, sometimes creating raised edges or a peaked appearance. Cracks often appear suddenly as the slab is pushed up with significant force. The concrete may tilt or slope upward rather than creating level surfaces. After freeze-thaw cycles, you might notice the slab has risen but hasn’t returned to its original position when temperatures warm. These changes can occur relatively quickly compared to the gradual nature of settlement.

    Professional Repair Solutions and Costs

    Both heaving and settling require professional intervention, but the repair methods differ significantly. Understanding your options helps you make informed decisions about restoring your concrete.

    Mudjacking for Settled Concrete

    Mudjacking, also called slabjacking, lifts settled concrete back to its original position by pumping a specialized slurry mixture underneath to fill voids and raise the slab. The process involves drilling small holes (typically 1.5-2 inches) in the sunken slab and injecting a mixture of water, soil, sand, and cement under high pressure.[9]

    Cost: $3-$6 per square foot, with most projects ranging from $662 to $1,866 total.[10][11] A typical 200 square foot driveway section costs $650-$1,300 to mudjack. Contractors typically charge minimum fees of $300-$700 for small jobs.

    Mudjacking typically requires 1-3 days of curing time before the slab can support weight. The technique works well for slabs 4 inches or thicker that have settled due to soil issues but remain structurally sound.[12]

    Polyurethane Foam Leveling

    Polyurethane foam leveling (polyjacking) represents a more modern approach that injects lightweight, expanding foam beneath the slab. The foam cures in just 15-30 minutes, allowing immediate use of the repaired area.[13] This method creates less disruption, requires smaller injection holes (typically 5/8 inch), and adds minimal weight to already compromised soil.

    Cost: $5-$25 per square foot, with projects ranging from $1,015 to $8,100.[14][15] A 200 square foot section costs approximately $1,500-$3,200 for foam jacking. While polyurethane costs 20-50% more than mudjacking, it offers superior durability, lighter weight, faster curing, and less invasive installation.[16]

    Addressing Heaving Concrete

    Heaving requires a different approach. First, the underlying cause must be identified and corrected. This might involve improving drainage, removing problem tree roots, or addressing soil expansion issues. In some cases, the affected section must be removed, the soil properly prepared, and the concrete replaced.

    For frost heave, ensuring adequate drainage and proper subbase materials that resist frost action can prevent recurrence. For expansive clay issues common in Arkansas, soil stabilization techniques or deeper foundation systems may be necessary.

    Preventing Future Slab Movement in Northwest Arkansas

    Prevention starts with proper installation techniques tailored to local soil conditions. Professional contractors familiar with Arkansas’s Porters Creek Clay and regional climate patterns can implement strategies that minimize future problems.

    Soil Preparation and Compaction

    Proper soil compaction before installation is non-negotiable. The subgrade should be mechanically compacted to at least 95% of maximum density. A well-compacted granular base layer (typically 4-6 inches of crushed stone) provides stable support and facilitates drainage.[2]

    For areas with known expansive clay, deeper excavation and replacement with non-expansive fill material may be warranted. Some installations benefit from geotextile fabric layers that prevent soil migration while allowing water drainage.

    Drainage System Design

    Effective drainage is critical in Arkansas’s wet climate. Proper grading should direct water away from concrete slabs at a slope of at least 1-2%. Gutters and downspouts must discharge water at least 10 feet away from concrete installations.

    For areas prone to water accumulation, French drains or other subsurface drainage systems may be necessary. The goal is to prevent water from pooling near or beneath concrete, thereby minimizing both erosion (which causes settling) and soil saturation (which causes heaving).

    Control Joints and Reinforcement

    Proper jointing techniques allow for thermal expansion and contraction without causing random cracking. According to ACI guidelines, control joints should be spaced at intervals of 2-3 times the slab thickness in feet (for a 4-inch slab, joints should be spaced 8-12 feet apart).[17]

    Reinforcement options include welded wire mesh, rebar, or fiber reinforcement. While these don’t prevent slab movement, they help control cracking and maintain slab integrity when minor movement occurs. Studies show that slabs with proper reinforcement experience 40% fewer cracks.[18]

    When to Call a Professional

    Early intervention prevents minor issues from becoming major problems. Contact a professional concrete contractor when you notice cracks wider than 1/4 inch, uneven surfaces creating trip hazards, water pooling where it previously drained properly, or visible gaps between the slab and adjacent structures.

    Professional evaluation can determine whether you’re dealing with settling or heaving, identify the underlying cause, and recommend appropriate solutions. Many contractors offer free inspections and estimates, making it easy to understand your options without financial commitment.

    Repair MethodCost Per Sq FtCure TimeLongevityBest For
    Mudjacking$3-$61-3 days8-10 yearsLarge areas, budget-conscious repairs
    Polyurethane Foam$5-$2515-30 minutesDecadesQuick repairs, weak soil, high-visibility areas
    Replacement$8-$187-28 days20-30 yearsSeverely damaged slabs, structural issues

    Conclusion

    Concrete slab heaving and settling result from soil changes beneath your concrete, influenced by moisture, temperature, and soil composition. Arkansas homeowners face unique challenges from expansive Porters Creek Clay soils, seasonal freeze-thaw cycles, and substantial rainfall that can trigger both settling and heaving. Understanding the difference between these two types of movement—settling from soil loss or compression versus heaving from soil expansion or frost action—is essential for choosing the right repair approach.

    Professional repair methods like mudjacking and polyurethane foam leveling can restore settled slabs at a fraction of replacement costs, while heaving requires addressing the underlying pressure source. Prevention through proper soil preparation, effective drainage, and appropriate reinforcement saves money and extends the life of your concrete installations. If you notice signs of slab movement, contact AR Concrete Fayetteville for a professional evaluation and customized solution tailored to Northwest Arkansas’s unique conditions.

    Why Concrete Slabs Heave or Settle FAQs

    How do I know if my concrete slab is settling or heaving?

    Settling creates a downward, concave depression where the slab sinks below its original level, while heaving produces an upward, convex shape where the slab lifts or tilts upward. Settlement typically occurs gradually with widening cracks over time, whereas heaving can happen more suddenly, especially after freeze-thaw cycles or heavy rain.[19]

    Why do concrete slabs heave or settle in Arkansas specifically?

    Arkansas’s expansive Porters Creek Clay soils can swell up to 10% when saturated and shrink significantly when dry, creating the pressure differences that cause heaving and the voids that cause settling. Combined with Northwest Arkansas’s freeze-thaw cycles from late October through mid-April and 45 inches of annual rainfall, these conditions create perfect scenarios for slab movement.[1][6]

    Can concrete slab settling be fixed without replacement?

    Yes, mudjacking and polyurethane foam leveling can effectively lift settled concrete back to its original position without full replacement. Mudjacking costs $3-$6 per square foot and works well for most residential applications, while polyurethane foam leveling costs $5-$25 per square foot and offers faster curing and longer-lasting results.[10][14]

    What’s the main difference between mudjacking and foam jacking?

    Mudjacking uses a heavy cement-based slurry mixture to fill voids and lift concrete, requiring 1-3 days to cure and costing less upfront, while foam jacking uses lightweight polyurethane foam that cures in 15-30 minutes, costs 20-50% more, but provides superior long-term durability and adds minimal weight to already compromised soil.[16][20]

    How can I prevent my concrete slab from heaving or settling?

    Prevention requires proper soil compaction to at least 95% maximum density before installation, effective drainage systems that direct water at least 10 feet away from concrete, appropriate control joint spacing (2-3 times the slab thickness in feet), and understanding your local soil conditions to implement suitable base preparation techniques.[2][17]

    Why Concrete Slabs Heave or Settle Citations

    1. Arkansas Geological Survey. “Expansive Soils in Arkansas.” https://www.geology.arkansas.gov/geohazards/expansive-soils.html
    2. American Concrete Institute. “ACI 360R-10: Guide to Design of Slabs-on-Ground.” 2010. https://www.concrete.org/portals/0/files/pdf/previews/360r-10web.pdf
    3. Concrete Repairman LLC. “Dealing with Expansive Clay Soils.” August 31, 2024. https://www.concreterepairman.com/expansive-clay-soils/
    4. Concrete Captain. “Essential Standards For Concrete Slabs: Ensure Durability And Safety In Your Projects.” June 5, 2025. https://concretecaptain.com/standards-for-concrete-slabs/
    5. HydroGuard Foundations. “Expansive Soils: A Hidden Disaster.” 2018. https://hydroguardfoundations.com/2018/09/20/expansive-soils-a-hidden-disaster/
    6. 5 News Online. “Did we see our first freeze earlier than normal this year?” https://www.5newsonline.com/article/weather/frost-climatology-arkansas-fayetteville-fortsmith/527-3c74e237-bea2-489a-a30f-bb47becc28b7
    7. KNWA FOX24. “Weather Blog: Last Frost/Freeze Climatology For NW Arkansas & the River Valley.” April 19, 2021. https://www.nwahomepage.com/weather/weather-blog/weather-blog-last-frost-freeze-climatology-for-nw-arkansas-the-river-valley/
    8. A-1 Concrete Leveling. “A Homeowner’s Guide to Freeze-Thaw Cycles.” December 3, 2024. https://www.a1concrete.com/concrete-repair-learning-center/concrete-freeze-thaw-cycles
    9. American Concrete Institute. “ACI RAP Bulletin 11: Slabjacking.” 2010. https://www.concrete.org/portals/0/files/pdf/rap-11.pdf
    10. HomeGuide. “How Much Does Mudjacking Cost? (2025).” 3 weeks ago. https://homeguide.com/costs/mudjacking-cost
    11. Angi. “How Much Does Mudjacking Cost? [2025 Data].” October 15, 2025. https://www.angi.com/articles/how-much-does-mudjacking-cost.htm
    12. Fixr. “Concrete Leveling Cost | Mudjacking Cost.” https://www.fixr.com/costs/concrete-leveling
    13. Angi. “How Much Does Polyurethane Concrete Lifting Cost? [2025 Data].” 1 month ago. https://www.angi.com/articles/polyurethane-concrete-lifting-cost.htm
    14. A-1 Concrete Leveling. “Concrete Leveling Costs: The Ultimate Guide [2025 Prices].” September 10, 2025. https://www.a1concrete.com/concrete-repair-learning-center/concrete-leveling-costs
    15. A-1 Concrete Leveling. “Foam Concrete Lifting Costs: Everything You Need To Know About Polyjacking Costs.” March 6, 2024. https://www.a1concrete.com/concrete-repair-learning-center/foam-concrete-lifting-costs-everything-you-need-know-about-polyjacking-costs
    16. Slab-Jack Kings. “How Much Does Polyurethane Concrete Lifting Cost?” July 1, 2020. https://slabjackkings.com/articles/how-much-does-polyurethane-concrete-lifting-cost/
    17. American Concrete Institute. “ACI 302.1R-15: Guide to Concrete Floor and Slab Construction.” 2015. http://www.concrete.org/Portals/0/Files/PDF/302.1R-15_Chapter5.pdf
    18. Concrete Foundations Association. Referenced in Concrete Captain. “Essential Standards For Concrete Slabs.” June 5, 2025. https://concretecaptain.com/standards-for-concrete-slabs/
    19. Superior Grouting. “Concrete Leveling Costs in 2024.” https://www.superiorgrouting.com/blog/concrete-leveling-costs-in-2024-a-comprehensive-guide/
    20. HomeAdvisor. “How Much Does Concrete Leveling or Mudjacking Cost in 2025?” https://www.homeadvisor.com/cost/foundations/level-concrete-slabs/
  • How Do Control Joints Help with Slab Durability?

    How Do Control Joints Help with Slab Durability?

    Key Takeaways:

    • Control joints act as planned weak points that guide cracks to specific locations, preventing random cracking across your concrete slab
    • Proper control joint spacing in Arkansas should be 24 to 30 times the slab thickness, with joints cut to one-quarter of the slab depth
    • Control joints help concrete slabs withstand Arkansas’s freeze-thaw cycles and expansive clay soil movements common throughout the region
    • Well-placed control joints can reduce uncontrolled cracking by up to 85% according to ACI standards
    • Control joints preserve structural integrity while making future repairs more predictable and manageable

    Control joints dramatically extend concrete slab durability by creating intentional weak points that direct where cracks form as concrete naturally shrinks during curing. Rather than allowing random cracks to compromise your slab’s strength and appearance, control joints confine cracking to straight, manageable lines that preserve the overall integrity of your concrete.[1]

    Understanding How Control Joints Protect Your Concrete Slab

    When concrete cures and loses moisture, it naturally shrinks, creating internal tensile stress throughout the slab. Since concrete excels at handling compression but struggles with tension, this shrinkage stress inevitably leads to cracking. Control joints work by creating a deliberately weakened plane in your concrete, essentially telling the crack exactly where to form.[2]

    Think of control joints as relief valves for your concrete. As your slab dries and contracts, the stress concentrates at these pre-cut grooves rather than building up until it cracks randomly somewhere else. The joint creates a weak point that’s typically cut to one-quarter of the slab’s total depth, making it the path of least resistance when shrinkage stress develops.[3]

    For Fayetteville homeowners, this is particularly important because Arkansas’s clay-heavy soils and temperature fluctuations create additional stress on concrete slabs. Expansive clay soils common throughout Arkansas swell when wet and shrink when dry, creating soil movement that stresses concrete foundations and slabs.[4] Control joints allow your slab to accommodate these soil movements without developing structural cracks.

    The Science Behind Concrete Shrinkage and Cracking

    Concrete doesn’t just shrink once and then stop. During the first few months after pouring, concrete undergoes significant drying shrinkage as water evaporates from the mix. Studies show that nearly 50 percent of the drying shrinkage that will occur over 20 years happens within the first two months, with about 80 percent occurring within the first year.[5]

    The amount of shrinkage depends on several factors that matter specifically in Arkansas installations. Higher water content in the concrete mix leads to more shrinkage. The type and amount of aggregate used affects how much the cement paste can shrink. Even environmental conditions like temperature and humidity play major roles.[6]

    Temperature changes add another layer of complexity. Concrete expands in heat and contracts in cold, creating additional stress beyond initial curing shrinkage. In northwest Arkansas, where temperatures can swing from below freezing in winter to over 100°F in summer, this thermal movement is substantial.[7] Without control joints to accommodate this natural expansion and contraction, your slab faces continuous stress that leads to premature failure.

    How Freeze-Thaw Cycles Impact Uncontrolled Cracking

    Arkansas experiences regular freeze-thaw cycles that make uncontrolled cracking particularly problematic. When water enters cracks in concrete and then freezes, it expands by approximately 9 percent in volume.[8] This expansion creates tremendous pressure from within the concrete, causing the cracks to widen and deepen.

    Concrete needs to reach at least 500 psi compressive strength before it can safely tolerate a single freeze-thaw cycle. For exposure to repeated freezing and thawing, especially with deicing chemicals, concrete should reach at least 4,000 psi.[9] Control joints help by keeping cracks confined to locations where they can be properly sealed, preventing water infiltration that leads to freeze-thaw damage.

    How Control Joints Maintain Structural Integrity

    The primary purpose of control joints is preserving your slab’s load-bearing capacity. By directing cracks to specific, non-critical locations, control joints prevent the random cracking patterns that compromise structural integrity.

    Slab ConditionLoad TransferLong-Term PerformanceMaintenance Requirements
    With Properly Spaced Control JointsExcellent load transfer maintained across jointsControlled cracking preserves slab function for 30+ yearsMinimal joint sealing every 5-7 years
    Without Control JointsPoor load transfer after random cracking developsUncontrolled cracks worsen over time, requiring major repair within 10-15 yearsConstant crack repair and potential slab replacement
    Improperly Spaced JointsReduced load transfer as cracks form between jointsAdditional cracks reduce effectiveness of joint placementIncreased maintenance addressing unexpected cracks

    When control joints are properly placed, they create panels of concrete that can flex slightly under load without transferring excessive stress to adjacent sections. This is especially important in Arkansas, where expansive clay soils can cause differential movement beneath your slab. The joints act as buffer zones, allowing different sections of your slab to move independently without creating stress concentrations that lead to structural cracking.[10]

    Preventing Water Infiltration and Base Deterioration

    Uncontrolled cracks that wander randomly across your slab create pathways for water to reach the base material beneath your concrete. Once water infiltrates below the slab, it can wash away base material, create voids, and in Arkansas’s expansive clay soils, trigger problematic swelling and shrinking cycles.

    Control joints concentrate cracks in known locations where you can apply sealant to prevent water infiltration. This proactive approach protects the gravel base and prevents the erosion issues that lead to slab settlement and failure.[11] For homeowners dealing with expansive clay soils, which can swell by 10 percent or more when saturated, preventing water infiltration beneath the slab is critical for long-term durability.[12]

    Proper Control Joint Spacing for Arkansas Slabs

    The American Concrete Institute recommends spacing control joints at intervals of 24 to 30 times the slab thickness for unreinforced concrete slabs.[13] This means a 4-inch thick residential slab should have control joints every 8 to 10 feet, while a 6-inch slab can extend to 12 to 15 feet between joints.

    However, Arkansas’s specific conditions may require adjustments to these general guidelines. The high clay content in local soils, combined with significant seasonal moisture changes, creates additional shrinkage stress that might warrant closer joint spacing in some installations.[14]

    Key Factors Determining Control Joint Placement

    Beyond basic spacing formulas, several factors influence where you should place control joints in Arkansas concrete installations:

    Concrete mix design: Higher cement content and lower water-cement ratios generally produce more shrinkage, potentially requiring closer joint spacing. Mixes with larger aggregate content and lower slump values may perform better with standard spacing recommendations.[15]

    Slab reinforcement: If your slab includes reinforcing steel or fiber reinforcement, you may be able to extend joint spacing slightly. However, the reinforcement doesn’t prevent cracking entirely—it just holds cracks tighter together. Control joints remain essential even in reinforced slabs.[16]

    Exposure conditions: Slabs exposed to direct sunlight, wind, and temperature extremes need more frequent control joints. Arkansas’s hot summers and cold winters create significant thermal stress that benefits from closer joint spacing than the same slab might need in a more moderate climate.[17]

    Panel shape: Control joints should create panel shapes as close to square as possible. Long, narrow panels are more prone to cracking between joints. If your design creates a 10-by-20-foot panel, expect shrinkage stress to crack it into a more square shape regardless of your joint placement.[18]

    Control Joint Depth and Installation Methods

    Control joint effectiveness depends not just on spacing but also on proper depth. Industry standards specify that control joints should be cut to a minimum depth of one-quarter the slab thickness.[19] A 4-inch slab needs 1-inch deep joints, while a 6-inch slab requires 1.5-inch joints.

    Installation MethodBest Use CaseTypical DepthTiming
    Hand Tooling (Grooving)Small residential slabs, decorative finishes1/4 slab thickness, minimum 1 inchDuring finishing while concrete is plastic
    Wet Saw CuttingStandard residential and commercial slabs1/4 slab thickness or minimum 1 inchGenerally 4-12 hours after finishing when concrete is firm but not fully hard
    Early-Entry Dry CuttingLarger commercial projects, tight schedules1.25 inches for slabs up to 9 inches thick1-4 hours after finishing
    Pre-formed StripsChallenging conditions, complex patternsFull slab depthInstalled before concrete placement

    Timing is critical for saw-cut control joints. Cut too early, and the saw blade chips and ravels the edges of the joint. Wait too long, and the concrete has already developed shrinkage cracks in random locations. For most Arkansas residential slabs, contractors typically saw-cut within 4 to 12 hours after finishing, though exact timing depends on weather conditions and concrete mix design.[20]

    Special Considerations for Expansive Arkansas Clay

    When pouring concrete over expansive clay soils, additional precautions help control joints perform their intended function. A well-compacted gravel base at least 4 inches thick provides a stable, non-expansive foundation that reduces the stress transferred from soil movement to your slab.[21]

    Some contractors recommend installing a vapor barrier between the base and concrete to prevent moisture migration from the soil. While this protects against moisture-related flooring problems in interior slabs, it can reduce friction between the slab and base, potentially increasing the movement that control joints must accommodate.[22]

    Maintenance Benefits of Control Joint Systems

    Beyond preventing initial cracking, control joints make long-term maintenance significantly more manageable. When cracks form at control joints rather than randomly across your slab, repairs become straightforward and predictable.

    Simplified sealing: You know exactly where cracks will develop, allowing you to apply joint sealant proactively rather than chasing unexpected cracks around your slab. Quality polyurethane or silicone-based sealants protect joints from water infiltration and debris accumulation.[23]

    Predictable repairs: If a section of your slab does require repair or replacement, control joints provide natural boundaries for the work. You can remove and replace concrete between joints without affecting adjacent sections of the slab.[24]

    Preserved aesthetics: Straight control joint lines are far less visually jarring than the random spiderweb patterns of uncontrolled cracking. In stamped concrete or other decorative applications, control joints can even be integrated into the design pattern to enhance rather than detract from appearance.[25]

    For homeowners maintaining their concrete over decades, the difference between maintaining sealed control joints every five to seven years versus constantly addressing random cracks represents substantial time and cost savings.

    Common Control Joint Mistakes to Avoid

    Even with professional installation, certain control joint errors can compromise slab durability:

    Insufficient depth: Joints cut too shallow don’t create enough weakness to attract the crack, causing it to form somewhere else on the slab surface instead. Always ensure joints reach at least one-quarter of the slab thickness.[26]

    Too-wide spacing: Following general spacing guidelines without considering your specific conditions can leave panels too large. In Arkansas’s challenging climate with expansive soils, err on the side of closer spacing rather than pushing the maximum recommendations.[27]

    Poor panel shapes: Creating long, narrow panels almost guarantees cracking between joints. Plan your joint layout to create panels as close to square as possible, even if this means adding extra joints.

    Ignoring reentrant corners: Wherever your slab has an inside corner, plan a control joint from that corner. These stress concentration points will crack if you don’t provide a planned path for the stress to relieve itself.[28]

    Continuing reinforcement through joints: If your slab includes reinforcing steel, ensure it doesn’t cross control joints. Continuous reinforcement prevents the joint from opening, defeating its purpose and forcing cracks to form elsewhere.[29]

    Control Joints vs. Expansion Joints: Understanding the Difference

    Homeowners often confuse control joints with expansion joints, but these serve different purposes in concrete construction. Control joints manage shrinkage and minor thermal movement in a single concrete pour. Expansion joints, also called isolation joints, separate different concrete pours or isolate concrete from other structures like walls or columns.

    Most residential slabs in Arkansas need control joints but may not require expansion joints. Expansion joints become necessary when concrete meets buildings, light posts, or other fixed structures that shouldn’t be connected to the slab. They’re also used between separate concrete pours, such as where a new patio connects to an existing driveway.[30]

    The key difference is function: control joints expect and accommodate cracking beneath them, while expansion joints provide complete separation through the full depth of the slab with a compressible filler material.[31]

    Conclusion: Protecting Your Investment Through Proper Joint Design

    Control joints represent a small additional step during installation that pays enormous dividends in long-term slab performance. By directing inevitable shrinkage cracks to predetermined locations, control joints preserve your concrete’s structural integrity, prevent water damage to the base, and keep your slab looking good for decades. In Arkansas’s challenging environment of expansive clay soils and significant temperature swings, proper control joint design isn’t optional—it’s essential for durable concrete that stands up to local conditions.

    Whether you’re planning a new driveway, patio, or workshop floor, insisting on properly spaced and cut control joints protects your investment and minimizes future maintenance headaches. For more information on preventing concrete problems during installation, see our guide on preventing cracks in newly poured concrete slabs.

    Control Joints Concrete Slab Durability FAQs

    How do control joints help with slab durability in freeze-thaw climates?

    Control joints help with slab durability in freeze-thaw climates by confining cracks to planned locations where they can be sealed, preventing water infiltration that causes freeze-thaw damage. When water enters uncontrolled cracks and freezes, it expands by 9 percent, creating pressure that worsens the cracking and leads to spalling and deterioration.[32]

    What happens if control joints are spaced too far apart?

    If control joints are spaced too far apart, shrinkage stress exceeds the concrete’s tensile strength between the joints, causing random cracks to form in the middle of large panels. These uncontrolled cracks compromise structural integrity more than properly placed control joint cracks and are more difficult to repair and seal effectively.[33]

    Do control joints work in reinforced concrete slabs?

    Control joints work in reinforced concrete slabs, but the reinforcement must be discontinued at the joint location or it will prevent the joint from opening. Steel reinforcement or fiber reinforcement holds cracks tightly together but doesn’t eliminate cracking, so control joints remain necessary to direct where those cracks form.[34]

    How often should I seal control joints in my concrete?

    You should seal control joints every five to seven years with quality polyurethane or silicone-based sealant. Regular sealing prevents water, dirt, and debris from entering the joint, which protects the base material and prevents the joint edges from spalling or chipping under traffic and environmental exposure.[35]

    Can I add control joints to existing concrete that’s already cracking?

    You cannot effectively add control joints to existing concrete that’s already developed shrinkage cracks, as the concrete has already relieved its shrinkage stress. However, saw-cutting along existing cracks can sometimes help manage their growth and provide a straighter line for sealing and repair work.[36]

    Control Joints Concrete Slab Durability Citations

    1. Portland Cement Association. “Joints in Concrete Construction.” https://www.cement.org/learn/concrete-technology/concrete-construction/contraction-control-joints-in-concrete-flatwork
    2. ProAll Inc. “Why Control Joints Are Crucial in Concrete Construction.” August 24, 2023. https://proallinc.com/news/the-importance-of-control-joints-in-concrete/
    3. Concrete Network. “Control Joints in Concrete – When To Cut & Spacing.” July 1, 2021. https://www.concretenetwork.com/concrete/slabs/controljoints.htm
    4. Arkansas Geological Survey. “Expansive Soils in Arkansas.” https://www.geology.arkansas.gov/geohazards/expansive-soils.html
    5. BASF Construction Chemicals. “Shrinkage of Concrete – Concrete Technology in Focus.” https://insights.basf.com/files/pdf/Shrinkage_Of_Concrete_CTIF.pdf
    6. BASF Construction Chemicals. “Shrinkage of Concrete – Concrete Technology in Focus.” https://insights.basf.com/files/pdf/Shrinkage_Of_Concrete_CTIF.pdf
    7. Foundation Pro. “Can Extreme Heat Cause Foundation Damage?” October 13, 2020. https://foundationpro.com/2020/07/10/can-extreme-heat-cause-foundation-damage/
    8. For Construction Pros. “How to Protect Concrete During Cold Weather Pours.” https://www.forconstructionpros.com/concrete/equipment-products/article/11232331/kb-engineering-llc-how-to-protect-concrete-during-cold-weather-pours
    9. For Construction Pros. “How to Protect Concrete During Cold Weather Pours.” https://www.forconstructionpros.com/concrete/equipment-products/article/11232331/kb-engineering-llc-how-to-protect-concrete-during-cold-weather-pours
    10. American Concrete Institute. “ACI 302.1R-15: Guide to Concrete Floor and Slab Construction.” http://www.concrete.org/Portals/0/Files/PDF/302.1R-15_Chapter5.pdf
    11. Green Hammer Concrete. “The Purpose of Control Joints.” https://www.greenhammerconcrete.com/blog-the-purpose-of-control-joints/
    12. Foundation Pro. “Foundation Repair in Arkansas: How Rain and Heat Can Damage Your Home’s Foundation.” May 10, 2022. https://foundationpro.com/2021/07/23/foundation-repair-in-arkansas-how-rain-and-heat-can-damage-your-homes-foundation/
    13. U.S. Bureau of Reclamation. “Joint Spacing for Concrete Structures.” September 2016. https://www.usbr.gov/tsc/techreferences/mands/mands-pdfs/JointSpacingForConcreteStructures_09-2016_508.pdf
    14. Airlift Concrete Experts. “How Arkansas Soil Types Affect Your Home’s Foundation.” May 12, 2025. https://airliftconcreteexperts.com/arkansas-soil-types/
    15. BASF Construction Chemicals. “Shrinkage of Concrete – Concrete Technology in Focus.” https://insights.basf.com/files/pdf/Shrinkage_Of_Concrete_CTIF.pdf
    16. American Concrete Institute. “ACI 302.1R-04: Guide for Concrete Floor and Slab Construction – Chapter 3.” https://www.concrete.org/Portals/0/Files/PDF/3021R_04Ch3.pdf
    17. Triangle Ready Mix. “Cold Weather Concrete.” January 13, 2025. https://trianglereadymix.com/placing-concrete-during-cold-weather/
    18. 4specs Discussion Forum. “Spacing of control joints in slabs.” http://discus.4specs.com/discus/messages/23/9724.html
    19. Everything About Concrete. “Install Effective Concrete Contraction Joints – Depth and Spacing.” https://www.everything-about-concrete.com/concrete-contraction-joints.html
    20. Everything About Concrete. “Install Effective Concrete Contraction Joints – Depth and Spacing.” https://www.everything-about-concrete.com/concrete-contraction-joints.html
    21. Structured Foundation. “Preventing Foundation Problems in Expansive Clay Soil Environments.” May 21, 2024. https://www.structuredfoundation.com/preventing-foundation-problems-in-expansive-clay-soil-environments/
    22. Eng-Tips Forum. “Residential foundations for expansive clay.” May 6, 2006. https://www.eng-tips.com/threads/residential-foundations-for-expansive-clay.154139/
    23. Royale Concrete. “The Benefits of Joint Filling in Concrete Slabs.” https://www.royaleconcrete.com/the-benefits-of-joint-filling-in-concrete-slabs
    24. ProAll Inc. “Why Control Joints Are Crucial in Concrete Construction.” August 24, 2023. https://proallinc.com/news/the-importance-of-control-joints-in-concrete/
    25. Calgary Concrete Services. “Definitive Guide to Control Joints.” https://www.calgaryconcreteservices.ca/definitive-guide-to-control-joints/
    26. Everything About Concrete. “Install Effective Concrete Contraction Joints – Depth and Spacing.” https://www.everything-about-concrete.com/concrete-contraction-joints.html
    27. ConcreteCaptain.com. “Essential Guide To ACI Concrete Wall Control Joints: Prevent Cracks And Ensure Stability.” August 6, 2025. https://concretecaptain.com/aci-concrete-wall-control-joints/
    28. Everything About Concrete. “Install Effective Concrete Contraction Joints – Depth and Spacing.” https://www.everything-about-concrete.com/concrete-contraction-joints.html
    29. American Concrete Institute. “ACI 302.1R-04: Guide for Concrete Floor and Slab Construction – Chapter 3.” https://www.concrete.org/Portals/0/Files/PDF/3021R_04Ch3.pdf
    30. EPP Concrete. “Control Joints vs Expansion Joints in Concrete.” https://eppconcrete.com/control-joints-expansion-joints-concrete/
    31. EPP Concrete. “Control Joints vs Expansion Joints in Concrete.” https://eppconcrete.com/control-joints-expansion-joints-concrete/
    32. For Construction Pros. “How to Protect Concrete During Cold Weather Pours.” https://www.forconstructionpros.com/concrete/equipment-products/article/11232331/kb-engineering-llc-how-to-protect-concrete-during-cold-weather-pours
    33. U.S. Bureau of Reclamation. “Joint Spacing for Concrete Structures.” September 2016. https://www.usbr.gov/tsc/techreferences/mands/mands-pdfs/JointSpacingForConcreteStructures_09-2016_508.pdf
    34. American Concrete Institute. “ACI 302.1R-04: Guide for Concrete Floor and Slab Construction – Chapter 3.” https://www.concrete.org/Portals/0/Files/PDF/3021R_04Ch3.pdf
    35. Royale Concrete. “The Benefits of Joint Filling in Concrete Slabs.” https://www.royaleconcrete.com/the-benefits-of-joint-filling-in-concrete-slabs
    36. OK Crete Solutions. “How Control Joints Prevent Concrete Cracks.” 2024. https://www.okcretesolutions.com/2024/how-control-joints-prevent-concrete-cracks/
  • What’s the Ideal Weather for Pouring a Concrete Slab in Fayetteville, Arkansas?

    What’s the Ideal Weather for Pouring a Concrete Slab in Fayetteville, Arkansas?

    Key Takeaways:

    • The optimal temperature range for pouring concrete slabs is between 50°F and 75°F, with 50-60°F being ideal for Fayetteville’s climate
    • Mild, overcast days with low wind and no rain provide the best conditions for proper concrete curing and maximum strength development
    • Spring (April-May) and fall (September-October) offer the most consistent favorable weather windows in Northwest Arkansas
    • Hot weather above 77°F accelerates water evaporation and can reduce 28-day strength by 10-15%, while cold weather below 40°F significantly slows curing[1][2]
    • Rain within the first 4-8 hours after pouring can dilute the water-cement ratio and compromise concrete strength by up to 50%[3][4]
    • Professional contractors use protective measures like curing blankets, windbreaks, and temperature monitoring to successfully pour concrete year-round when necessary

    For Fayetteville homeowners planning a concrete slab project, the perfect weather conditions mean the difference between a durable, long-lasting surface and one prone to cracking, weakness, or premature failure. The ideal weather for pouring a concrete slab combines temperatures between 50°F and 75°F, overcast skies or light shade, minimal wind, and dry conditions for at least 24-48 hours after placement.

    Why Weather Conditions Matter for Concrete Slab Installation

    Concrete doesn’t simply “dry” – it undergoes a chemical process called hydration where water molecules bond with cement particles to create the rock-solid material that supports your home’s foundation, driveway, or patio. This hydration process is extraordinarily sensitive to environmental conditions, particularly during the critical first 24-72 hours after pouring.

    According to the American Concrete Institute (ACI), concrete must reach a minimum compressive strength of 500 psi to resist damage from freezing, and it typically achieves about 70% of its specified strength within the first seven days under ideal conditions[5][6]. However, extreme temperatures, precipitation, wind, and humidity can dramatically alter this timeline and final strength.

    For homeowners in Fayetteville, understanding these weather impacts is especially important due to Arkansas’s humid subtropical climate with distinct seasonal variations. Temperatures in Northwest Arkansas range from winter lows around 28°F to summer highs reaching 90°F, with an average growing season of 194 days and freeze-thaw cycles occurring from November through March[7][8].

    The Science Behind Concrete Curing and Weather

    When cement mixes with water, it triggers an exothermic reaction that generates heat while forming calcium silicate hydrates – the “glue” that binds aggregates into solid concrete. Temperature directly affects the rate of this reaction. Jack Holley, a concrete quality control expert with 45 years of experience, emphasizes that “there is no standard mix for varying weather conditions – each scenario should be analyzed individually by qualified personnel who should find the optimum mix of quality, practicability, and cost-efficiency”[9].

    The water-cement ratio, typically between 0.40 and 0.60 for residential slabs, is critical for achieving proper strength[10]. When weather conditions cause excessive water loss through evaporation or add unwanted water through rain, this carefully calculated ratio becomes compromised, directly impacting the concrete’s structural integrity.

    Ideal Weather Conditions for Pouring Concrete Slabs

    Weather FactorIdeal ConditionWhy It Matters
    Temperature50°F to 75°F (10°C to 24°C)
    Optimal: 50-60°F
    Allows for steady hydration without rapid evaporation or freezing. ACI recommends maintaining above 50°F for at least 48 hours after pouring[1][5]
    Sky ConditionsOvercast or light shadePrevents direct sunlight from heating the surface and accelerating moisture evaporation, which causes uneven curing and surface cracking[2]
    Wind SpeedLow wind (under 10 mph)Strong winds accelerate surface moisture evaporation. When evaporation exceeds 0.2 lb/ft²/h, plastic shrinkage cracking becomes likely[11][12]
    HumidityModerate (40-70%)Balanced humidity prevents rapid drying while allowing proper curing progression. Low humidity increases evaporation risk[2]
    PrecipitationNo rain for 24-48 hoursRain within the first 4-8 hours can wash away cement, dilute the mix, and ruin the surface finish, reducing strength by up to 50%[3][4]
    Forecast StabilityConsistent conditions for 3+ daysSudden temperature changes can cause thermal shock and cracking. Gradual, stable conditions promote even curing throughout the slab[13]

    Temperature: The Most Critical Factor

    Temperature control is paramount for successful concrete placement. The American Concrete Institute defines cold weather concreting as periods when the average daily ambient temperature falls below 40°F for more than three consecutive days[14]. During these conditions, concrete curing slows significantly, and if the concrete freezes before reaching 500 psi strength, the expanding ice crystals can cause internal damage that reduces ultimate strength by up to 50%[15][16].

    Conversely, hot weather conditions – defined by ACI as temperatures exceeding 77°F combined with factors like low humidity and high wind – accelerate the hydration reaction too quickly[2]. Research shows that concrete cured at 100°F during the first 24 hours can experience 10-15% reduction in 28-day compressive strength compared to concrete cured at standard temperatures[17]. This phenomenon, called the “crossover effect,” occurs because rapid early hydration prevents proper formation of the dense calcium silicate hydrate structure needed for maximum strength[18].

    For Fayetteville homeowners, this means spring and fall offer the most reliable weather windows. According to climate data, Fayetteville experiences average temperatures of 56-75°F in April-May and September-October, with the last spring frost typically occurring around April 10 and the first fall frost around November 1[7][8].

    Sunlight and Shade Considerations

    Direct sunlight creates uneven heating across the concrete surface, with exposed areas becoming significantly warmer than shaded portions. This differential causes the surface to cure faster than the interior, creating internal stresses that manifest as surface cracking. Additionally, sunlight dramatically increases surface temperature – a concrete slab in direct summer sun can reach 150°F or higher, even when air temperature is only 85°F[19].

    Overcast days provide natural protection from these temperature extremes. When overcast conditions aren’t available, professional contractors create artificial shade using tarps or temporary structures, schedule pours for early morning or evening hours, and employ misting systems to cool the surface during the critical initial curing period.

    Seasonal Timing for Concrete Slabs in Fayetteville, Arkansas

    Understanding Fayetteville’s seasonal weather patterns helps homeowners choose the optimal time for their concrete project. Northwest Arkansas experiences a humid subtropical climate with four distinct seasons, each presenting unique challenges and opportunities for concrete work.

    Spring (March-May): Excellent Conditions with Rain Considerations

    Spring represents one of the best windows for concrete work in Fayetteville. Average temperatures climb from the mid-50s in March to the low 70s by May, falling squarely in the ideal range for concrete placement[8]. However, spring is also the wettest season in Northwest Arkansas, with May receiving an average of 6 inches of rainfall spread across 16 rainy days[8].

    Homeowners planning spring concrete projects should monitor 5-7 day weather forecasts carefully and have contingency plans for sudden weather changes. The benefit of spring pouring is that soil moisture levels are typically good, reducing the risk of the subgrade drawing water from fresh concrete – a particular concern with Fayetteville’s clay-rich soils.

    Summer (June-August): Hot Weather Challenges

    Summer presents the most challenging conditions for concrete work in Fayetteville. July temperatures average 79°F but frequently exceed 90°F, with some days reaching 95-97°F[8]. These conditions require special precautions to prevent rapid evaporation, which according to ACI standards becomes a concern when the rate exceeds 0.2 lb/ft²/h[11][12].

    Professional contractors working in Fayetteville summers employ several strategies: scheduling pours for early morning (before 10 AM) or evening (after 6 PM), pre-cooling aggregates and using chilled mixing water, adding water-reducing admixtures, and implementing aggressive curing methods like continuous misting or applying evaporation retardants immediately after finishing[2][20].

    Fall (September-November): Prime Concrete Season

    Fall offers the most consistently ideal conditions for residential concrete work in Northwest Arkansas. September through October temperatures range from 70-81°F in early fall to 56-70°F by November, providing extended periods of perfect concrete weather[8]. Precipitation decreases compared to spring, and humidity levels remain moderate.

    Many Fayetteville contractors consider September and October the premium months for concrete installation. The stable weather patterns allow for proper planning, reduced risk of weather-related delays, and optimal curing conditions that maximize long-term strength and durability.

    Winter (December-February): Cold Weather Concerns

    Winter poses significant challenges for concrete work in Fayetteville. Average January temperatures range from 29-45°F, with overnight lows frequently dropping below freezing[8]. According to climate data, Fayetteville experiences an average growing season of 194 days, meaning freezing temperatures are possible from late October through early April[7].

    Cold weather concreting requires extensive protective measures including heated enclosures, curing blankets, accelerating admixtures, and careful temperature monitoring for 48-72 hours after placement[14][15]. These precautions add significant cost and complexity to projects. For most homeowners, delaying winter projects until spring represents the most practical and economical choice.

    How Hot Weather Affects Concrete Slabs

    Hot weather accelerates concrete setting time but paradoxically weakens the final product when not properly managed. When temperatures exceed 77°F, especially combined with low humidity and wind, the concrete faces multiple threats to its long-term performance.

    Rapid Water Evaporation and Plastic Shrinkage Cracking

    The most immediate hot weather concern is excessive evaporation from the concrete surface. Fresh concrete contains bleed water that rises to the surface during the first few hours after placement. Under normal conditions, this bleed water helps maintain surface moisture during finishing operations. However, when evaporation rate exceeds the bleed rate (typically around 0.2 lb/ft²/h), the surface begins drying before the concrete has set[11][12].

    This premature drying causes plastic shrinkage cracks – irregular cracks that form in random patterns across the slab surface within the first few hours after placement. These cracks compromise the slab’s water resistance and create pathways for moisture intrusion that can lead to more serious structural problems over time. Research using ACI’s evaporation rate nomograph shows that a combination of 90°F air temperature, 70°F concrete temperature, 30% relative humidity, and 15 mph wind speed produces evaporation rates exceeding 0.5 lb/ft²/h – well above the critical threshold[21][22].

    Reduced 28-Day Compressive Strength

    Perhaps more concerning than surface cracking is hot weather’s impact on long-term strength. Studies demonstrate that concrete cured at temperatures around 100°F during the first 24 hours shows 10-15% lower 28-day compressive strength compared to identical concrete cured at 73°F[17]. This strength reduction occurs due to the crossover effect, where rapid early hydration creates a porous, less organized calcium silicate hydrate structure that cannot achieve the same ultimate strength as slowly cured concrete[18].

    For a typical 4-inch residential concrete slab specified at 4,000 psi, a 15% strength reduction means the slab only achieves 3,400 psi – potentially inadequate for its intended use and certainly problematic for long-term durability.

    Increased Drying Shrinkage and Thermal Cracking

    Hot weather also increases both drying shrinkage and thermal cracking potential. As concrete loses moisture during curing, it shrinks slightly. When this shrinkage is restrained by subgrade friction, reinforcement, or adjacent structures, tensile stresses develop that can exceed the concrete’s tensile strength, causing cracks[23].

    Additionally, the exothermic hydration reaction generates heat within the concrete mass. On hot days, the combination of internal heat generation and high ambient temperature creates elevated concrete temperatures that expand the material. When the concrete eventually cools, it contracts, creating additional internal stresses that contribute to cracking[23].

    How Cold Weather Affects Concrete Slabs

    Cold weather presents different but equally serious challenges for concrete placement and curing. The ACI defines cold weather as periods when average daily temperature falls below 40°F for more than three consecutive days[14]. In Fayetteville, this typically occurs from December through February, with occasional cold snaps in November and March.

    Dramatically Slowed Curing Process

    Temperature directly controls the rate of concrete hydration. At 73°F (the standard laboratory curing temperature), concrete typically reaches sufficient strength for light foot traffic within 24-48 hours and achieves about 70% of specified strength by seven days[6]. However, hydration rates drop precipitously as temperature decreases. At 40°F, the curing process proceeds at less than half the normal rate, and below 32°F, hydration essentially stops[24].

    This dramatically extended timeline creates practical problems for construction schedules and increases the period during which the concrete remains vulnerable to damage. More critically, if concrete freezes before reaching the critical 500 psi strength threshold, the water within the paste expands upon freezing, disrupting the partially formed cement paste structure and causing permanent damage[15][16].

    Freeze-Thaw Damage and Strength Loss

    When fresh concrete freezes before achieving adequate strength, water within the cement paste expands by approximately 9% of its volume as it transforms to ice[16]. This expansion creates internal pressure that exceeds the concrete’s tensile capacity, causing microscopic cracking throughout the paste structure. Research by the Portland Cement Association shows that concrete frozen at early ages can lose up to 50% of its potential ultimate strength[15].

    Even a single freeze-thaw cycle during the critical first 48 hours can cause irreversible damage. The American Concrete Institute emphasizes that concrete placed in cold weather must be maintained at temperatures above 50°F for at least 48 hours (72 hours for normal-strength concrete) to develop sufficient strength to resist freezing damage[14][15].

    Frozen Subgrade Concerns

    Fayetteville’s clay-rich soils present an additional cold weather challenge. When concrete is placed on frozen ground, the frozen subgrade acts as a heat sink, drawing heat from the fresh concrete and causing the bottom portion to cure much slower than the surface[24]. As spring arrives and the ground thaws, the soil can settle unevenly, causing the slab to crack or become unlevel.

    Professional contractors address this by thawing frozen ground with heaters or insulated blankets before pouring, ensuring the subgrade temperature exceeds 32°F and preferably reaches 40°F or higher[14].

    Rain and Precipitation: Critical Timing Considerations

    Rain represents one of the most unpredictable threats to fresh concrete. The timing of precipitation relative to concrete placement determines the severity of potential damage. Understanding these timing windows helps homeowners make informed decisions about whether to proceed with scheduled pours when weather forecasts show rain possibilities.

    Rain During or Immediately After Placement (0-2 Hours)

    Rain falling on concrete during placement or within the first two hours causes the most severe damage. At this stage, the concrete is completely plastic and the cement paste has not begun to set. Raindrops create pockmarks in the surface, dilute the water-cement ratio in the top layer, and can wash cement paste off the aggregate, leaving a rough, honeycombed surface[3][4].

    According to the Portland Cement Association, this dilution of the carefully proportioned mix can result in surface concrete that is 30-50% weaker than the intended design strength[3]. The American Society of Concrete Contractors reports that approximately 50% of concrete placements can be compromised without proper protection during rainfall in this critical window[25].

    Rain During Initial Set (2-8 Hours)

    As concrete begins its initial set (typically 2-4 hours after placement, depending on temperature and admixtures), it becomes less vulnerable to rain damage but still faces significant risks. Rain during this period can create surface discoloration, uneven texture, and scaling – a condition where the surface layer gradually flakes off over months or years[4].

    Professional contractors typically plan for at least 4-8 hours of dry weather after finishing to allow the surface to achieve initial set and develop resistance to rain damage. For evening pours, this means ensuring rain won’t arrive during overnight hours before the concrete has adequately set.

    Rain After Initial Set (8-24 Hours)

    Once concrete has achieved initial set (usually 4-8 hours after placement in moderate weather), rain becomes much less damaging and can actually be beneficial for curing. Light rain provides additional moisture that supports continued hydration. However, heavy downpours can still cause surface erosion if the concrete hasn’t fully hardened[4].

    After 24 hours, rain typically poses no threat to properly placed and finished concrete. In fact, many contractors apply wet curing methods – keeping the concrete continuously moist for 7 days – to maximize strength development[5][6].

    Protecting Concrete from Rain

    When unexpected rain threatens a pour, contractors use several protective strategies. Plastic sheeting or tarps immediately covered over the finished surface prevent raindrops from contacting the concrete. These coverings must be carefully placed to avoid marring the finished surface – typically suspended slightly above the slab or laid flat only after initial set has occurred[25].

    For planned pours when rain is possible, contractors may add water-reducing admixtures to lower the water-cement ratio, use rapid-setting cement to speed initial set time, or employ super-absorbent polymers that can be broadcast on the surface to absorb light rain[26].

    Wind Speed and Concrete Evaporation Rates

    Wind speed significantly influences moisture evaporation from fresh concrete surfaces, yet homeowners often overlook this factor when scheduling concrete projects. The ACI includes “high wind speed” as one of the four primary factors defining hot weather conditions, alongside high temperatures, low humidity, and solar radiation[2][11].

    How Wind Accelerates Moisture Loss

    Wind moving across a concrete surface carries away moisture-saturated air and replaces it with drier air, maintaining a steep humidity gradient that drives continued evaporation. Research by the Federal Highway Administration found that wind blowing directly onto fresh concrete can cause water loss considerably higher than predicted by standard evaporation nomographs – in some cases up to twice the calculated rate[27].

    The ACI’s evaporation rate nomograph shows that wind speed has a nearly linear relationship with evaporation rate. For example, when air temperature is 80°F, concrete temperature is 70°F, and relative humidity is 40%, increasing wind speed from calm (0 mph) to 15 mph increases the evaporation rate from approximately 0.15 lb/ft²/h to 0.35 lb/ft²/h – pushing well beyond the critical 0.2 lb/ft²/h threshold where plastic shrinkage cracking becomes likely[21][22].

    Wind Chill Effects in Cold Weather

    In cold weather, wind creates a wind chill effect that strips heat from the concrete surface, accelerating cooling and potentially dropping surface temperature below the critical 50°F threshold before adequate strength develops[28]. This is particularly concerning for vertical surfaces like foundation walls that have greater exposure to wind.

    Northwest Arkansas experiences average wind speeds of 8-10 mph year-round, with occasional stronger gusts during storm fronts[8]. While these speeds don’t typically create severe problems alone, they become significant when combined with other adverse conditions like high temperatures or low humidity.

    Creating Windbreaks for Concrete Protection

    Professional contractors protect concrete from wind using temporary windbreaks – erected walls made from plywood, tarpaulins, or dedicated wind-screening materials positioned on the windward side of the pour. Effective windbreaks should extend at least 6 feet beyond the concrete edges and stand 6-8 feet tall to create adequate protection[20].

    For residential slabs in Fayetteville, existing structures, fences, or landscaping often provide natural wind protection. When planning a pour, homeowners should consider wind direction (prevailing winds in Fayetteville come from the south and southwest) and discuss wind protection strategies with their contractor if the slab will be exposed to direct wind during the critical first 24 hours[8].

    Best Months for Pouring Concrete Slabs in Fayetteville

    MonthSuitability RatingAverage Temp RangeKey Considerations
    January❌ Poor29-45°FToo cold; requires extensive heating and protection. High risk of freeze damage
    February❌ Poor32-49°FCold weather precautions still necessary. Most snowfall occurs this month
    March⚠️ Fair41-59°FImproving conditions but frost still possible. Last freeze averages April 10
    April✅ Excellent50-68°FPrime spring window. Watch for increased rainfall (4.5″ average)
    May✅ Excellent60-76°FIdeal temperatures. Highest rainfall month (6″ average) – check forecasts carefully
    June✅ Good69-84°FAcceptable but warming. Schedule morning pours to avoid peak heat
    July⚠️ Fair73-89°FHot weather precautions needed. Evaporation control critical
    August⚠️ Fair71-89°FSimilar to July. Early morning or evening pours recommended
    September✅ Excellent64-81°FPremium fall window. Stable weather, moderate temperatures, lower rainfall
    October✅ Excellent52-70°FPeak concrete season. Consistent conditions ideal for proper curing
    November✅ Good42-58°FAcceptable early in month. Watch for first freeze (avg. Nov 1)
    December❌ Poor32-47°FCold weather challenges return. Not recommended for standard residential work

    Professional Weather Mitigation Strategies

    Experienced concrete contractors serving Fayetteville have developed specialized techniques to successfully place concrete even when weather conditions aren’t ideal. Understanding these strategies helps homeowners appreciate the value of professional installation and the additional costs associated with challenging weather conditions.

    Hot Weather Concrete Solutions

    Professional contractors employ multiple strategies to combat hot weather challenges. These include cooling the concrete ingredients (using chilled water, ice substitution for part of the mix water, or pre-cooling aggregates), adding chemical admixtures like retarders or hydration stabilizers to extend working time, scheduling pours for cooler hours (5-9 AM typically best in Fayetteville summers), creating artificial shade over the work area, implementing continuous misting or fogging systems during placement and finishing, applying evaporation retardants immediately after finishing, and using wet curing methods (continuously wet burlap or curing compounds) for at least 7 days[2][20][26].

    These measures add cost to the project but provide essential protection for the concrete’s long-term performance. AR Concrete Fayetteville utilizes these professional techniques to ensure your slab achieves maximum strength and durability regardless of seasonal timing.

    Cold Weather Concrete Solutions

    Cold weather concreting requires even more intensive protective measures including heating the concrete ingredients (warm water, heated aggregates) to ensure the mix temperature at placement exceeds 55°F, using Type III high-early-strength cement or accelerating admixtures to speed strength gain, protecting the subgrade from freezing with insulated blankets or heating, enclosing the work area with heated tarps or temporary structures, applying insulated curing blankets immediately after finishing to retain heat, and monitoring concrete temperature continuously for 48-72 hours after placement[14][15][24].

    The American Concrete Institute provides specific minimum protection temperatures based on slab thickness, ranging from 50-55°F for slabs under 12 inches thick[14]. For typical 4-inch residential slabs in Fayetteville, maintaining 55°F for at least 48 hours ensures adequate early-age strength development.

    Rain Protection and Contingency Planning

    Forward-thinking contractors check detailed weather forecasts 5-7 days before scheduled pours and have rain contingency plans in place. These plans include having plastic sheeting or tarps readily available on-site, establishing communication protocols for weather updates during the pour, identifying protected staging areas for materials and equipment, coordinating with ready-mix suppliers for schedule flexibility, and maintaining relationships with weather monitoring services for real-time updates[25].

    For scheduled pours when rain is possible within 24 hours, contractors may use rapid-setting cement blends, adjust mix designs with water reducers, or reschedule the pour rather than risk compromising the installation.

    Arkansas-Specific Climate Considerations

    Fayetteville’s location in the Ozark Mountains creates unique microclimatic conditions that differentiate concrete work here from other regions. Understanding these local factors helps homeowners make informed decisions about timing and contractor selection.

    Freeze-Thaw Cycles in Northwest Arkansas

    Unlike southern Arkansas where freezing is rare, Fayetteville experiences regular freeze-thaw cycling from November through March. Climate data shows the area averages 5.35 inches of snow annually, with the growing season averaging 194 days[7][8]. This means concrete slabs must be designed and installed to withstand repeated freeze-thaw exposure.

    The ACI recommends air-entrained concrete for all exterior applications in freeze-thaw regions[15]. Air entrainment creates millions of tiny air bubbles throughout the concrete that provide space for freezing water to expand without causing internal pressure buildup. For Fayetteville homeowners, specifying 5-7% air content in the concrete mix provides essential freeze-thaw resistance[29].

    Clay Soil Considerations

    Fayetteville area soils are characterized as “problematic” due to high clay content that expands and contracts with moisture changes[30]. While Fayetteville itself sits on fine sandy loam that’s less problematic than the highly expansive Porters Creek Clay found in other parts of Arkansas, soil moisture management remains critical for concrete success[31][32].

    Proper site preparation includes ensuring adequate drainage away from the slab, compacting the subgrade to at least 95% of maximum density, maintaining consistent moisture in the subgrade (damp but not saturated), and considering vapor barriers to prevent moisture migration from the soil into the slab[30][32].

    Humidity and Seasonal Moisture Patterns

    Arkansas’s humid subtropical classification means moisture is rarely a limiting factor for concrete curing – the opposite problem from arid western climates. However, this high humidity creates its own challenges. Spring and early summer humidity levels of 70-78% can slow the evaporation needed for surface finishing and extend the time required for the slab to become ready for service[8].

    Contractors working in Fayetteville’s humid conditions often use less aggressive finishing techniques and allow additional time for surface water to evaporate before applying final finishes. This patience pays dividends in surface quality and long-term durability.

    When to Delay or Reschedule a Concrete Pour

    Sometimes the best decision is to delay a scheduled pour rather than proceed under adverse conditions. Understanding the red flags that should trigger rescheduling helps protect your investment.

    Clear Conditions for Rescheduling

    Professional contractors typically recommend postponing concrete work when forecasts show rain probability exceeding 30% within 24 hours of the scheduled pour, temperatures below 40°F for the pour day or following 48 hours, temperatures above 95°F with low humidity (under 40%) and wind above 15 mph, severe weather warnings including thunderstorms or high winds, or overnight low temperatures below 50°F within 48 hours of the pour[2][14].

    While these conditions don’t make concrete work impossible, they require extensive additional measures that may not be practical or cost-effective for residential projects. Reputable contractors like AR Concrete Fayetteville prioritize long-term slab performance over meeting arbitrary schedules and will recommend postponement when conditions threaten quality.

    The Cost of Proceeding Under Poor Conditions

    The temptation to proceed with a scheduled pour despite poor weather often stems from concerns about project delays, contractor availability, or event deadlines. However, the long-term costs of compromised concrete far exceed the inconvenience of postponing. Concrete damaged by weather-related issues may show surface scaling requiring replacement within 5-10 years, reduced strength necessitating structural evaluation or reinforcement, cracking that allows water intrusion and subgrade erosion, poor surface aesthetics reducing property value, and premature deterioration requiring costly repairs or complete replacement[3][4][23].

    A properly poured slab under ideal conditions can last 30-50 years with minimal maintenance, while a weather-compromised slab may require significant intervention within 10-15 years.

    Monitoring Weather Forecasts for Your Concrete Project

    For homeowners planning concrete work, becoming weather-conscious in the weeks before your scheduled pour helps ensure optimal conditions. Modern weather forecasting provides remarkable accuracy for 3-5 day forecasts, with decreasing reliability beyond that window.

    What to Monitor

    When checking weather forecasts for your concrete project, track daily high and low temperatures (ensuring both stay within the 40-85°F comfort zone), precipitation probability and amounts, wind speed and direction, humidity levels, and extended forecasts showing weather pattern trends[8]. The National Weather Service provides detailed forecasts for Fayetteville at weather.gov/tsa, including hourly forecasts that help with pour timing decisions.

    Working with Your Contractor

    Establish clear communication with your contractor about weather monitoring responsibilities. Professional contractors typically check forecasts daily in the week before scheduled pours and have protocols for weather-related schedule changes. Understand the contractor’s decision-making timeline – most need 24-48 hours’ notice to reschedule ready-mix deliveries and crew schedules. Discuss contingency plans if weather deteriorates during the pour, and agree on communication methods for last-minute weather updates[25].

    At AR Concrete Fayetteville, we maintain close relationships with local weather monitoring services and coordinate with our ready-mix suppliers to maintain schedule flexibility, ensuring we only pour when conditions support optimal concrete performance.

    Conclusion

    The ideal weather for pouring a concrete slab combines moderate temperatures between 50-75°F, overcast or lightly shaded conditions, minimal wind, and dry weather for 24-48 hours after placement. For Fayetteville homeowners, this means spring (April-May) and fall (September-October) provide the most consistently favorable conditions, with fall offering slightly more stable weather patterns and lower precipitation.

    While professional contractors can successfully place concrete in less-than-ideal conditions using specialized techniques, these measures add cost and complexity to projects. Understanding the weather factors that influence concrete curing empowers you to make informed decisions about project timing and helps you appreciate the value that experienced contractors bring to ensuring long-term slab performance.

    Ready to schedule your concrete slab project during optimal weather conditions? Contact AR Concrete Fayetteville today for a free consultation and quote. Our experienced team monitors Northwest Arkansas weather patterns year-round and will help you choose the perfect timing for your project, ensuring your concrete slab achieves maximum strength, durability, and longevity.

    Ideal Weather for Pouring Concrete Slab Fayetteville Arkansas FAQs

    What’s the best time of year to pour a concrete slab in Fayetteville?

    The best time of year to pour a concrete slab in Fayetteville is during spring (April-May) or fall (September-October) when temperatures consistently range between 50-75°F. September and October are particularly ideal because they offer stable weather patterns with moderate temperatures around 64-81°F, lower rainfall than spring, and minimal risk of extreme heat or freeze events[8]. These months provide the optimal conditions for proper concrete curing and maximum long-term strength development.

    Can concrete be poured in the rain?

    Concrete should not be poured during rain or when rain is expected within 4-8 hours after placement. Rain falling on fresh concrete dilutes the carefully calculated water-cement ratio, which can reduce strength by up to 50% and wash away surface cement[3][4]. If unexpected rain occurs after concrete has achieved initial set (typically 4-8 hours after placement), it causes less damage and may even help with curing, though heavy downpours should still be avoided until the concrete fully hardens after 24 hours.

    What temperature is too cold to pour concrete slabs?

    According to the American Concrete Institute, temperatures below 40°F for three consecutive days define cold weather conditions that require special precautions[14]. Concrete should not be poured when air temperature is below 40°F or when overnight temperatures will drop below freezing within 48 hours of placement unless extensive heating and protection measures are implemented. For Fayetteville homeowners, this typically means avoiding concrete work from December through February when average temperatures range from 29-49°F[8].

    How hot is too hot for pouring concrete in Arkansas?

    The American Concrete Institute defines hot weather conditions as temperatures above 77°F combined with low humidity, wind, or direct sunlight – conditions that accelerate moisture loss and can reduce 28-day strength by 10-15%[2][17]. In Fayetteville’s summer months when temperatures frequently exceed 85-90°F, concrete work requires special hot weather precautions including early morning scheduling, concrete cooling, rapid placement, and aggressive moisture retention during curing. While concrete can be successfully placed at temperatures up to 95°F with proper measures, homeowners should expect additional costs for these protective procedures.

    Does wind affect concrete curing?

    Wind significantly affects concrete curing by accelerating moisture evaporation from the surface. The American Concrete Institute identifies high wind speed as one of four primary factors defining hot weather conditions[2][11]. Wind speeds above 15 mph combined with warm temperatures can push evaporation rates above the critical 0.2 lb/ft²/h threshold, causing plastic shrinkage cracking[21][22]. Research shows wind can cause water loss up to twice the rate predicted by standard calculations[27]. For optimal curing, concrete should be protected from direct wind exposure during the critical first 24 hours through windbreaks or covering.

    Ideal Weather for Pouring Concrete Slab Fayetteville Arkansas Citations

    1. American Concrete Institute. (2016). “ACI 306R-16: Guide to Cold Weather Concreting”
    2. American Concrete Institute. (2020). “ACI 305R-20: Guide to Hot Weather Concreting”
    3. ConcreteCaptain.com. (2025). “Is It OK For Fresh Concrete To Be Rained On? Understanding The Risks And Best Practices”
    4. Prism Cement. (2025). “Concrete Mix Ratio by Volume for Wet Weather”
    5. ECS Limited. (2022). “A Guide to Working with Concrete in Cold Weather”
    6. Powerblanket. (2025). “Concrete Curing Time: How Long & Best Practices”
    7. Arkansas Department of Agriculture. (2014). “Climate of Arkansas”
    8. Weather-US.com. (2024). “Fayetteville, AR Climate and Weather Averages”
    9. CarbonCure Technologies. (2025). “Best Practices for Cold Weather Concreting” – Jack Holley Quote
    10. Wikipedia. (2024). “Water-Cement Ratio”
    11. American Concrete Institute. (2006). “ACI 305.1-06: Specification for Hot Weather Concreting”
    12. The Euclid Chemical Company. “Preventing Rapid Evaporation When the Heat is On”
    13. iMix Concrete. (2025). “Does Temperature Affect Concrete Curing? [Curing Guide]”
    14. American Concrete Institute. (2002). “ACI 306.1-90: Standard Specification for Cold Weather Concreting”
    15. National Institutes of Health. (2016). “Concrete Construction Precautions during Cold Weather Overview”
    16. Kansas City Government. “Cold Weather Concrete Guidelines”
    17. Çimsa. (2025). “Hot Weather Concreting: A Comprehensive Guide”
    18. Maturix. (2025). “Hot Weather Concreting – Intelligent Concrete Monitoring”
    19. For Construction Pros. “How Climate Affects Concrete – Hot Weather Cold Weather and Wind”
    20. Arizona Rock Products Association. “Hot Weather Concrete Practices”
    21. National Ready Mixed Concrete Association. “Hot Weather Concreting”
    22. The Euclid Chemical Company. “When the Heat is On: Best Practices for Hot Weather Concreting”
    23. National Precast Concrete Association. (2023). “Hot Weather Concreting”
    24. Empire Parking Lot Services. “What is the Best Temperature for Pouring Concrete?”
    25. ConcreteCaptain.com. (2025). “Can Concrete Dry In Rain? Essential Tips For Curing Concrete In Wet Conditions”
    26. Portland Cement Association. (2024). “Cement & Concrete FAQ”
    27. Federal Highway Administration. (2006). “Guide for Curing Portland Cement Concrete Pavements – Additional Investigation”
    28. Texas Department of Transportation. “Hot Weather Concreting”
    29. Encyclopedia of Arkansas. (2024). “Climate and Weather”
    30. Olshan Foundation Repair. (2024). “Fayetteville, AR Foundation Repair & Crawl Space Service”
    31. Arkansas Geological Survey. “Expansive Soils in Arkansas”
    32. Encyclopedia of Arkansas. (2025). “Soils”
  • Should a Vapor Barrier Be Installed Under a Concrete Slab?

    Should a Vapor Barrier Be Installed Under a Concrete Slab?

    Key Takeaways

    • Vapor barriers are essential for most interior concrete slabs in Fayetteville, Arkansas, protecting against moisture damage and flooring failures.
    • Current building codes require 10-mil minimum thickness meeting ASTM E1745 Class A standards for residential applications.
    • Arkansas’s expansive Porters Creek Clay soils and freeze-thaw cycles make moisture control particularly critical for long-term slab performance.
    • Vapor barriers prevent costly flooring failures by stopping ground moisture from migrating upward through porous concrete.
    • Proper installation directly under the slab (not beneath granular fill) represents current industry best practice for optimal moisture protection.

    Yes, a vapor barrier should be installed under a concrete slab for most interior applications in Fayetteville, Arkansas. Industry standards from the American Concrete Institute and current building codes strongly recommend using a minimum 10-mil vapor retarder meeting ASTM E1745 Class A specifications beneath interior slabs, especially those receiving floor coverings.[1][2] This protection is particularly important in Arkansas due to expansive clay soils, seasonal moisture variations, and the risk of radon gas infiltration.[3][4]

    Why Vapor Barriers Are Critical for Arkansas Concrete Slabs

    Understanding why vapor barriers matter starts with recognizing that concrete is porous. Even though concrete feels solid, it has millions of tiny pores that allow water vapor to move through the material. In Fayetteville, where we deal with Porters Creek Clay soils and significant seasonal moisture changes, ground moisture naturally migrates upward through slabs.[5]

    Without a vapor barrier, this moisture creates several serious problems. Water vapor carrying dissolved salts from the concrete can damage floor adhesives, causing expensive flooring failures. The moisture also raises the pH level at the concrete surface above 9-10, which breaks down modern flooring adhesives and causes floor coverings like wood, vinyl, and carpet to warp, discolor, or separate from the slab.[6]

    Arkansas’s unique soil conditions amplify these moisture challenges. The Porters Creek Clay found along Arkansas’s Fall Line from Hope to Batesville is highly expansive, meaning it swells significantly when wet and shrinks when dry.[7] This constant movement puts additional stress on concrete slabs, making proper moisture control even more essential for maintaining structural integrity.

    What Building Codes Require in Arkansas

    The 2021 International Residential Code (IRC), which Arkansas jurisdictions increasingly adopt, upgraded vapor barrier requirements significantly. The code now mandates a minimum 10-mil vapor retarder conforming to ASTM E1745 Class A specifications beneath concrete floor slabs in residential buildings.[8][9] This represents an important change from the previous 6-mil standard that didn’t include durability requirements.

    Arkansas building inspectors in cities like Fort Smith specifically check for vapor barrier installation during slab inspections, requiring that it be in place before concrete is poured.[10] These inspections verify that the vapor barrier provides adequate moisture protection and termite defense for your home’s foundation.

    The code does include exceptions where vapor barriers aren’t required:[11]

    • Garages, utility buildings, and other unheated accessory structures
    • Unheated storage rooms smaller than 70 square feet
    • Driveways, walks, patios, and other exterior flatwork
    • Situations where the building official approves based on local site conditions

    For heated, occupied spaces with floor coverings, vapor barriers are mandatory under current Arkansas building practices. This includes homes, finished basements, workshops, and attached garages that will be climate-controlled.

    Vapor Barrier Decision Guide for Fayetteville Homeowners

    Project TypeVapor Barrier Required?Recommended ThicknessKey Considerations
    Interior slab with flooringYES – Required10-15 mil minimumEssential for warranty compliance and preventing flooring failure
    Finished basementYES – Strongly advised15-20 mil preferredPrevents mold, mildew, and humidity issues in occupied spaces
    Attached heated garageYES – Recommended10 mil minimumEspecially if finished or connected to living space
    Unheated workshop/shedOptional but beneficial10 mil if usedProtects stored items from moisture damage
    Exterior patio/drivewayGenerally not neededN/AExposed concrete allows natural moisture movement

    How Arkansas Climate Affects Vapor Barrier Performance

    Fayetteville’s climate creates specific challenges for concrete moisture management. The area experiences temperatures ranging from 28°F in winter to 90°F in summer, with approximately 43 inches of precipitation distributed fairly evenly throughout the year.[12] This combination of moisture and temperature fluctuations makes vapor barriers particularly valuable.

    Freeze-Thaw Cycle Protection

    When temperatures drop below freezing, any moisture that has entered concrete expands by approximately 9% as it turns to ice.[13] This expansion creates internal pressure that can crack and damage concrete from within. A vapor barrier prevents ground moisture from entering the slab, reducing the amount of water available to freeze and cause damage during Fayetteville’s winter months.

    The combination of daytime thawing and nighttime freezing is particularly destructive. Water seeps into pores during warmer periods, then freezes and expands at night, gradually widening cracks and causing surface scaling called spalling. By keeping ground moisture out, vapor barriers significantly reduce freeze-thaw damage potential.

    Summer Humidity and Condensation

    Arkansas summers bring hot, humid conditions that can cause condensation issues when cool, moist air from beneath a slab meets warmer indoor air. This condensation accumulates on the underside of floor coverings, creating ideal conditions for mold growth and adhesive failure.[14] A properly installed vapor barrier blocks this moisture pathway, maintaining healthier indoor air quality and protecting your flooring investment.

    Understanding Vapor Barrier Specifications

    Not all vapor barriers provide equal protection. The American Concrete Institute recommends that vapor retarders have a permeance rating of less than 0.3 perms when tested according to ASTM E96.[15] True vapor barriers have even lower permeance ratings below 0.01 perms, providing superior moisture protection.

    ASTM E1745 Class Requirements

    The ASTM E1745 standard classifies vapor retarders into three categories based on their strength and puncture resistance:[16]

    Class A (Highest Performance): Minimum tensile strength of 45 pounds per inch and puncture resistance of 2,200 grams. These barriers withstand construction traffic and the weight of wet concrete without tearing.

    Class B (Medium Performance): Minimum tensile strength of 35 pounds per inch and puncture resistance of 1,600 grams. Suitable for lighter-duty applications with careful installation.

    Class C (Basic Performance): Minimum tensile strength of 25 pounds per inch and puncture resistance of 1,100 grams. Meets minimum requirements but tears more easily during construction.

    For Fayetteville projects, Class A barriers offer the best long-term protection and peace of mind. The additional cost is minimal compared to the potential expense of flooring failures or moisture remediation.

    Recommended Thickness for Arkansas Conditions

    While codes mandate 10-mil minimum thickness, many concrete professionals in Arkansas recommend 15-mil or 20-mil vapor barriers for enhanced durability.[17] Thicker barriers better resist punctures from sharp aggregate stones in the base material and from rebar, wire mesh, and foot traffic during construction.

    Quality vapor barriers are manufactured from virgin polyethylene or polyolefin resins rather than recycled materials. Virgin resin products maintain their integrity longer and resist degradation from soil chemicals, providing protection for the lifetime of your slab.[18]

    Protection Against Arkansas Soil Gases

    Beyond moisture control, vapor barriers provide critical protection against harmful soil gases that naturally occur in Arkansas soils. This dual function makes them even more valuable for homeowner safety and health.

    Radon Gas Mitigation

    Radon is a colorless, odorless radioactive gas that forms naturally from uranium decay in soil. It’s the second leading cause of lung cancer in the United States after smoking.[19] Arkansas has areas with moderate to elevated radon potential, particularly in regions with certain geological formations.

    A properly installed vapor barrier serves as the first line of defense against radon infiltration. The barrier should meet minimum 6-mil thickness for basic radon protection, though 10-mil or thicker provides better long-term performance.[20] For comprehensive radon protection, the barrier must be sealed at all seams with proper tape and at all penetrations like pipes and columns.

    According to industry expert Howard Kanare: “This author firmly believes that a floor slab is part of the building envelope and that every slab on ground should have a vapor retarder meeting ASTM E1745 installed directly beneath the concrete.”[21] This philosophy reflects growing recognition that vapor barriers provide multiple protective functions beyond just moisture control.

    Methane and Other Soil Gases

    In areas with organic soils or near former agricultural sites, methane and other gases can migrate through soil and enter buildings through concrete slabs. Vapor barriers block these pathways, preventing potentially dangerous gas accumulation in occupied spaces.[22]

    Proper Installation Methods for Maximum Protection

    Even the highest-quality vapor barrier fails if improperly installed. Following best practices ensures your barrier performs as intended for decades.

    Base Preparation

    The foundation for proper vapor barrier installation begins with a well-prepared granular base. A 4-inch minimum layer of clean, coarse gravel or crushed stone provides a capillary break and allows for drainage beneath the slab.[23] This aggregate should pass through a 2-inch sieve but be retained on a 1/4-inch sieve for optimal performance.

    In Arkansas, where we encounter expansive Porters Creek Clay soils, proper base preparation becomes even more critical. The granular layer helps distribute loads evenly and provides a stable platform that minimizes the effects of soil movement from moisture changes.[24] For more detailed information on soil preparation, see our guide on how local soil conditions affect concrete installations.

    Vapor Barrier Placement

    Current ACI Committee 302 recommendations specify placing the vapor barrier directly on top of the prepared granular base, immediately beneath the concrete slab.[25] This represents a change from older practices that placed barriers beneath the gravel layer or used a sand “blotter layer” above the barrier.

    Direct placement beneath the slab provides several advantages:

    • Prevents moisture trapped in blotter layers from eventually migrating back into the slab
    • Eliminates the “reservoir” effect where moisture accumulates between the barrier and slab
    • Allows for more even concrete curing with moisture loss only from the top surface
    • Reduces long-term moisture-related flooring problems

    Some contractors worry that direct placement increases plastic shrinkage cracking risk, but proper concrete mix design and finishing techniques effectively manage this concern.[26]

    Sealing Seams and Penetrations

    A vapor barrier is only as good as its weakest point. All seams must overlap by at least 6 inches and be sealed with manufacturer-approved tape specifically designed for vapor barrier applications.[27] Standard construction tape or duct tape doesn’t provide adequate long-term adhesion.

    Pay special attention to penetrations where pipes, electrical conduits, or columns pass through the barrier. Cut the barrier carefully around these obstacles and seal thoroughly with approved tape or sealant. Some contractors use boot-style collars that wrap around penetrations for enhanced protection.

    The barrier should extend up foundation walls approximately 6 inches and be sealed to the wall or footing to create a continuous moisture envelope beneath the entire slab.[28]

    Cost Considerations for Fayetteville Homeowners

    Many homeowners worry about vapor barrier costs, but the investment proves modest compared to potential flooring failure expenses.

    Material Costs

    Vapor barrier material costs vary based on thickness and quality:[29]

    • 10-mil polyethylene: $0.10-$0.15 per square foot
    • 15-mil high-performance barrier: $0.15-$0.25 per square foot
    • 20-mil commercial-grade barrier: $0.20-$0.35 per square foot
    • Seaming tape: $25-$45 per 180-foot roll

    For a typical 1,500 square foot home foundation, quality vapor barrier materials cost approximately $225-$525 depending on thickness selected. This represents less than 2% of total foundation costs but provides substantial long-term value.

    Installation Labor

    Professional installation typically adds $0.50-$1.00 per square foot to material costs, bringing total installed prices to approximately $1,200-$2,000 for an average residential foundation.[30] Many concrete contractors include vapor barrier installation as a standard part of their slab preparation process.

    Considering that flooring failures from moisture damage can cost $5,000-$15,000 or more to remediate, the vapor barrier investment offers exceptional return on investment. Most flooring manufacturers require vapor barriers for their product warranties to remain valid, making installation essentially mandatory for protecting your flooring investment.[31]

    Vapor Barrier vs. No Vapor Barrier: Long-Term Comparison

    FactorWith Vapor BarrierWithout Vapor Barrier
    Initial Cost$1,200-$2,000 additionalNo additional cost
    Flooring WarrantyFull manufacturer warranty validWarranty may be voided or limited
    Moisture ProblemsRare if properly installedCommon in 5-10 years
    Indoor Air QualityBetter humidity control, reduced mold riskHigher humidity, increased mold potential
    Radon ProtectionSignificant gas infiltration reductionNo protection against soil gases
    Concrete DurabilityProtected from ASR “concrete cancer”Vulnerable to moisture-driven degradation
    Energy EfficiencyReduced HVAC moisture loadHVAC works harder to remove humidity
    10-Year Cost$1,200-$2,000 (initial only)Potential $5,000-$20,000+ in repairs

    Special Considerations for Arkansas Concrete Projects

    Expansive Soil Management

    Arkansas’s Porters Creek Clay presents unique challenges that make vapor barriers even more valuable. These highly expansive soils can swell up to 10% in volume when saturated, creating tremendous pressure on concrete foundations.[32] While the vapor barrier doesn’t prevent soil movement, it works synergistically with proper base preparation to minimize moisture infiltration that drives this expansion-contraction cycle.

    For properties in areas with known expansive soils, consider these additional measures alongside your vapor barrier:

    • Maintain consistent soil moisture around your foundation through controlled irrigation during dry periods
    • Install proper drainage systems to quickly remove water from around the foundation
    • Extend roof gutters and downspouts well away from the slab perimeter
    • Consider soil stabilization treatments for severely expansive clay conditions

    Seasonal Timing for Installation

    Fayetteville’s optimal concrete pouring seasons also affect vapor barrier installation. Spring and fall typically provide ideal conditions with moderate temperatures and lower humidity. Avoid installation during heavy rain periods when site conditions make it difficult to keep the barrier clean and properly positioned.

    During hot Arkansas summers, protect the vapor barrier from direct sunlight for extended periods before concrete placement. UV exposure can degrade some barrier materials, reducing their long-term effectiveness.

    Common Vapor Barrier Mistakes to Avoid

    Even experienced contractors sometimes make errors that compromise vapor barrier effectiveness. Watch out for these common mistakes:

    Using Inadequate Material

    Standard 6-mil construction plastic from big-box stores doesn’t meet current code requirements and lacks the puncture resistance needed to survive construction. Always specify vapor retarders that meet ASTM E1745 Class A standards for residential applications.

    Poor Seam Sealing

    Simply overlapping sheets without sealing creates moisture pathways that negate the barrier’s purpose. Every seam needs proper tape application with adequate overlap and good adhesion to both surfaces.

    Damage During Construction

    Punctures from rebar, stakes, or foot traffic create openings for moisture infiltration. Inspect the barrier immediately before concrete placement and repair any damage with patches and proper tape.

    Extending Over Footings Without Sealing

    Some building codes restrict vapor barrier placement over footings to maintain the bond between walls and footings. Consult local Fayetteville building officials about proper termination methods. Where barriers must stop at the footing edge, ensure thorough sealing to prevent moisture infiltration at this critical junction.

    When Can You Skip a Vapor Barrier?

    While vapor barriers benefit most concrete applications, certain scenarios don’t require them:

    Unheated exterior structures: Open-sided pavilions, carports without walls, and similar structures where moisture can evaporate naturally don’t need vapor barriers. The concrete remains exposed to air circulation that prevents moisture buildup.

    Driveways and exterior flatwork: Exposed concrete surfaces like driveways, sidewalks, and patios typically don’t require vapor barriers since they’re not enclosed and won’t receive moisture-sensitive floor coverings. However, some homeowners choose to include them even for driveway installations to maximize long-term durability.

    Arid climates with deep water tables: In very dry regions where groundwater sits well below the surface, the risk of moisture migration decreases. However, Arkansas doesn’t fit this category—our moderate to high precipitation levels mean vapor barriers remain valuable even when water tables are relatively deep.

    Warehouse floors with no coverings: Some industrial applications with bare, exposed slabs may not require vapor barriers if moisture doesn’t impact operations. However, even these facilities often benefit from barriers to prevent product damage from condensation on the floor.

    Vapor Barriers and Future Flooring Flexibility

    One often-overlooked advantage of vapor barrier installation is the flexibility it provides for future home modifications. Your plans may change over time—that garage you’re building today might become finished living space in five years. Installing a vapor barrier now, even if not strictly required for the initial use, protects your options.

    Without a vapor barrier, adding floor coverings later becomes problematic. You’d need to apply expensive surface-applied moisture mitigation systems costing $3-$8 per square foot, or accept the risk of flooring failure.[33] Installing the barrier during initial construction costs a fraction of these remediation expenses and future-proofs your investment.

    This flexibility proves particularly valuable for concrete slab installations in attached garages, workshops, and basement spaces that might eventually transition to finished living areas.

    Conclusion

    For Fayetteville homeowners planning concrete slab projects, installing a high-quality vapor barrier represents essential protection rather than optional expense. Arkansas’s combination of expansive clay soils, seasonal moisture fluctuations, and moderate climate creates conditions where vapor barriers deliver exceptional value through moisture control, radon mitigation, and long-term concrete protection.

    Modern building codes recognize these benefits by requiring 10-mil minimum barriers meeting ASTM E1745 Class A standards for most residential applications. The modest $1,200-$2,000 investment prevents costly flooring failures, protects indoor air quality, maintains manufacturer warranties, and provides flexibility for future home modifications. When combined with proper base preparation and professional installation, vapor barriers deliver decades of reliable moisture protection for your concrete investment.

    Don’t compromise your home’s foundation with outdated practices or cost-cutting shortcuts. Contact AR Concrete Fayetteville today to discuss vapor barrier options for your upcoming project and ensure your concrete slab provides the lasting performance Northwest Arkansas homeowners expect.

    Vapor Barrier Concrete Slab Fayetteville Arkansas FAQs

    What happens if I don’t install a vapor barrier under my concrete slab?

    Without a vapor barrier, ground moisture will continuously migrate upward through your porous concrete slab. This moisture can cause floor coverings to fail as water-based adhesives break down, create mold and mildew problems that compromise indoor air quality, void your flooring manufacturer warranties, and contribute to concrete degradation through alkali-silica reaction (ASR). In Arkansas’s climate with expansive clay soils and significant precipitation, these problems typically appear within 5-10 years of construction and can cost $5,000-$20,000 or more to remediate.[34][35]

    Can I use regular plastic sheeting instead of a proper vapor barrier?

    Standard plastic sheeting from hardware stores doesn’t meet current building code requirements or ASTM E1745 Class A specifications. These generic plastics lack the necessary puncture resistance, tensile strength, and long-term durability that proper vapor retarders provide. During concrete placement, regular plastic often tears from foot traffic, rebar, and construction equipment, creating openings that allow moisture infiltration. Always use vapor retarders specifically manufactured and tested for underslab applications—the small cost difference prevents major problems later.

    Should a vapor barrier be installed under my Fayetteville garage floor?

    For attached, heated garages that connect to your living space, installing a vapor barrier under the concrete slab is strongly recommended even though building codes may not mandate it. The barrier prevents moisture migration that can increase humidity in adjacent living areas and protects against soil gas infiltration. For detached, unheated garages, the benefit is less critical unless you plan future conversion to finished space. Many Fayetteville homeowners choose to include barriers even in unheated garages for approximately $300-$500 to maintain future flexibility and protect stored items from moisture damage.[36]

    How thick should the vapor barrier be under a concrete slab in Arkansas?

    Current Arkansas building codes following the 2021 International Residential Code require a minimum 10-mil thickness vapor retarder meeting ASTM E1745 Class A specifications for residential applications. However, many concrete professionals in Fayetteville recommend 15-mil or 20-mil barriers for enhanced durability and puncture resistance, particularly when dealing with angular crushed stone base materials or heavy construction traffic. The thicker barriers cost only slightly more but provide significantly better protection against damage during installation and improved long-term performance.[37][38]

    Does a vapor barrier prevent radon gas in Fayetteville homes?

    Yes, a properly installed vapor barrier provides important protection against radon gas infiltration from Arkansas soils. Radon is a naturally occurring radioactive gas that’s the second leading cause of lung cancer after smoking. A 10-mil or thicker vapor barrier with all seams and penetrations properly sealed significantly reduces radon entry through concrete slabs. For comprehensive radon protection, the barrier works as part of a passive or active radon mitigation system that includes a gravel layer beneath the slab and vent pipes to exhaust any accumulated gas. EPA guidelines specifically recommend vapor retarders as a key component of radon-resistant construction techniques for new homes.[39][40]

    Vapor Barrier Concrete Slab Fayetteville Arkansas Citations

    1. American Concrete Institute. (2015). Guide for Concrete Floor and Slab Construction – ACI 302.1R-15. Concrete Floor and Slab Construction Committee.
    2. Americover. (2025). What is the Best Vapor Barrier to Use Under Concrete Slabs? Americover Blog.
    3. Arkansas Geological Survey. Expansive Soils in Arkansas. Arkansas Department of Energy & Environment.
    4. Foundation Pro. (2022). Foundation Repair in Arkansas: How Rain and Heat Can Damage Your Home’s Foundation.
    5. Nevada Ready Mix. Vapor Retarders Under Slabs on Grade — What, why, & how? Nevada Ready Mix Concrete Tips.
    6. Graniterock. Vapor Barriers under Concrete Floor Slabs: Friend or Foe? Technical Reports.
    7. Arkansas Geological Survey. Expansive Soils in Arkansas – Porters Creek Clay. Geohazards Division.
    8. International Code Council. (2021). 2021 International Residential Code Section R506.2.3 Vapor Retarder.
    9. Stego Industries. (2024). Your Guide to Navigating the IRC Building Code Changes to Vapor Retarders.
    10. City of Fort Smith, Arkansas. Residential Construction Requirements. Building Development.
    11. The Building Code Forum. (2023). 2021 IRC 506.2.3 Discussion.
    12. Weather Spark. Fayetteville Climate, Weather By Month, Average Temperature.
    13. Nitterhouse Masonry. (2024). The Effects of Freeze-Thaw on Concrete.
    14. Stego Industries. (2024). When and Where to Install a Below-Slab Vapor Barrier.
    15. ASTM International. ASTM E96 – Standard Test Methods for Water Vapor Transmission of Materials.
    16. ASTM International. ASTM E1745 – Standard Specification for Plastic Water Vapor Retarders Used in Contact with Soil or Granular Fill Under Concrete Slabs.
    17. W. R. Meadows. (2025). 20 Mil Underslab Vapor Barrier – ASTM E1745 Class A, B & C.
    18. GBD Magazine. (2022). Critical Code Change for Residential Concrete Slabs.
    19. EPA. (2025). Radon-Resistant Construction Basics and Techniques. United States Environmental Protection Agency.
    20. Ecohome. (2021). Installing a radon barrier below slab floor.
    21. CRC Coatings. (2025). Vapor Barriers For Concrete Floors: Key Factors.
    22. W. R. Meadows. (2017). Underslab Radon Barriers Technical Bulletin.
    23. Stego Industries. (2024). When and Where to Install a Below-Slab Vapor Barrier – Installation Methods.
    24. Airlift Concrete Experts. (2025). How Arkansas Soil Types Affect Your Home’s Foundation.
    25. American Concrete Institute. (2015). ACI Committee 302 Recommendations on Vapor Retarder Placement.
    26. The Building Code Forum. (2023). Discussion on Vapor Retarder Effects on Concrete Curing.
    27. ASTM International. ASTM E1643 – Standard Practice for Installation of Water Vapor Retarders.
    28. ShunTool. (2025). The Ultimate Guide To Installing Vapor Barriers On Concrete Slabs.
    29. Everything About Concrete. Concrete Vapor Barrier Cost.
    30. HomeGuide. (2024). How Much Does Crawl Space Encapsulation Cost? (2025).
    31. Forensis Group. Moisture Problems Plague Flooring from Concrete Slabs-on-Grade: Causes, Prevention, and Legal Considerations.
    32. Earth Contact Products. (2025). Expansive Clay and Your Foundation.
    33. CustomCrete. (2025). Pros and Cons of a Moisture Vapor Barrier (MVB).
    34. Polyguard. (2025). Preventing Water & Vapor Transmission in Concrete Slabs.
    35. Wagner Meters. (2025). Concrete Vapor Retarders.
    36. Building Code Trainer. Are Vapor Barriers Required Under Concrete Floors?
    37. Americover. (2025). IRC Guidelines for Vapor Barriers Used Under Concrete Slabs.
    38. Stego Industries. (2024). 2021 IRC Code Updates – Vapor Retarder Thickness Requirements.
    39. Stego Industries. (2024). How a Vapor Barrier Can Help Mitigate Radon in New Residential Construction.
    40. EPA. (2025). EPA Radon-Resistant Construction Guidelines.
  • How do I prepare my yard for a concrete project?

    How do I prepare my yard for a concrete project?

    Key Takeaways

    • Proper yard preparation requires clearing vegetation, excavating 6-8 inches deep, and compacting the subgrade to prevent settling and cracking
    • A 4-6 inch crushed stone subbase provides essential drainage and load distribution, particularly important in Arkansas’s clay soil conditions
    • Installing 10-mil polyethylene vapor barriers protects concrete from ground moisture that causes premature deterioration
    • Establishing proper drainage slope (minimum 1/8 inch per foot away from structures) prevents water pooling and freeze-thaw damage
    • Professional plate compactor rental costs $89-$150 per day, while crushed stone runs $15-$50 per ton for most residential projects

    Preparing your yard for a concrete project involves clearing and excavating the area, compacting the soil subgrade, installing a gravel subbase, building formwork, and placing vapor barriers with reinforcement. For homeowners in Fayetteville, Arkansas, addressing local clay soil conditions and freeze-thaw cycles during preparation ensures your concrete driveway, patio, or walkway remains stable and crack-free for decades. According to the American Concrete Institute, proper site preparation is the single most important factor determining whether a concrete slab will perform well over its service life.[1]

    Why Proper Yard Preparation Matters for Arkansas Homeowners

    The foundation beneath your concrete is just as critical as the concrete itself. When homeowners skip proper yard preparation, they face expensive consequences including premature cracking, uneven settling, and complete slab failure. A properly prepared base prevents 90% of common concrete problems that lead to costly repairs within the first five years.[2]

    Arkansas presents unique challenges for concrete installation. Northwest Arkansas experiences freeze-thaw cycles during winter months when temperatures fluctuate around freezing.[3] Water trapped in inadequately prepared soil expands when frozen, creating upward pressure that cracks concrete slabs. Additionally, the clay-rich soils common throughout Fayetteville and surrounding areas expand when wet and contract when dry, creating movement that stresses concrete from below.[4]

    Professional concrete contractors understand that time invested in thorough site preparation saves homeowners thousands of dollars in future repairs. As noted by concrete industry experts, “The quality of a concrete floor or slab is highly dependent on achieving a hard and durable surface that is flat, relatively free of cracks, and at the proper grade and elevation. Properties of the surface are determined by the mixture proportions and the quality of the concreting and jointing operations.”[5]

    Step-by-Step Guide to Preparing Your Yard for Concrete

    Step 1: Plan Your Project and Mark the Area

    Begin by clearly defining your project boundaries. Drive wooden stakes into the ground at each corner of your planned concrete area. Connect the stakes with mason’s string to create visible perimeter lines. Add an extra 3 inches on all sides to accommodate formwork installation.[6]

    Before any digging begins, contact 811 (the national “Call Before You Dig” hotline) at least 2-3 business days before your project starts. Underground utility lines for electricity, gas, water, telecommunications, and sewer must be marked to prevent dangerous and expensive accidents.[7] This free service protects you from liability and prevents service disruptions to your neighborhood.

    For properties in Fayetteville’s established neighborhoods like Wilson Park or newer developments in southwest Fayetteville, existing utilities may not follow predictable patterns. Never assume you know where underground lines run—always verify through official utility location services.

    Step 2: Clear Vegetation and Excavate to Proper Depth

    Remove all organic material from your marked area including grass, weeds, plants, roots, leaves, and topsoil. Organic matter decomposes over time, creating voids beneath your concrete that lead to settling and cracking.[8] For areas with established trees nearby, be cautious of major root systems. Consult an arborist if roots from valuable trees extend into your project area, as improper removal can harm the tree’s stability.

    Excavate to a depth of 6-8 inches below your desired finished surface height. This depth accommodates the concrete thickness (typically 4 inches for patios and walkways, 4-6 inches for driveways) plus the subbase layer.[9] The American Concrete Institute defines the subgrade as “the native soil (or improved soil), usually compacted” beneath the subbase layer.[1]

    For Arkansas clay soils, excavation often reveals expansive clay that requires special attention. These soils absorb water and swell, then shrink when dry, creating ongoing movement beneath your concrete.[10] If you encounter heavy clay during excavation, consider increasing your subbase thickness by 1-2 inches to provide additional stability.

    Step 3: Compact the Subgrade Thoroughly

    Soil compaction is the most frequently overlooked step in concrete preparation, yet it’s absolutely critical for long-term performance. Proper compaction squeezes out air pockets and moisture, increasing soil density and load-bearing capacity by up to 50%.[11]

    Lightly dampen the exposed soil with a garden hose using a fine mist setting. The soil should be moist but not muddy—think of the consistency of a wrung-out sponge. This moisture helps soil particles bind together during compaction.[12]

    Rent a plate compactor (also called a vibratory compactor) from equipment rental stores. For residential projects, a forward plate compactor typically costs $89-$150 per day rental.[13] These machines weigh 190-450 pounds and deliver 3,600-9,000 pounds of centrifugal compaction force.[14]

    Run the plate compactor over the entire subgrade in overlapping passes. The compactor should create a high-pitched vibrating sound as it works. Walk slowly behind the machine, allowing it to work thoroughly on each section. Test compaction by walking across the area—your footprints should barely be visible if compaction is adequate.[15]

    For Arkansas clay soils, achieving proper compaction requires more effort than sandy or granular soils. Clay particles are fine and cohesive, needing shearing force to compress effectively. Multiple passes with the compactor, working in a grid pattern, ensures uniform density across the entire subgrade.[16]

    Soil TypeCompaction DifficultyRecommended Approach
    Sandy/GranularEasy2-3 compactor passes, vibratory action
    Clay (Arkansas typical)Challenging4-5 passes, higher impact force, moisture control
    Mixed/LoamModerate3-4 passes, standard vibratory compactor

    Step 4: Install and Compact the Subbase Layer

    The subbase is a layer of granular material (typically crushed stone or gravel) placed on top of the compacted subgrade. While technically optional according to ACI guidelines, a subbase provides multiple critical benefits that make it essential for most residential projects.[17]

    A proper subbase serves as a capillary break, preventing groundwater from wicking up into your concrete slab. It also provides a stable work platform during concrete placement, distributes loads more evenly, and improves drainage beneath the slab.[18] For Arkansas homeowners dealing with clay soils and occasional freeze-thaw cycles, the subbase layer is particularly important.

    Spread 4-6 inches of crushed stone or gravel over your compacted subgrade. Crushed stone (sometimes called crusher run or road base) costs $15-$50 per ton depending on your location and material quality.[19] For a typical 10-foot by 20-foot patio requiring a 4-inch subbase, you’ll need approximately 2.5 cubic yards or 3.75 tons of material, costing $55-$190 plus delivery.

    Rake the crushed stone to create an even layer, then compact it thoroughly using your plate compactor. For subbase materials, compact in layers—also called “lifts”—of no more than 3 inches at a time.[20] If your subbase is 6 inches thick, spread 3 inches, compact it completely, then add the remaining 3 inches and compact again. This layered approach ensures uniform density throughout the subbase.

    After final compaction, the subbase surface should run parallel to your planned concrete surface. If your concrete will slope for drainage, the subbase should follow the same slope. Check the grade using a string line and level to ensure consistency.

    Step 5: Establish Proper Drainage Slope

    Proper drainage protects your concrete investment from water damage, freeze-thaw deterioration, and premature failure. Concrete slabs should slope a minimum of 1/8 inch per foot away from structures, with 1/4 inch per foot recommended for optimal drainage.[21]

    For a 10-foot patio extending from your house, this means the edge farthest from your home should be 1.25 to 2.5 inches lower than the edge touching your foundation. This gentle slope is barely perceptible to the eye but effectively moves water away from your home.

    Industry experts note that “the most important reason for including slope, or concrete fall, in a slab rather than making the surface level is to promote drainage and prevent ponding water. Standing water can seep into the concrete, leading to cracks, spalling, and other forms of deterioration.”[22] In Arkansas’s humid climate with average annual rainfall exceeding 45 inches, proper drainage becomes even more critical.

    For driveways, establish slope in two directions: a slight crown in the center directing water to both sides, and a longitudinal slope directing water toward the street or drainage area. Avoid creating low spots where water can pool—these areas are prone to ice formation during winter freeze-thaw cycles.

    Step 6: Build and Secure Your Formwork

    Concrete forms create the mold that shapes your slab and holds wet concrete in place during placement and initial curing. For most residential projects, use dimensional lumber: 2×4 boards for 4-inch slabs, 2×6 for thicker sections or thickened edges.[23]

    Set forms to your desired finished height, accounting for the drainage slope you established. Drive wooden stakes every 2-3 feet along the outside of form boards, then secure the forms to stakes with deck screws (not nails, which can loosen from vibration).[24]

    Verify that your forms are square using the 3-4-5 triangle method: measure 3 feet along one side from a corner, 4 feet along the adjacent side, and the diagonal between these points should measure exactly 5 feet if the corner is square.[25] Check that forms follow your desired slope using a string line and level.

    Apply a release agent like form oil or cooking spray to the inside faces of your forms. This prevents concrete from bonding to the wood, making form removal easier after the concrete cures.[26]

    Step 7: Install Vapor Barrier and Reinforcement

    While vapor barriers are not required by code for unheated outdoor structures like patios and driveways, they provide valuable protection against ground moisture that can deteriorate concrete over time.[27] For Fayetteville’s humid climate and clay soils that retain moisture, installing a vapor barrier is highly recommended.

    Use 10-mil polyethylene plastic sheeting as your vapor barrier, which meets the International Residential Code’s updated Class A vapor retarder specifications.[28] This thickness provides better puncture resistance than 6-mil material and creates an effective barrier against ground moisture and soil gases like radon.

    Roll the vapor barrier over your compacted subbase, extending it to overlap form edges. Overlap seams by at least 6 inches and seal them with contractor-grade tape.[29] The American Concrete Institute recommends placing vapor barriers directly on top of a granular subbase rather than directly on soil, as this positioning reduces the risk of punctures and allows easier concrete placement.[30]

    For driveways and high-load areas, install steel reinforcement over the vapor barrier. Use welded wire mesh (typically 6×6-W1.4xW1.4) or steel rebar in a grid pattern. Place reinforcement on “chairs” or dobies that elevate it to approximately mid-height within the slab thickness.[31] This positioning ensures the steel can do its job of controlling cracking, as reinforcement placed on the bottom of the slab provides minimal benefit.

    Critical Mistakes to Avoid When Preparing Your Yard

    Even experienced DIYers make costly errors during site preparation. Understanding common mistakes helps you avoid expensive repairs later.

    Insufficient Compaction

    The number one cause of concrete slab failure is inadequate soil compaction. “If the ground underneath the slab isn’t compacted enough, it can shift or settle over time, leading to cracks in the slab,” notes concrete construction experts.[32] Many homeowners believe simply leveling the soil is sufficient—it’s not. Proper mechanical compaction is essential.

    Pouring Directly on Fill Dirt

    New construction areas often have fill dirt around foundations. Fill dirt settles significantly over time, bringing concrete slabs down with it.[33] If your project area contains fill dirt less than 2-3 years old, expect ongoing settlement. Consider delaying your concrete project or implementing deep compaction techniques with professional equipment.

    Ignoring Tree Roots

    Tree roots continue growing after concrete is placed. Large roots can heave concrete slabs, creating trip hazards and drainage problems.[34] Remove roots within your project area, but consult an arborist about roots from valuable trees near your project perimeter. Killing major structural roots can destabilize trees and create liability issues.

    Skipping the Subbase in Clay Soil

    Homeowners sometimes try to save money by eliminating the gravel subbase, particularly if their native soil seems stable. In Arkansas’s clay soil conditions, this decision virtually guarantees future problems. Clay expands and contracts with moisture changes, creating movement that cracks concrete slabs. A proper gravel subbase isolates your concrete from this damaging movement.[35]

    Poor Drainage Planning

    Failing to establish proper drainage slope is a mistake that becomes apparent after the first heavy rain. Standing water on concrete surfaces accelerates deterioration, creates slipping hazards when frozen, and directs water toward building foundations where it can cause basement leaks or foundation damage.[36]

    Preparation MistakeConsequencePrevention CostRepair Cost
    No soil compactionSettling, cracking within 1-3 years$89-150 (compactor rental)$1,500-5,000+ (slab replacement)
    Skipping subbaseUneven support, premature cracking$200-400 (gravel materials)$2,000-6,000+ (removal and replacement)
    Poor drainageWater pooling, freeze-thaw damage$0 (proper grading)$1,000-4,000 (mudjacking or replacement)
    No vapor barrierMoisture deterioration, shorter lifespan$50-150 (poly sheeting)$3,000-8,000+ (early replacement)

    Arkansas-Specific Considerations for Yard Preparation

    Fayetteville’s unique climate and soil conditions require special attention during concrete preparation. Northwest Arkansas sits in USDA Hardiness Zone 6b/7a, experiencing average winter low temperatures between 0-10°F.[37] These temperature swings create freeze-thaw cycles that can damage inadequately prepared concrete.

    The region’s clay-rich soils, classified as Captina silt loam and similar series, present additional challenges.[38] These soils have high shrink-swell potential, meaning they expand when wet and contract when dry. This movement stresses concrete slabs from below, causing cracking if proper preparation steps are skipped.

    For optimal performance in Arkansas conditions:

    • Increase subbase thickness to 5-6 inches (rather than the minimum 4 inches) to provide better insulation from soil movement
    • Ensure subbase materials are free-draining crushed stone rather than materials with fines that can retain moisture
    • Schedule concrete placement during mild weather (spring or fall) when air temperatures range between 50-80°F for optimal curing
    • Plan for adequate concrete thickness: 4 inches minimum for walkways and patios, 5-6 inches for driveways, particularly if you own trucks or RVs

    Professional concrete contractors in Fayetteville understand these local conditions and adjust their preparation techniques accordingly. While proper yard preparation adds upfront costs, it’s far more economical than replacing failed concrete after just a few years.

    When to Hire Professional Help for Yard Preparation

    While many homeowners can successfully prepare smaller areas for concrete, certain situations warrant professional assistance. Consider hiring experienced concrete contractors for:

    • Large projects over 300 square feet where equipment rental costs and labor time approach professional installation costs
    • Areas with significant drainage challenges requiring French drains, catch basins, or complex grading solutions
    • Properties with poor soil conditions including expansive clay, high groundwater, or contaminated fill dirt
    • Sloped sites requiring extensive excavation, retaining walls, or engineered solutions
    • Projects near valuable landscaping or structures where mistakes could cause expensive collateral damage

    Professional concrete contractors bring specialized equipment, trained crews, and expertise in local soil conditions. For Fayetteville homeowners, working with experienced driveway installation specialists ensures your project meets local standards and performs well in Arkansas’s challenging climate.

    Conclusion: Invest Time in Preparation for Decades of Performance

    Properly preparing your yard for a concrete project requires significant effort, but this investment pays dividends for decades. By following these steps—clearing vegetation, excavating to proper depth, compacting the subgrade, installing a quality subbase, establishing drainage, building secure forms, and placing vapor barriers with reinforcement—you create the foundation for concrete that resists cracking, settling, and premature failure.

    For Arkansas homeowners facing clay soils and freeze-thaw cycles, thorough yard preparation isn’t optional—it’s essential for long-term concrete performance. Take the time to prepare properly, or work with professional contractors who understand local conditions. Your concrete driveway, patio, or walkway will reward this careful preparation with decades of reliable service.

    Ready to start your concrete project with confidence? Contact AR Concrete Fayetteville for professional assistance with yard preparation and concrete installation designed for Northwest Arkansas conditions.

    Prepare Yard for Concrete Project FAQs

    How deep should I excavate my yard for a concrete patio?

    You should excavate 6-8 inches deep for a concrete patio to accommodate the 4-inch concrete slab plus a 4-inch crushed stone subbase. This depth allows proper drainage and prevents settling while providing adequate support for typical patio use in Arkansas‘s clay soil conditions.

    Can I skip the gravel base if my soil is already compact?

    You should not skip the gravel base even if soil appears compact, as it provides critical drainage and prevents moisture from wicking into your concrete slab. In Arkansas’s clay soil conditions, the gravel subbase is essential for isolating concrete from soil expansion and contraction that causes cracking.

    What type of compactor do I need to prepare yard for a concrete project?

    You need a vibratory plate compactor for preparing yard for concrete projects, specifically a forward plate compactor delivering 3,600-9,000 pounds of centrifugal force for residential work. These machines rent for $89-150 per day and provide adequate compaction for typical driveways, patios, and walkways in Arkansas soil conditions.

    How much does it cost to prepare a yard for concrete in Fayetteville?

    Preparing a yard for concrete in Fayetteville typically costs $2-4 per square foot for DIY work including crushed stone ($15-50/ton), vapor barrier ($50-150), and equipment rental ($89-150/day). For a 200-square-foot patio, expect $400-800 in materials and equipment, while professional site preparation runs $4-8 per square foot including labor.

    What is the minimum slope for concrete drainage in Arkansas?

    The minimum slope for concrete drainage in Arkansas is 1/8 inch per foot away from structures, though 1/4 inch per foot is recommended for optimal water runoff. This translates to 1.25-2.5 inches of drop over a 10-foot span, which effectively prevents water pooling and freeze-thaw damage during Arkansas winters.

    Prepare Yard for Concrete Project Citations

    1. Concrete Network – Best Fill Under Concrete Slabs – Gravel Subbase
    2. Build Construct – Subgrade and Subbase for Concrete Slabs
    3. AR Concrete Fayetteville – Stamped vs Plain Concrete Driveways
    4. Airlift Concrete Experts – How Arkansas Soil Types Affect Your Home’s Foundation
    5. American Concrete Institute – ACI 302.1R-15: Guide to Concrete Floor and Slab Construction
    6. Kwiatkowski Concrete – A Guide on Preparing Ground for Concrete Slab
    7. Richfield Concrete – How to Prep Your Property for Concrete Driveway Installation
    8. Dirt Connections – How To Prepare Subgrade For Concrete
    9. Barrow Mix Concrete – Pouring Concrete Over Soil: A Comprehensive Guide for DIY Success
    10. Substrata – How to Build Low-Maintenance Roads on Clay Soil
    11. The Constructor – Subgrade and Subbase for Concrete Slabs
    12. Flowmix – How to Lay a Concrete Driveway
    13. RS Equipment – Plate Compactors For Rent
    14. United Rentals – Vibratory Plate Compactors for Rent
    15. Travis Perkins – Concrete Slab Preparation
    16. Concrete Network – How to Install Concrete
    17. Dirt Connections – What Is Subgrade For Concrete?
    18. Constro Facilitator – Subgrade and Subbase for Concrete Slab
    19. HomeGuide – 2025 Gravel Prices | Crushed Stone Cost (Per Ton, Yard & Load)
    20. Wisconsin DATCP – Chapter 4: Concrete Materials and Properties
    21. Concrete Network – Concrete Slope for Exterior Slabs: How to Ensure Proper Drainage
    22. Concrete Construction Magazine – How Much Should Concrete Fall?
    23. Powerblanket – Step-by-Step Guide to Pouring a Perfect Concrete Slab
    24. Networx – What Are Subbases and Subgrades in Concrete Foundations?
    25. DMI Ready Mix – Concrete Guidelines
    26. Ozinga – DIY Concrete: How to Prepare Your Subgrade
    27. Today’s Homeowner – Do You Need Plastic Under Concrete Driveway? (2025)
    28. Americover – What is the Best Vapor Barrier to Use Under Concrete Slabs?
    29. Americover – Is a 6 mil Vapor Barrier Thick Enough for Underslab Concrete?
    30. ACI 302.1R-15 – Guide to Concrete Floor and Slab Construction
    31. Heidelberg Materials – How to Lay a Concrete Base
    32. Columbia Concrete Supply – How to Prepare Your Site for Concrete Slab Installation
    33. A-1 Concrete Leveling – How To Prep for a Concrete Slab: Proper Site Preparation
    34. Sudlow Concrete – Mistakes to Avoid When Pouring Concrete
    35. Concrete Network – 12 DIY Concrete Slab Mistakes to Avoid When Pouring
    36. Tolliver Paving – How Do You Properly Prepare A Site Before A Concrete Pour?
    37. USDA Plant Hardiness Zone Map
    38. AR Concrete Fayetteville – How Thick Should a Concrete Driveway Be in Arkansas?
  • Are Permits Required for Concrete Work in Arkansas?

    Are Permits Required for Concrete Work in Arkansas?

    Key Takeaways

    • Most concrete projects in Arkansas require permits if they connect to public roads, exceed $2,000 in project cost, or involve structural work like foundations
    • Driveways connecting to state highways always need an access driveway permit from ARDOT (Arkansas Department of Transportation) before construction begins[1]
    • Fayetteville and other Arkansas cities typically require building permits for concrete work including driveways, patios, and walkways larger than basic repairs[2]
    • Contractors must be licensed by the Arkansas Contractors Licensing Board for any project over $2,000 (residential) or $50,000 (commercial), and they should handle permit applications[3]
    • Calling 811 (Arkansas One Call) is mandatory at least two business days before any digging to mark underground utility lines – it’s free, safe, and required by law[4]

    Whether you need a permit for concrete work in Arkansas depends on your project type, location, and scope. For homeowners in Fayetteville and across Arkansas, understanding permit requirements protects you from code violations, ensures structural safety, and prevents costly mistakes. Most concrete projects exceeding $2,000 or connecting to public rights-of-way require permits from your local building department, while driveway access to state highways always needs ARDOT approval.

    Understanding Arkansas Concrete Permit Requirements

    Arkansas doesn’t have a single statewide permit rule that applies to all concrete work. Instead, permit requirements are determined by three key factors: your local municipality’s building codes, the Arkansas Department of Transportation regulations for road access, and state contractor licensing thresholds. This layered system means homeowners must check with multiple authorities depending on their project.

    The confusion around permits often stems from this multi-level regulatory structure. A patio built entirely on private property has different requirements than a driveway connecting to a public street. Understanding which authority governs your specific project saves time and prevents violations.

    State Highway Access Permits (ARDOT Requirements)

    If your concrete driveway connects to any Arkansas state highway, you must obtain an access driveway permit from the Arkansas Department of Transportation before starting construction. This requirement applies to both new driveway installations and modifications to existing driveways that access state-maintained roads.[1]

    ARDOT issues these permits through district offices to ensure driveways meet safety standards for sight distances, drainage, and traffic flow. The permit process typically requires submitting site plans showing the proposed driveway location, dimensions, and relationship to the highway. Professional concrete contractors familiar with Fayetteville and Northwest Arkansas projects understand ARDOT requirements and can navigate this process efficiently.

    According to ARDOT regulations, access driveway permits ensure that new connections to state highways don’t create safety hazards or drainage problems. The department reviews each application based on traffic volumes, highway classification, and local conditions. Homeowners attempting DIY driveway projects without this permit risk enforcement action and may be required to remove non-compliant work.[1]

    Local City and County Building Permits

    Beyond state highway requirements, most Arkansas cities and counties require building permits for concrete work. In Fayetteville, the Building Safety Division enforces codes based on Arkansas state building standards with local modifications. Concrete projects including driveways, patios, walkways, and slabs typically require permits when they’re not purely cosmetic maintenance.[2]

    Fayetteville’s permit requirements cover structural changes and new construction. While painting or minor surface repairs don’t need permits, installing a new concrete driveway or expanding a patio does. The city requires homeowners or contractors to obtain permits before starting work, with penalties up to $100 for starting without proper authorization.[5]

    Other Northwest Arkansas cities like Rogers, Springdale, and Bentonville have similar requirements. Rogers specifically requires building permits for all residential projects over $2,000 and commercial projects over $50,000, aligning with state contractor licensing thresholds.[6] Each municipality may have specific submission requirements including site plans, drawings, and project dimensions.

    When Permits Are NOT Required

    Certain concrete projects may not require permits in Arkansas, though exceptions vary by location. Generally, permits aren’t needed for:

    Small repairs and maintenance: Patching cracks, resurfacing existing concrete, or fixing minor damage typically falls under maintenance exemptions. However, replacing entire sections or expanding existing concrete usually requires permits.

    Private property projects with no public access: Concrete work entirely on private land that doesn’t affect drainage, utilities, or property lines may not require permits in some rural or unincorporated areas. This exemption is rare and should always be confirmed with local authorities.[7]

    Small decorative elements: Stepping stones, small garden borders, or minimal landscaping features under 200 square feet sometimes avoid permit requirements, though zoning approval may still be needed for accessory structures.

    Even when permits aren’t strictly required, Arkansas law mandates calling 811 before any excavation. This free service from Arkansas One Call protects homeowners from hitting underground utilities, which could result in injuries, service interruptions, and costly repairs.[4]

    Arkansas Contractor Licensing and Permit Responsibilities

    The Arkansas Contractors Licensing Board plays a crucial role in permit requirements through licensing thresholds. Any contractor performing work over $2,000 on residential projects (including labor and materials) must hold an appropriate Arkansas contractor license.[3] This means most concrete driveways, patios, and walkways require a licensed contractor since typical projects exceed this amount.

    For homeowners in Fayetteville, this licensing requirement provides important protections. Licensed contractors understand local permit requirements and typically handle the permitting process as part of their service. They pull necessary permits, schedule required inspections, and ensure work meets code requirements. According to the Arkansas Contractors Licensing Board, properly licensed contractors must handle permit applications for projects they undertake, removing this burden from homeowners.[3]

    Types of Arkansas Contractor Licenses

    Arkansas offers several contractor license types relevant to concrete work:

    Residential Builders License: Required to build single-family residences when project costs exceed $2,000. This license also covers residential remodeling and allows contractors to perform most concrete work on homes.[8]

    Residential Remodelers License: Needed for major structural changes or additions to existing single-family residences over $2,000. This applies to many concrete projects including foundation work and major driveway installations.[8]

    Commercial License: Required for any commercial project exceeding $50,000. Since most projects not involving single-family residences are considered commercial, this includes concrete work at apartment buildings, businesses, and multi-unit properties.[3]

    Homeowners should always verify their contractor holds the appropriate license before starting work. The Arkansas Contractors Licensing Board maintains a searchable database of licensed contractors. Working with unlicensed contractors voids permit protections and may leave homeowners liable for substandard work.

    Who Pulls the Permits?

    When hiring a licensed contractor for concrete work in Arkansas, the contractor typically pulls all necessary permits as part of their service. This arrangement benefits homeowners because professional contractors understand local requirements, have established relationships with building departments, and know which documents and fees are needed.

    For homeowner DIY projects, the property owner can apply for permits directly. However, homeowners should carefully consider their capabilities. Concrete work involves specialized knowledge of Arkansas soil conditions, proper grading for the region’s clay soils, and understanding how freeze-thaw cycles affect installations in Northwest Arkansas. Even when legally allowed to self-permit, many homeowners find that hiring licensed professionals provides better long-term results.

    Project TypePermit Typically Required?Governing AuthorityWho Should Pull Permit
    Driveway to State HighwayYesARDOTLicensed Contractor
    Driveway Within City LimitsYes (Usually)Local Building DepartmentLicensed Contractor or Homeowner
    Concrete Patio (New Construction)Yes (Usually)Local Building DepartmentLicensed Contractor or Homeowner
    Structural Foundation WorkYes (Always)Local Building DepartmentLicensed Contractor
    Concrete Slab on Private LandSometimesLocal Building DepartmentVerify with Local Authority
    Minor Repairs/ResurfacingUsually NotN/AN/A
    Walkway/Sidewalk (Private)SometimesLocal Building DepartmentVerify with Local Authority
    Walkway/Sidewalk (Public ROW)YesCity/County + ARDOT (if applicable)Licensed Contractor

    The Arkansas Concrete Permit Application Process

    Obtaining permits for concrete work in Arkansas follows a systematic process, though specific requirements vary by jurisdiction. Understanding the typical steps helps homeowners plan their projects and avoid delays.

    Step 1: Contact Your Local Building Department

    Before starting any concrete project in Fayetteville or elsewhere in Arkansas, contact your local building department to determine exact permit requirements. For Fayetteville residents, the Building Safety Division can be reached at 479-575-8238 to clarify whether your specific project needs a permit.[2]

    During this initial contact, ask about: Required documentation (site plans, property surveys, engineering drawings) Permit fees for your project type Timeline for permit approval Inspection requirements during and after construction Any special requirements for your property’s zoning or location

    Step 2: Call 811 Before You Dig

    Arkansas law requires calling 811 (Arkansas One Call) at least two business days before any excavation. This free service arranges for professional locators to mark underground utility lines including electric, gas, water, telecommunications, and cable.[4]

    You can call 811 or 1-800-482-8998, or submit requests online through Arkansas811.com. Locators will mark utilities with color-coded flags or paint: red for electric lines, yellow for gas, orange for telecommunications, and other colors for different utilities. Even small concrete projects require this step, as underground utilities can be located only inches below the surface.[9]

    Failure to call 811 before digging is illegal in Arkansas and can result in fines, liability for utility damage, and serious safety hazards. According to Arkansas One Call, homeowners should wait until utilities are marked before beginning any excavation work for concrete projects.[4]

    Step 3: Submit Permit Application and Required Documents

    Once you’ve determined permit requirements and had utilities marked, submit your permit application to the appropriate authority. For city projects in Fayetteville, applications go to the Building Safety Division. For driveways accessing state highways, submit to your local ARDOT district office.

    Typical permit application requirements include: Completed application form with property information Site plan showing project location, dimensions, and proximity to property lines Proof of contractor licensing (if applicable) Permit fees (typically $50-$200 for residential concrete projects, varying by jurisdiction) Engineering documents (for structural or complex projects)

    Processing times vary but typically range from 3-10 business days for straightforward concrete projects. Complex projects or those requiring zoning review may take longer. Building departments may request additional information or modifications before approving permits.

    Step 4: Schedule and Pass Required Inspections

    After permit approval, Arkansas building codes require inspections at specific project stages. For concrete work, inspections typically occur before concrete is poured (to verify proper base preparation, forms, and reinforcement) and after project completion (to confirm the work meets approved plans and code requirements).

    Professional contractors schedule these inspections and ensure work is ready for inspection. For homeowner DIY projects, contact your building department to schedule inspections at appropriate stages. Never pour concrete or backfill excavations before required inspections, as inspectors need to verify work before it’s covered.

    Failed inspections require corrections before proceeding. Common issues in Arkansas concrete work include improper drainage, insufficient base preparation for clay soils, inadequate reinforcement, or deviations from approved plans. Working with experienced contractors familiar with local requirements helps avoid inspection failures.

    Why Arkansas Concrete Permit Requirements Exist

    Permit requirements serve important purposes beyond bureaucratic process. Understanding why Arkansas requires permits for concrete work helps homeowners appreciate their value.

    Safety and Structural Integrity

    Concrete structures must safely support their intended loads and withstand Arkansas’s climate conditions. Building codes ensure concrete work meets minimum standards for thickness, reinforcement, and construction quality. In Fayetteville and Northwest Arkansas, this includes accounting for clay soil expansion, freeze-thaw cycles, and proper drainage to prevent premature failure.[10]

    Inspections catch problems before they become expensive failures. Inadequate base preparation, improper concrete mix, or missing expansion joints can cause cracking, settling, or complete structural failure within months. Permitted work provides documentation and accountability, protecting homeowners’ investments.

    Property Value and Resale Protection

    Unpermitted concrete work creates problems when selling your home. Buyers’ home inspectors and lenders often require proof that major improvements were permitted and inspected. According to real estate experts, unpermitted work can delay or prevent home sales, reduce property values, or require expensive corrections before closing.[11]

    Properly permitted and inspected concrete driveways can recover up to 80% of installation costs in increased home value. This return on investment disappears if work is unpermitted or fails to meet code requirements.

    Utility Protection and Public Safety

    Permit requirements integrate with Arkansas One Call (811) to protect underground utilities. Concrete excavation without utility location causes gas leaks, power outages, water main breaks, and telecommunications disruptions. These incidents endanger lives, disrupt communities, and leave property owners liable for damage costs that can reach tens of thousands of dollars.[4]

    The permit process ensures contractors and homeowners follow safety protocols. Building departments verify that projects comply with setback requirements, don’t block easements, and maintain proper drainage that doesn’t flood neighboring properties.

    Drainage and Environmental Compliance

    Arkansas’s humid subtropical climate makes proper drainage critical for concrete projects. Permits ensure new concrete work doesn’t create flooding problems, redirect stormwater onto neighbors’ property, or violate environmental regulations.

    Fayetteville’s rolling terrain and clay soils require careful attention to grading and drainage. Building departments review projects to ensure compliance with stormwater management requirements. Unpermitted work that creates drainage problems can result in enforcement action, required corrections, and liability for damage to neighboring properties.

    Fayetteville and Northwest Arkansas Specific Considerations

    Concrete work in Fayetteville and surrounding Northwest Arkansas communities faces unique challenges that make understanding permit requirements especially important.

    Clay Soil Conditions

    Northwest Arkansas, including Fayetteville, features clay-based soils that expand and contract with moisture changes. These soil characteristics require special attention to base preparation, proper compaction, and adequate concrete thickness. Building inspections verify contractors properly address clay soil issues, which are critical for long-lasting concrete installations in the region.[10]

    Permitted work ensures contractors follow best practices for Arkansas clay soils: removing organic topsoil, compacting the subgrade thoroughly, and installing proper base layers. These steps prevent the settling and cracking that plague improperly prepared concrete in clay soil areas.

    Freeze-Thaw Cycle Impacts

    While Arkansas experiences milder winters than northern states, Fayetteville and the Ozark region encounter occasional freeze-thaw cycles. Water infiltrating concrete expands when freezing, causing cracks and spalling. Properly permitted concrete work includes appropriate air entrainment, proper joint spacing, and adequate thickness to resist freeze-thaw damage.

    Building code requirements address these climate-specific factors. Inspectors verify concrete specifications match local conditions, protecting homeowners from premature deterioration.

    University of Arkansas Area Considerations

    Properties near the University of Arkansas campus or in established neighborhoods like Wilson Park face additional scrutiny for concrete work. Historic district requirements, homeowners’ association rules, or special zoning provisions may impose additional standards beyond basic permit requirements.

    Homeowners in these areas should contact Fayetteville’s Planning Division in addition to the Building Safety Division to ensure compliance with all applicable regulations. Professional contractors familiar with Fayetteville’s various neighborhoods understand these nuanced requirements.

    Common Permit Violations and How to Avoid Them

    Understanding common permit-related mistakes helps Arkansas homeowners avoid costly problems.

    Starting Work Before Permit Approval

    The most common violation is beginning concrete work before obtaining required permits. Fayetteville and other Arkansas cities can levy penalties, stop work orders, and require permit applications after the fact with additional fees. Some jurisdictions assess “after-the-fact” permit fees at double the standard rate.[5]

    Even when contractors promise to “handle the permits later,” homeowners remain ultimately responsible for unpermitted work on their property. Always verify permits are approved before allowing concrete work to begin.

    Hiring Unlicensed Contractors

    Working with unlicensed contractors creates multiple problems. Arkansas law requires contractor licensing for projects over $2,000, and properly licensed contractors must pull necessary permits. Unlicensed contractors often skip permits entirely or lack the knowledge to obtain them correctly.[3]

    Homeowners who hire unlicensed contractors face liability for unpermitted work, have no recourse through the Contractors Licensing Board if problems arise, and may find their homeowners’ insurance doesn’t cover damage from unlicensed work.

    Skipping Required Inspections

    Some contractors or DIY homeowners attempt to avoid inspections by covering work before inspectors review it. This violation can result in requirements to expose covered work, failed inspections, and potential requirements to remove and replace non-compliant concrete.

    Follow the inspection schedule outlined in your permit. Professional contractors coordinate inspections as part of their service, ensuring work proceeds smoothly through all required checkpoints.

    Not Calling 811 Before Excavation

    Failing to call Arkansas One Call before digging is both illegal and dangerous. Homeowners who skip this step risk hitting underground utilities, causing injuries, service outages, and expensive emergency repairs. Additionally, utility companies may hold property owners financially liable for damage to their infrastructure.[4]

    The 811 call takes minutes and costs nothing. Professional utility locators mark your property within two business days, allowing safe excavation for concrete projects.

    Common ViolationPotential ConsequencesHow to Avoid
    Starting work without permitStop work orders, double permit fees, removal requirementsObtain all permits before beginning any construction
    Using unlicensed contractorsNo permit protection, no legal recourse, insurance issuesVerify contractor license with Arkansas Contractors Licensing Board
    Skipping 811 utility locationUtility damage, injuries, fines, liability for repairsCall 811 at least 2 business days before any excavation
    Missing required inspectionsFailed permits, removal of non-compliant work, additional costsSchedule all required inspections before covering work
    Deviating from approved plansFailed inspections, permit violations, required correctionsFollow approved plans exactly or submit change requests
    Ignoring drainage requirementsNeighbor complaints, legal liability, required correctionsEnsure proper grading per approved plans and local codes

    Working With Professional Contractors for Permitted Concrete Work

    Hiring experienced, licensed contractors simplifies the permit process and ensures compliance with Arkansas regulations.

    What Licensed Contractors Should Provide

    When hiring a contractor for concrete work in Fayetteville or elsewhere in Arkansas, expect these professional standards:

    Proof of licensing: Contractors should provide their Arkansas contractor license number, which you can verify through the Arkansas Contractors Licensing Board website or by calling 501-372-4661.[12]

    Permit handling: Professional contractors pull necessary permits, pay permit fees (typically included in project quotes), and coordinate all required inspections. They should explain which permits your project needs and handle the application process.

    Insurance documentation: Licensed contractors carry general liability insurance and workers’ compensation coverage. Request certificates of insurance before signing contracts to protect yourself from liability for on-site injuries or property damage.

    Written contracts: All work should be documented in written contracts specifying project scope, materials, timeline, payment terms, and permit responsibilities. Arkansas law requires written contracts for work exceeding $2,000.[3]

    Code compliance expertise: Experienced contractors understand Arkansas building codes, local requirements, and climate-specific considerations. They should explain how your project addresses soil conditions, drainage, and other regional factors.

    Questions to Ask Potential Contractors

    Before hiring a contractor for permitted concrete work, ask:

    “What is your Arkansas contractor license number?” Verify the response through official channels. Licensed contractors readily provide this information.

    “Which permits does my project require?” Professional contractors clearly explain permit requirements and their process for obtaining them.

    “Will permit fees be included in your quote?” Understand whether your contract includes permit costs or if they’ll be additional expenses.

    “How long will the permit process take?” Experienced contractors provide realistic timelines based on local processing times.

    “What inspections are required and who schedules them?” Contractors should handle inspection scheduling and ensure work is ready when inspectors arrive.

    “Do you have experience with Fayetteville/Arkansas soil conditions?” Local expertise matters for addressing clay soils, drainage, and climate factors.

    The Value of Local Expertise

    Contractors familiar with Fayetteville and Northwest Arkansas bring valuable local knowledge. They understand Fayetteville’s building department procedures, have relationships with local inspectors, and know how to navigate ARDOT requirements for state highway access.

    Local contractors also understand regional challenges like clay soil preparation, proper drainage for Arkansas’s humid climate, and appropriate concrete specifications for freeze-thaw resistance. This expertise prevents problems that plague concrete installations by contractors unfamiliar with Arkansas conditions.

    Permit Costs and Project Budgeting

    Understanding permit costs helps homeowners budget accurately for concrete projects in Arkansas.

    Typical Arkansas Permit Fees

    Permit fees vary by jurisdiction and project scope, but typical ranges for concrete work in Arkansas include:

    City building permits: $50-$200 for standard residential concrete projects like driveways and patios. Larger or more complex projects may incur higher fees based on project valuation.[2]

    ARDOT access driveway permits: Fees vary by district but typically range from $50-$150 for residential driveway connections to state highways.[1]

    Inspection fees: Some jurisdictions charge separate inspection fees ($25-$75 per inspection) while others include inspection costs in base permit fees.

    Plan review fees: Complex projects requiring engineering review may incur additional plan review fees based on project valuation.

    According to industry sources, building permit fees for Arkansas homes typically range from $800-$1,800 when constructing new homes, but individual concrete projects have much lower permit costs.[13]

    Total Project Costs Including Permits

    When budgeting for concrete work, permit fees represent a small fraction of total costs. For example, typical Fayetteville concrete driveway projects cost $6-$10 per square foot for standard installation. A 400-square-foot driveway (12 feet x 33 feet) costs $2,400-$4,000 for materials and installation, with permit fees adding perhaps $100-$200 to the total.[14]

    Professional contractors typically include permit fees in their project quotes, simplifying budgeting. Always request itemized quotes showing permit fees separately so you understand all project costs.

    Homeowner Exemptions and DIY Considerations

    Arkansas law allows property owners to perform work on their own homes without contractor licensing, but permits are still generally required. Understanding these exemptions helps homeowners who prefer DIY concrete projects.

    The Homeowner Exemption

    According to the Arkansas Contractors Licensing Board, property owners can perform “home improvement” work on their own single-family residence without a contractor license. This exemption applies whether you live in the home or it’s a rental property you own.[15]

    However, this exemption doesn’t eliminate permit requirements. Homeowners must still obtain building permits for concrete work requiring them and follow all code requirements. The exemption only allows working without a contractor license – it doesn’t bypass building codes or inspection requirements.

    For homeowners hiring contractors, remember that the contractor performing the work must be licensed if the project exceeds $2,000. The homeowner exemption doesn’t extend to contractors you hire, even if you purchase materials separately.[15]

    Challenges of DIY Permitted Concrete Work

    While homeowners legally can tackle their own concrete projects, several factors make this challenging:

    Technical complexity: Quality concrete work requires understanding mix design, proper reinforcement, joint placement, and finishing techniques. Arkansas’s clay soils and climate add complexity that professional contractors navigate through experience.

    Equipment requirements: Concrete projects need specialized tools including mixers, screeds, floats, edgers, and groover tools. Renting or purchasing these tools adds costs that narrow the DIY savings gap.

    Physical demands: Concrete work is physically demanding, requiring heavy lifting, extended periods of kneeling or bending, and working within tight time constraints as concrete sets.

    Permit and inspection knowledge: Navigating permit applications, understanding code requirements, and preparing for inspections requires research and attention to detail. Mistakes can lead to failed inspections and required corrections.

    Timing and weather: Concrete installation depends on suitable weather conditions and requires completing all finishing work before the concrete sets. DIY homeowners may lack flexibility to respond to weather changes or complete work efficiently.

    When to Hire Professionals vs. DIY

    Consider hiring licensed professionals for:

    • Projects requiring ARDOT permits or complex permitting
    • Structural concrete like foundations or load-bearing slabs
    • Large projects (over 200 square feet) requiring significant excavation
    • Work in areas with difficult access or challenging site conditions
    • Projects where mistakes would be expensive to correct
    • Any work you’re not confident completing to code standards

    DIY may be appropriate for:

    • Small, non-structural projects like garden stepping stones
    • Projects with clearly defined permit requirements and simple inspection processes
    • Work where you have relevant experience or skills
    • Projects where you can work flexibly around weather and personal schedule

    Even when considering DIY, consult with professional contractors. Many offer consultation services or can review your plans to ensure code compliance. The cost of professional advice often prevents expensive mistakes.

    Conclusion

    Navigating permit requirements for concrete work in Arkansas doesn’t have to be overwhelming. Most concrete projects in Fayetteville and across Arkansas require permits – whether from your local building department, ARDOT for state highway access, or both. The key to success is understanding which authorities govern your specific project and working with licensed contractors who handle permitting as part of their professional service.

    Remember these essential steps: contact your local building department early in project planning to clarify permit requirements, verify any contractor you hire holds appropriate Arkansas licensing, always call 811 at least two business days before excavation, and never skip required inspections. These simple practices protect your investment, ensure code compliance, and create concrete installations that withstand Arkansas’s unique climate challenges for decades.

    For homeowners in Fayetteville and Northwest Arkansas, working with experienced local contractors familiar with regional soil conditions, drainage requirements, and climate considerations provides the best results. Professional contractors navigate permit processes efficiently, ensuring your concrete driveway, patio, or walkway meets all requirements while delivering the durability and appearance you expect.

    Ready to start your concrete project with confidence? Contact AR Concrete Fayetteville for expert guidance on permit requirements and professional installation that exceeds Arkansas building standards. Our licensed team handles all aspects of permitting and ensures your project succeeds from planning through final inspection.

    Do You Need a Permit for Concrete in Arkansas FAQs

    Do I need a permit for a concrete driveway in Fayetteville Arkansas?

    Yes, most concrete driveways in Fayetteville require permits from the city’s Building Safety Division, especially for new installations or major replacements. If your driveway connects to a state highway, you’ll also need an access driveway permit from ARDOT. Small repairs or resurfacing typically don’t require permits, but it’s best to confirm with the Building Safety Division at 479-575-8238 before starting work.[2]

    Do I need a permit for a concrete patio in Arkansas?

    Concrete patios typically require building permits in Arkansas cities including Fayetteville, especially for new construction or substantial expansions. Small decorative elements or minor repairs may not need permits, but most patio projects over 100 square feet will require permits and inspections. Your local building department can confirm requirements for your specific project based on size, location, and complexity.[5]

    What happens if I pour concrete without a permit in Arkansas?

    Pouring concrete without required permits in Arkansas can result in stop-work orders, fines, and requirements to remove non-compliant work. Many jurisdictions charge double permit fees for after-the-fact permits, and unpermitted work can create problems when selling your home. Additionally, unpermitted work may not be covered by homeowners insurance if problems arise, and you may face enforcement action from your city or county building department.[5]

    How much does a concrete permit cost in Arkansas?

    Concrete permit costs in Arkansas vary by jurisdiction and project scope, but typically range from $50-$200 for standard residential projects like driveways and patios. ARDOT access driveway permits for connections to state highways typically cost $50-$150. Some cities charge additional inspection fees while others include inspection costs in base permit fees. Your contractor should include permit fees in their project quote, or you can contact your local building department for exact fees for your specific project.[1][2]

    Do contractors need to be licensed to pour concrete in Arkansas?

    Yes, contractors performing concrete work valued at more than $2,000 (including labor and materials) on residential projects must hold an appropriate Arkansas contractor license from the Arkansas Contractors Licensing Board. For commercial projects, licensing is required for work exceeding $50,000. Homeowners can perform work on their own single-family residence without a license, but contractors you hire must be properly licensed. You can verify contractor licensing at labor.arkansas.gov or by calling 501-372-4661.[3][8]

    Do You Need a Permit for Concrete in Arkansas Citations

    1. Arkansas Department of Transportation. “Access Driveway Permits.” ARDOT Permits Division.
    2. City of Fayetteville Arkansas. “Permitting Services.” City of Fayetteville Building Safety Division.
    3. Arkansas Department of Labor and Licensing. “Apply for Contractors License/Registration.” Arkansas Contractors Licensing Board.
    4. Arkansas One Call. “Call 811 Before You Dig.” Entergy Arkansas Safe Digging Guidelines.
    5. NWA Decks & Patios. “What Home Projects Do You Need a Building Permit For in Fayetteville, AR?” (2021).
    6. City of Rogers Arkansas. “Contractor Licensing Requirements.” City of Rogers Building Department.
    7. Arkansas Attorney General. “File an 811 Complaint.” Arkansas Underground Facilities Damage Prevention Act Enforcement.
    8. Procore. “Arkansas Contractor Licensing Requirements: A Complete Guide.” (2024).
    9. Conway Corp. “Call Before You Dig.” (2023).
    10. AR Concrete Fayetteville. “How Thick Should a Concrete Driveway Be in Arkansas?” AR Concrete Fayetteville Blog.
    11. Today’s Homeowner. “How Much Does it Cost to Build a House in Arkansas?” (2025).
    12. Arkansas Contractors Licensing Board. “Home Page.” Arkansas Contractors Licensing Board Official Website.
    13. Today’s Homeowner. “How Much Does it Cost to Build a House in Arkansas?” Building Permit Fees Section. (2025).
    14. HomeBlue. “Concrete Driveway Cost in Fayetteville, Arkansas.” (2025).
    15. Arkansas Contractors Licensing Board. “Frequently Asked Questions.” (2020).
  • What’s the best concrete mix for hot Arkansas summers?

    What’s the best concrete mix for hot Arkansas summers?

    Key Takeaways:

    • Type II or Type IV Portland cement combined with 15-30% fly ash or slag delivers optimal heat control for Arkansas summer conditions
    • Water-reducing and retarding admixtures extend working time and prevent premature setting when temperatures exceed 85°F
    • Keeping fresh concrete below 90°F at placement prevents thermal cracking and maintains 28-day strength targets of 4000-4500 PSI
    • Chilled mixing water or ice reduces initial concrete temperature by 10-15°F, buying crucial placement time during Fayetteville’s peak summer heat
    • Proper mix design costs an additional $5-12 per cubic yard but prevents expensive repairs from heat-induced cracking

    The best concrete mix for hot Arkansas summers uses Type II or Type IV Portland cement blended with 15-30% fly ash or slag, combined with retarding and water-reducing admixtures to control hydration rate and extend workability. This combination minimizes heat generation while maintaining the 4000-4500 PSI strength needed for Arkansas driveways, patios, and walkways.

    Understanding How Arkansas Summer Heat Affects Concrete Performance

    Fayetteville and Northwest Arkansas experience summer temperatures that regularly reach 89-90°F in July and August, with humidity levels between 73-78%.[1] These conditions create significant challenges for concrete placement and curing. When air temperatures exceed 85°F, concrete sets faster than normal, making finishing difficult and increasing the risk of surface cracking.

    Hot weather accelerates the chemical reaction between cement and water, known as hydration. While faster hydration sounds beneficial, it actually creates problems. Concrete mixed and placed in high temperatures develops less ultimate strength because rapid water evaporation disrupts proper curing. The surface dries and hardens while interior concrete remains plastic, causing internal stresses that lead to cracking.

    Arkansas homeowners need concrete that can withstand temperature fluctuations while maintaining structural integrity. Standard concrete mixes designed for moderate climates struggle in our regional summer conditions. Professional contractors use specialized hot weather mixes that cost $5-12 more per cubic yard but prevent thousands in repair expenses.

    The American Concrete Institute defines hot weather concreting as any combination of high ambient temperature, high concrete temperature, low humidity, or high wind speed that impairs concrete quality.[2] In Fayetteville, we often face all these conditions simultaneously during July and August, making proper mix design essential for long-term performance.

    Quick Decision Guide: Selecting Your Hot Weather Concrete Mix

    Mix ComponentStandard MixHot Weather MixBenefit for Arkansas Summers
    Cement TypeType I (General)Type II or IV30% less heat generation during curing
    PozzolansNone15-30% fly ash/slagReduces peak heat by 15-20°F
    Water TemperatureAmbient (75-85°F)Chilled or ice (40-50°F)Lowers mix temperature 10-15°F
    AdmixturesOptionalRetarder + water reducerExtends working time 60-90 minutes
    Target Placement TempNot specifiedBelow 90°FMaintains full 28-day strength
    Cost per Cubic Yard$130-150$135-162Prevents $2,000-5,000 repair costs

    Type II and Type IV Cement: Your Foundation for Heat Resistance

    Portland cement comes in different types, each formulated for specific conditions. For hot Arkansas summers, Type II and Type IV cement offer significant advantages over standard Type I cement. These specialized cements generate less heat during the hydration process, which is exactly what you need when ambient temperatures already push concrete toward problematic temperature ranges.

    How Type II Cement Controls Heat Generation

    Type II cement, often called moderate sulfate-resistant cement, produces approximately 15-20% less heat than Type I during the first seven days after placement.[3] This reduced heat output comes from modified chemical composition, specifically lower C3A (tricalcium aluminate) content. The lower heat generation means your concrete hardens more gradually, reducing thermal stress and cracking risk.

    Most ready-mix suppliers in Northwest Arkansas stock Type II cement because it works well for our climate conditions year-round. It costs approximately the same as Type I cement, making it an easy upgrade for summer projects. For a typical 4-inch thick Arkansas driveway, using Type II cement instead of Type I can reduce peak internal temperatures by 10-15°F during curing.

    When Type IV Cement Makes Sense for Large Projects

    Type IV cement, designed specifically for low heat applications, generates even less heat than Type II but takes longer to gain strength. This cement type works best for mass concrete placements like large foundation slabs or thick patio sections where heat buildup in the interior becomes problematic. Type IV cement produces approximately 40-50% less heat than Type I during the critical first week.[4]

    The trade-off with Type IV is slower strength development. Where Type I or II cement might reach 70% of design strength in seven days, Type IV might only reach 50%. For most residential projects in Fayetteville, Type II offers the best balance of heat control and strength development. Reserve Type IV for projects with thick sections exceeding 12 inches or when placement occurs during the hottest periods of July and August.

    Fly Ash and Slag: Reducing Heat While Boosting Long-Term Strength

    Supplementary cementitious materials transform good concrete into great concrete for Arkansas summers. Fly ash and ground granulated blast-furnace slag (GGBFS) replace a portion of Portland cement, reducing heat generation while improving long-term durability and strength.

    Understanding Fly Ash Percentages and Performance

    Fly ash, a byproduct from coal-fired power plants, comes in two classes with different properties. Class F fly ash contains less calcium and works best at 20-30% replacement of Portland cement. Class C fly ash has higher calcium content and is typically used at 15-25% replacement rates.[5] Both types slow the hydration reaction, extending working time and reducing peak temperatures.

    For hot Arkansas summers, aim for 20-25% fly ash replacement in residential concrete. This percentage reduces the heat of hydration by approximately 15-25°F compared to pure Portland cement mixes.[6] A standard residential driveway using 500 pounds of cement per cubic yard would replace 100-125 pounds with fly ash, costing about $3-5 less per cubic yard while improving hot weather performance.

    The benefits extend beyond temperature control. Fly ash improves workability, making concrete easier to place and finish even in hot conditions. It also reduces permeability, which helps Arkansas concrete resist moisture penetration and freeze-thaw damage during our occasional winter cold snaps. Long-term strength actually exceeds straight cement mixes, with fly ash concrete gaining strength for months after placement rather than weeks.

    Slag Cement for Maximum Durability

    Ground granulated blast-furnace slag offers similar benefits to fly ash with some distinct advantages. Slag can replace 25-50% of Portland cement while still meeting strength requirements.[7] It produces a denser concrete with lower permeability, which is valuable for Arkansas homeowners dealing with our clay-heavy soils and high annual rainfall.

    Slag cement creates a lighter-colored concrete than fly ash, which some homeowners prefer for aesthetic reasons. It also generates less heat during curing and continues to gain strength well beyond 28 days. The main drawback is slightly higher cost compared to fly ash, typically adding $2-4 per cubic yard to the mix price.

    Admixtures That Extend Your Working Time and Improve Results

    Chemical admixtures give contractors the flexibility to work with concrete during challenging summer conditions. Two admixture types are essential for hot weather success in Arkansas: retarders and water reducers.

    Retarding Admixtures for Extended Placement Time

    Retarding admixtures slow down the chemical reaction between cement and water, giving you more time to place, level, and finish concrete before it begins to set. In Fayetteville’s July heat, standard concrete might become unworkable in 60-90 minutes. A retarding admixture can extend that window to 3-4 hours, making it possible to complete large projects without rushing.[8]

    Retarders work by temporarily coating cement particles, delaying the formation of hydration products. Once the admixture breaks down, normal hydration resumes. This gives you the working time you need without sacrificing final strength. Most retarders cost $2-4 per cubic yard and are added at the batch plant based on expected ambient temperature and project duration.

    For Arkansas homeowners, this means contractors can pour your driveway or patio during cooler morning hours without worrying about the concrete setting before finishing work is complete. The extended working time also reduces surface defects and improves the final appearance of stamped or decorative concrete.

    Water-Reducing Admixtures for Strength and Workability

    Water-reducing admixtures allow concrete to maintain good workability while using less water. This is crucial because every gallon of excess water in your concrete mix reduces final strength and increases shrinkage cracking. Standard water reducers decrease water requirements by 5-10%, while high-range water reducers (superplasticizers) can reduce water needs by 12-25%.[9]

    The chemistry is straightforward. Water reducers disperse cement particles more effectively, allowing them to hydrate more completely with less water. Reducing water content from 0.50 to 0.45 water-cement ratio can increase 28-day strength by 15-20% while improving resistance to cracking and weathering.[10]

    For hot Arkansas summers, combination admixtures that provide both water reduction and set retardation (ASTM C494 Type D) offer the best performance. These cost-effective admixtures address multiple hot weather challenges simultaneously, typically adding $3-6 per cubic yard to your concrete cost.

    Cooling Techniques: Ice, Chilled Water, and Temperature Control

    Even with the best cement and admixtures, you still need to control the temperature of fresh concrete. The goal is keeping concrete below 90°F at placement to ensure proper strength development and prevent thermal cracking.

    Using Chilled Water and Ice

    The simplest way to reduce concrete temperature is chilling the mixing water or replacing part of it with ice. Water and ice make up about 15-18% of concrete’s weight but can significantly impact temperature. Replacing half the mixing water with ice can lower concrete temperature by 10-15°F.[11]

    When using ice, add it to the concrete mixer in flaked or crushed form so it melts during mixing. Large ice chunks won’t melt completely, creating weak spots in the finished concrete. Most ready-mix suppliers in Northwest Arkansas can provide chilled water or ice upon request, though it adds $5-10 per cubic yard to delivery costs.

    Cooling Aggregates and Timing Your Pour

    Aggregates (sand and stone) make up 60-75% of concrete’s volume, so their temperature greatly affects the final mix temperature. Shading aggregate piles and spraying them with water before batching can reduce their temperature by 10-20°F. Some contractors even use chilled water to cool aggregates for critical summer projects.

    Timing matters too. Pour concrete during the coolest part of the day, typically early morning or evening. In Fayetteville, morning temperatures of 70-75°F give you much better working conditions than afternoon temperatures of 90°F or higher. The concrete’s final temperature depends on the temperature of all ingredients plus the ambient air temperature.

    Maintaining Proper Strength: PSI Requirements for Arkansas Applications

    Your hot weather concrete mix must still meet strength requirements for its intended use. Arkansas residential driveways typically specify 4000-4500 PSI compressive strength at 28 days, while patios and walkways may use 3500-4000 PSI.[12]

    How Heat Affects Strength Development

    Concrete placed in hot weather initially gains strength faster but often achieves lower ultimate strength than concrete placed in moderate temperatures. This happens because rapid surface drying prevents complete hydration of cement particles. The outer inch or two of concrete may be strong, but the interior remains weaker than design specifications require.

    Proper mix design and curing prevent this problem. Using supplementary cementitious materials actually increases long-term strength even though early-age strength might be slightly lower. Fly ash concrete at 25% replacement might reach 3000 PSI at seven days but will achieve 5500 PSI at 90 days, exceeding the strength of straight cement concrete.

    Testing and Quality Control

    For critical projects, request test cylinders to verify your concrete meets strength specifications. Contractors should take samples during placement and cure them under the same conditions as your project. Testing at 7 and 28 days confirms whether the hot weather mix performed as designed.

    Cost Analysis: Investing in the Right Mix for Arkansas Conditions

    Hot weather concrete mixes cost more than standard mixes, but the investment prevents expensive failures and repairs. Here’s what to expect for pricing in the Fayetteville area for 2024-2025:

    Mix ComponentCost Impact per Cubic YardWhen to Use
    Standard Type I Mix$110-150 (baseline)Spring and fall projects
    Type II Cement$0-2 additionalAll summer projects
    20% Fly Ash Replacement$2-4 savingsAll residential applications
    Retarding Admixture$2-4 additionalTemps above 85°F
    Water-Reducing Admixture$3-6 additionalAll quality projects
    Chilled Water/Ice$5-10 additionalTemps above 90°F
    Complete Hot Weather Mix$135-162 totalJune-August placement

    For a typical 400-square-foot driveway using 5 cubic yards of concrete, the hot weather mix adds $25-60 to your total project cost. Compare that to repairing heat-induced cracking, which often costs $2,000-5,000 for diamond grinding, crack filling, and surface treatments. Spending an extra 2-3% on proper mix design prevents repairs costing 50-100% of the original installation.

    Practical Placement and Curing Strategies for Summer Success

    Even the best concrete mix fails without proper placement and curing practices. Arkansas contractors who specialize in summer concrete work follow specific protocols to ensure success.

    Pre-Placement Preparation

    Before concrete arrives, wet down subgrade and forms to prevent them from absorbing water from fresh concrete. Dry surfaces pull moisture away from concrete, causing rapid setting and surface defects. Have all tools ready and workers prepared so concrete placement can proceed without delays.

    Shade the work area if possible. A temporary canopy or tarp can reduce surface temperature by 10-15°F, giving you better working conditions. Plan your pour sequence so you’re not finishing large areas during the hottest part of the day.

    Curing in Hot Weather

    Proper curing is absolutely critical when placing concrete in Arkansas summers. Begin curing immediately after finishing. Apply a membrane-forming curing compound or cover the surface with wet burlap or plastic sheeting. The goal is preventing moisture loss for at least seven days, preferably 14 days.

    In hot, dry conditions, concrete can lose moisture so rapidly that surface cracking begins within 30 minutes of finishing. Use evaporation retarders during finishing to buy time until you can apply proper curing. For large flatwork projects, consider using water fog sprayers to maintain high humidity over the concrete surface.

    Common Hot Weather Concrete Problems and Prevention

    Plastic Shrinkage Cracking

    Plastic shrinkage cracks appear as shallow, irregular cracks while concrete is still plastic. They occur when surface moisture evaporates faster than bleed water rises to replace it. Hot, windy conditions with low humidity create ideal conditions for plastic shrinkage cracking. Prevention includes using water reducers to minimize bleed water, applying evaporation retarders during finishing, and starting curing immediately.

    Rapid Setting and Finishing Problems

    When concrete sets too quickly, finishers struggle to achieve proper surface texture and appearance. The concrete becomes stiff and unworkable before troweling is complete, resulting in surface defects and poor appearance. Using retarding admixtures and chilled mixing water prevents this problem by extending the working time to 2-3 hours even in 90°F temperatures.

    Reduced Long-Term Strength

    Concrete placed in hot weather without proper precautions often tests 10-20% below design strength at 28 days. This happens because rapid moisture loss prevents complete cement hydration. The solution involves proper mix design with supplementary cementitious materials and meticulous curing practices that maintain moisture for at least seven days.

    Expert Recommendations for Arkansas Homeowners

    According to the American Concrete Institute’s Guide to Hot Weather Concreting, “The combined effects of high concrete temperature, high ambient temperature, low relative humidity, and wind can significantly affect fresh and hardened concrete properties.”[13] For Fayetteville homeowners, this means summer concrete projects require extra attention to mix design and placement practices.

    Professional contractors should provide documentation of their hot weather procedures, including cement types, admixtures, and curing methods. Ask for references from summer projects completed in the past two years. Quality contractors understand that cutting corners on mix design or curing creates liability and callbacks.

    For projects scheduled during July and August, consider specifying strength testing at 56 or 90 days rather than 28 days when using high fly ash content. This accommodates the slower strength gain of supplementary cementitious materials while ensuring you receive concrete that exceeds minimum standards over time.

    Conclusion

    The best concrete mix for hot Arkansas summers combines Type II or Type IV cement with 20-25% fly ash or slag, enhanced with retarding and water-reducing admixtures. This mix design controls heat generation, extends working time, and maintains the 4000-4500 PSI strength your driveway or patio needs for decades of reliable service. While hot weather mixes cost $5-12 more per cubic yard than standard mixes, they prevent expensive cracking and surface defects that require costly repairs. Work with experienced contractors who understand Northwest Arkansas conditions and follow ACI 305 guidelines for hot weather concreting. With proper mix design, careful placement, and meticulous curing, your summer concrete project will deliver the durability and performance you expect from this premium building material.

    Best Concrete Mix for Hot Arkansas Summers FAQs

    What temperature is too hot for pouring concrete in Arkansas?

    When concrete temperature exceeds 90°F at placement, you risk reduced long-term strength and increased cracking. Plan pours for early morning when temperatures are 70-80°F, and use chilled water or ice to keep fresh concrete below 90°F.

    Can I use regular concrete mix in Arkansas summers?

    Regular Type I cement mixes work in moderate conditions but struggle when temperatures exceed 85°F. For reliable performance during Arkansas summers, upgrade to Type II cement with fly ash and proper admixtures.

    How much does hot weather concrete mix cost in Fayetteville?

    Hot weather mixes in the Fayetteville area cost $135-162 per cubic yard compared to $110-150 for standard mixes. The $5-12 per yard premium prevents expensive repairs from heat-induced cracking and surface defects.

    What’s the best time of day to pour concrete in summer?

    Early morning offers the best conditions for summer concrete placement in Arkansas. Starting between 6-8 AM gives you cooler temperatures of 70-75°F and higher humidity, both helping concrete cure properly.

    Do I need special curing methods for hot weather concrete?

    Hot weather concrete requires immediate curing using membrane-forming compounds or wet coverings. Begin curing within 30 minutes of finishing and maintain moisture for at least seven days to prevent surface cracking and strength loss.

    Best Concrete Mix for Hot Arkansas Summers Citations

    1. Weather Spark. (2024). Fayetteville Climate, Weather By Month, Average Temperature.
    2. American Concrete Institute. (2020). ACI 305R-20: Guide to Hot Weather Concreting.
    3. Portland Cement Association. (2024). Concrete Placement in Hot Weather.
    4. Redstone Construction Group. (2024). Best Cement Types for Hot Weather.
    5. Federal Highway Administration. (2024). Fly Ash in Portland Cement Concrete.
    6. Waycoochem. (2024). Top 4 Concrete Admixtures for Hot Climates.
    7. Precast.org. (2023). SCMs in Concrete.
    8. Concrete Network. (2025). Hot Weather Concreting Tips.
    9. EdenCrete. (2025). Concrete Admixture Types.
    10. For Construction Pros. (2024). How to Use Concrete Admixtures in Hot Weather.
    11. ECS Limited. (2024). Hot Weather Concrete.
    12. AR Concrete Fayetteville. (2024). How Thick Should a Concrete Driveway Be in Arkansas?
    13. American Concrete Institute. (2020). ACI 305R-20: Guide to Hot Weather Concreting.
  • How Do Local Soil Conditions Affect Concrete Installations?

    How Do Local Soil Conditions Affect Concrete Installations?

    Key Takeaways

    • Soil type determines load-bearing capacity and drainage performance beneath your concrete, with clay soils in Northwest Arkansas creating unique expansion and contraction challenges that can crack slabs if not properly managed.
    • Moisture content directly affects both installation quality and long-term durability, as extremely wet or dry soil interferes with proper concrete curing while seasonal moisture changes cause the freeze-thaw damage common in Fayetteville winters.
    • Proper soil compaction prevents 90% of concrete settling issues, but Arkansas’s expansive clay soils require professional testing to achieve the 95% density minimum that prevents future voids and structural failures.
    • Arkansas homeowners face specific soil challenges including Porters Creek Clay expansion, seasonal ground movement, and the need for specialized drainage solutions that protect concrete from our region’s 43-47 inches of annual rainfall.
    • Professional soil testing and preparation add upfront costs but prevent expensive repairs, with geotechnical evaluations costing $500-2,000 versus concrete replacement costs exceeding $8-15 per square foot when installations fail on unprepared soil.

    Local soil conditions play a critical role in determining whether your concrete installation lasts 30 years or develops cracks within the first season. The type of soil beneath your driveway installation or patio affects load-bearing capacity, drainage performance, and resistance to seasonal movement—factors that become especially important in Northwest Arkansas where expansive clay soils create unique challenges for homeowners planning concrete projects.

    Why Soil Matters for Concrete Success

    Think of soil as the foundation for your foundation. Even perfectly mixed and poured concrete will crack, settle, or heave if the ground beneath it cannot provide stable, uniform support. Soil conditions affect concrete installations in three fundamental ways that determine long-term performance.

    Load-Bearing Capacity Determines Structural Stability

    Different soil types handle weight differently. Sandy and gravelly soils typically support 2,000-3,000 pounds per square foot, making them excellent for concrete slabs.[1] Clay soils, which dominate much of Fayetteville and Northwest Arkansas, often provide only 1,500-2,000 pounds per square foot of bearing capacity when properly compacted.[2] This difference becomes critical when you consider that a typical concrete driveway with vehicles can exert pressures exceeding 1,000 pounds per square foot.

    Weak or unstable soils like uncompacted fill or organic-rich earth have even lower bearing capacity, sometimes under 1,000 pounds per square foot.[3] These soils compress under the weight of concrete and anything placed on top, creating the settling and sinking that causes cracked slabs and uneven surfaces. Professional contractors address this through soil removal, compaction, or using specialized foundation systems that distribute loads more effectively.

    Moisture Movement Creates Seasonal Pressure Changes

    Water in soil behaves differently depending on soil composition. Clay particles absorb water molecules into their chemical structure, causing significant volume expansion—sometimes increasing soil volume by 10% or more.[4][5] When that clay dries during Arkansas’s hot summers, it shrinks back down, creating a cycle of pressure that concrete simply cannot withstand long-term.

    This expansion and contraction cycle becomes particularly problematic in Fayetteville where we experience both wet springs with 43-47 inches of annual rainfall and dry summer periods.[6] The repeated stress manifests as cracks that start small but widen over time, eventually compromising the entire slab’s structural integrity. Sandy soils avoid this expansion problem but create different challenges with erosion and moisture loss that can undermine concrete support.

    Drainage Performance Prevents Water Damage

    How quickly water drains away from concrete determines whether moisture-related problems develop. Clay soils in Arkansas drain slowly—sometimes less than 0.06 inches per hour—allowing water to pool beneath slabs.[7] This standing water creates multiple problems: it saturates the soil, increasing expansion pressure; it can freeze in winter, causing frost heave; and it gradually erodes soil particles, creating voids beneath the concrete.

    Good drainage requires both proper soil characteristics and engineered solutions. Sandy and gravelly soils naturally drain at rates exceeding 2 inches per hour, but they need protection from erosion.[8] Clay-rich soils require intervention through grading, French drains, and permeable base layers that redirect water before it can accumulate and cause damage.

    Arkansas Soil Types and Their Concrete Challenges

    Northwest Arkansas sits in a geologically complex region where different soil types create varying challenges for concrete installations. Understanding which soil type exists on your property helps predict potential problems and plan appropriate solutions.

    Expansive Clay Soils: Arkansas’s Primary Concrete Challenge

    Much of Fayetteville and Northwest Arkansas sits atop expansive clay formations, particularly the Porters Creek Clay of the Midway Group.[9] This dark bluish-gray to black calcareous clay stretches in a continuous belt through central Arkansas and contains minerals like montmorillonite and smectite that make it highly reactive to moisture changes.[10]

    When saturated, these clays can generate expansion pressures exceeding 5,000 pounds per square foot—enough force to lift a concrete slab several inches or crack foundation walls.[11] The active zone, which is the depth where seasonal moisture changes occur, typically extends 3-5 feet below ground in Arkansas.[12] This means concrete slabs installed directly on expansive clay without proper preparation will experience movement throughout the year as the soil beneath them swells and shrinks.

    Contractors address expansive clay through several methods: removing and replacing with select fill, pre-wetting the soil before construction to limit future expansion, installing moisture barriers, or using post-tensioned concrete that can better accommodate some soil movement.[13] For driveways in areas with expansive clay, increasing concrete thickness to 5-6 inches provides additional resistance to cracking.

    Sandy and Loam Soils: Better Drainage, Different Risks

    Some areas of Northwest Arkansas, particularly near rivers and in alluvial zones, feature sandy or loam soils that offer advantages for concrete installations. These soils drain well, resist expansion and contraction, and compact effectively when properly prepared.[14] Loam, which contains a balanced mix of sand, silt, and clay particles, is considered the ideal soil for concrete foundations because it provides both stability and adequate drainage.[15]

    However, sandy soils present their own challenges. They erode easily when exposed to water flow, potentially creating voids beneath concrete slabs.[16] The loose, granular nature of sand also means it can shift under heavy loads if not properly compacted. Contractors working with sandy soils focus on achieving proper compaction density—typically 95% of maximum dry density—and installing drainage systems that prevent erosion while still allowing water to dissipate.

    Rocky and Gravelly Soils: Excavation Challenges with Stability Benefits

    Parts of the Ozark region around Fayetteville feature rocky or gravelly soils formed from weathered bedrock. These soils provide excellent bearing capacity and natural drainage, often supporting loads exceeding 3,000 pounds per square foot.[17] They resist expansion and contraction, making them stable foundations for concrete work.

    The primary challenge with rocky soils involves excavation difficulty and achieving proper grade for concrete installation. Large rocks must be removed or broken down to prevent creating voids beneath the slab. Once prepared, however, these soils provide some of the most reliable support for concrete projects. Many contractors view rocky subsoils as an advantage despite the extra preparation work required.

    How Soil Conditions Impact Different Concrete Projects

    Project TypePrimary Soil ConcernsRecommended Solutions
    DrivewaysLoad-bearing capacity for vehicles; expansion/contraction in clay; drainage4-6″ gravel base; 95% compaction; 5-6″ concrete thickness; proper drainage slope
    PatiosSettlement from poor compaction; moisture wicking; freeze-thaw damage4″ gravel base; vapor barrier; proper slope away from house; 4″ concrete minimum
    WalkwaysUneven settling creating trip hazards; cracking from soil movementConsistent base preparation; control joints every 4-5 feet; compacted subgrade
    Pool DecksExpansive clay heave; water saturation from pool; drainage around water featuresClay removal/replacement; drainage systems; possible structural slab design
    FoundationsLong-term stability; bearing capacity for structure weight; clay expansion pressureGeotechnical evaluation; deep footings; engineered fill; moisture control systems

    Understanding Soil Moisture and Concrete Performance

    Moisture content in soil affects concrete installations during both the construction process and throughout the life of the slab. Getting moisture levels right during installation determines curing quality, while managing long-term moisture prevents the most common concrete problems Arkansas homeowners face.

    Construction-Phase Moisture Considerations

    When contractors pour concrete, the soil beneath it should have optimal moisture content—not too dry and not saturated. Extremely dry soil acts like a sponge, drawing water from the fresh concrete mix.[18] This premature water loss prevents proper cement hydration, the chemical reaction that gives concrete its strength. The result is weaker concrete that may not reach its designed compressive strength of 3,000-4,000 PSI.

    Conversely, saturated soil cannot provide stable support during installation. Water-logged ground lacks bearing capacity, making it difficult to achieve proper compaction and grade. Many professional contractors lightly moisten dry subgrades before pouring concrete, providing just enough moisture for proper curing without creating instability. This balance becomes especially important in Arkansas during summer months when prolonged dry periods can desiccate clay soils.

    Long-Term Moisture Management Prevents Damage

    After installation, ongoing moisture management protects concrete from several damage mechanisms. In clay soils, maintaining relatively constant moisture levels minimizes the expansion and contraction cycle that causes cracking.[19] This doesn’t mean keeping soil saturated—rather, it means preventing dramatic moisture swings through proper drainage and sometimes irrigation during extreme dry periods.

    Poor drainage allows water accumulation beneath slabs, creating several problems. Saturated soil loses strength, increasing settlement risk. In winter, this water can freeze and expand, generating frost heave that lifts and cracks concrete.[20] Fayetteville typically experiences an estimated 20-30 freeze-thaw cycles per winter season, making frost damage a real concern for concrete installations without adequate drainage.[21]

    Effective moisture management combines surface grading that directs water away from concrete, subsurface drainage systems like gravel beds or perforated pipes, and proper site selection that avoids natural drainage channels or low-lying areas where water naturally accumulates during Arkansas’s frequent rainfall events.

    The Critical Importance of Soil Compaction

    Proper soil compaction is the single most important factor in preventing concrete settlement and failure. Even excellent soil can cause problems if not properly compacted, while marginal soil can perform well when compaction is done correctly. Understanding compaction principles helps homeowners evaluate whether their contractor is following best practices.

    What Compaction Achieves

    Compaction removes air voids from soil, increasing its density and load-bearing capacity. Loose, uncompacted soil might support only 500-800 pounds per square foot, while the same soil properly compacted can support 2,000-3,000 pounds per square foot or more.[22] This difference determines whether concrete settles over time or remains stable for decades.

    The compaction process involves applying mechanical force—through plate compactors, rollers, or tampers—while maintaining optimal moisture content. For most soils, this optimal moisture content allows soil particles to slide past each other and lock into a dense configuration. Too dry, and particles don’t pack effectively; too wet, and excess water prevents proper compaction.

    Compaction Standards and Testing

    Professional concrete installations follow specific compaction standards, typically requiring 95% of maximum dry density as determined by Proctor testing.[23] This testing method, codified in ASTM D698 and AASHTO T99, establishes the optimal moisture content and maximum achievable density for a given soil type.[24]

    Field testing verifies that installed soil meets these standards. Common testing methods include the nuclear density gauge, which provides quick results, and the sand cone test, which offers high accuracy at lower cost.[25] For residential concrete projects, contractors typically test every 50-100 cubic yards of fill material to ensure consistent compaction throughout the site.

    Compaction should occur in lifts—layers of 6-8 inches maximum thickness before compacting.[26] Attempting to compact thicker layers leaves loose soil in the middle, creating weak zones that will settle later. This lift requirement means that deep fills require multiple compaction cycles as material is placed, adding time and cost but ensuring proper support for concrete installations.

    Soil Testing: Knowing What You’re Building On

    Professional soil testing reveals the specific characteristics of earth on your property, allowing contractors to design concrete installations that address actual site conditions rather than making assumptions. While testing adds upfront cost, it prevents expensive failures and ensures installations perform as expected.

    Types of Soil Tests for Concrete Projects

    A basic geotechnical evaluation for residential concrete typically includes several tests. Soil classification determines the percentages of sand, silt, and clay, which indicates drainage characteristics and expansion potential.[27] Atterberg limits testing measures plasticity, revealing how much the soil will expand and contract with moisture changes.[28] This test is particularly important in Arkansas where expansive clays are common.

    Bearing capacity tests determine how much weight the soil can support. Standard Penetration Tests (SPT) measure soil resistance at different depths, helping engineers specify appropriate foundation designs.[29] For most residential driveways and patios, simplified bearing capacity estimates based on soil classification provide sufficient information, though critical structures like homes require more detailed analysis.

    Proctor compaction testing establishes the maximum dry density and optimal moisture content for site soils.[30] These parameters guide field compaction work, ensuring crews know exactly how dense the soil should be and what moisture content achieves that density. Without this information, achieving proper compaction becomes guesswork.

    When to Invest in Professional Testing

    Professional geotechnical evaluations for residential projects typically cost $500-2,000 depending on site size and testing depth.[31] This investment makes sense for several situations. Large projects like extensive driveways or patio installations exceeding 500 square feet justify testing costs by preventing expensive failures. Properties with visible soil problems—standing water, existing settlement, or cracks in nearby structures—definitely warrant testing before new concrete work.

    Areas with known expansive clay, including much of Northwest Arkansas, benefit from testing that quantifies expansion potential and guides mitigation strategies. Contractors planning significant grading or fill work should test to verify that imported materials meet project requirements. Even smaller projects benefit when homeowners want certainty about long-term performance and are willing to invest in doing things right from the start.

    Solutions for Challenging Soil Conditions

    When soil testing or site observation reveals problematic conditions, several proven solutions allow successful concrete installations even on challenging ground. The right approach depends on specific soil characteristics, project requirements, and budget considerations.

    Soil Removal and Replacement with Select Fill

    For highly expansive clay, organic-rich soil, or very weak subgrades, complete removal and replacement provides the most reliable solution. Contractors excavate problematic soil to depths of 12-24 inches or more, then backfill with select fill materials that offer superior properties.[32]

    Select fill typically consists of well-graded sand and gravel mixtures, crushed stone, or recycled concrete aggregate. These materials provide excellent bearing capacity (2,500-4,000 pounds per square foot when compacted), drain well, and resist expansion and contraction.[33] Common specifications include 3/4-inch crushed stone (ASTM #57) for the base layer with finer materials for the final lift that provides a smooth surface for concrete placement.[34]

    The excavation depth depends on problematic soil depth and the active zone for moisture changes. In Arkansas, excavating 12-18 inches typically removes the most problematic surface soil and provides sufficient depth for a well-compacted base. Deeper excavations become necessary when expansive clays extend several feet down or when bearing capacity is exceptionally poor.

    Moisture Control and Stabilization Methods

    Rather than removing expansive clay, some situations allow stabilization through moisture control. Pre-wetting involves saturating the soil before construction, allowing it to expand fully before placing concrete.[35] This technique works best when clay depth is limited and when adequate time (several weeks) exists for the soil to equilibrate at its expanded state.

    Chemical stabilization using lime or cement modifies clay properties, reducing plasticity and expansion potential while improving strength.[36] Lime treatment is particularly effective for Arkansas’s expansive clays. Contractors typically apply 3-6% hydrated lime by soil weight, mixing it thoroughly into the top 6-12 inches of soil. The lime reacts with clay minerals, creating a more stable matrix that resists moisture-induced volume changes.

    Installing moisture barriers beneath concrete slabs helps regulate moisture movement from soil into concrete while also preventing downward moisture loss from freshly placed concrete during curing. Polyethylene sheeting (6-mil minimum thickness) serves as an effective vapor barrier, though it should be placed over a sand layer to prevent punctures and provide a smooth surface for concrete placement.

    Enhanced Drainage Systems

    Comprehensive drainage solutions address water accumulation that exacerbates soil problems. Surface grading should slope away from concrete at minimum 2% grade (1/4 inch per foot), directing rainfall and runoff away from slabs before it can penetrate beneath them.[37]

    Subsurface drainage becomes necessary in low-lying areas or where clay soils prevent adequate percolation. French drains—perforated pipes surrounded by gravel—collect groundwater and direct it to appropriate discharge points.[38] For concrete slabs, installing a 4-6 inch gravel base beneath the concrete serves dual purposes: it provides a stable base and acts as a drainage layer that prevents water accumulation directly under the slab.

    Around the perimeter of driveways and patios, edge drains intercept surface water before it can infiltrate beneath the concrete edges, which are vulnerable points where water commonly enters and causes erosion or frost damage.

    Northwest Arkansas-Specific Soil Considerations

    Fayetteville and surrounding Northwest Arkansas communities face unique soil challenges that affect concrete installation planning and performance. Understanding these local factors helps homeowners and contractors make informed decisions.

    Porters Creek Clay and Expansive Soil Zones

    The Porters Creek Clay formation creates a continuous belt of highly expansive soils through central Arkansas, extending through parts of the Fayetteville area.[39] This calcareous clay contains smectite clay minerals that can expand up to 15% in volume when saturated, generating pressures that easily crack concrete slabs and damage foundations.

    Properties located within this geological zone require special attention to soil preparation. Homeowners should expect recommendations for deeper excavation, select fill replacement, or specialized foundation systems. Contractors familiar with Arkansas soil conditions will identify Porters Creek Clay indicators—dark gray to black coloration, high plasticity when wet, and hard, blocky structure when dry.

    Seasonal Moisture Variations and Temperature Cycles

    Northwest Arkansas experiences pronounced seasonal changes that affect soil moisture and concrete performance. Spring and late fall typically bring heavy rainfall, saturating soils and creating maximum expansion in clay formations.[40] Summer heat then dries surface soils, causing contraction. This annual cycle creates repetitive stress on concrete installations.

    Winter freeze-thaw cycles, while less severe than northern states, still impact concrete durability. Fayetteville typically sees an estimated 20-30 cycles per winter where temperatures cross the freezing point.[41] When combined with moisture in inadequately drained soil, these cycles create internal pressure as water freezes and expands in concrete pores and beneath slabs. Using air-entrained concrete (containing 4-6% microscopic air bubbles) provides protection by giving frozen water expansion space without cracking the concrete matrix.[42]

    Ozark Topography and Drainage Challenges

    The rolling hills characteristic of the Ozark region create natural drainage patterns that affect where water accumulates. Properties on slopes might experience good natural drainage but face challenges with erosion beneath concrete. Low-lying properties often battle seasonal water accumulation that saturates soil and undermines concrete support.

    Successful concrete installations in this topography require careful site grading that works with natural drainage rather than fighting it. Driveway installations on slopes need proper base preparation to prevent washout during heavy rains, while low-elevation sites might require raised grade or enhanced subsurface drainage.

    Soil TypeStability RatingDrainage QualityPrimary Arkansas Challenges
    Expansive ClayPoor (swells/shrinks)Very PoorSeasonal cracking, heaving, moisture retention, Porters Creek Clay expansion
    Sandy LoamGood (stable)ExcellentErosion during heavy rains, compaction requirements, limited availability
    LoamExcellent (ideal)GoodMinimal if properly compacted; may contain some clay content in Arkansas
    Rocky/GravelExcellentExcellentExcavation difficulty, achieving proper grade, removal of large rocks
    Organic/PeatVery Poor (unstable)VariableOngoing decomposition, settling, requires complete removal for concrete

    Cost Implications of Soil Conditions

    Understanding soil conditions affects project budgets significantly. While proper soil preparation adds upfront costs, it prevents far more expensive repairs when installations fail due to inadequate preparation.

    Basic soil testing for residential concrete projects runs $500-2,000 depending on site size and complexity.[43] Select fill materials cost $30-80 per cubic yard delivered, with typical residential driveways requiring 10-20 cubic yards for adequate base preparation.[44] Compaction services add $200-500 for equipment rental and operator time on smaller projects.

    Compare these costs to concrete replacement: full slab removal and reinstallation typically costs $8-15 per square foot.[45] A 500-square-foot driveway replacement runs $4,000-7,500—far more than the $1,500-2,500 additional cost of proper soil preparation during initial installation. Foundation repair for settlement caused by poor soil preparation can exceed $10,000 for residential structures.

    Premium solutions like chemical stabilization or deep excavation add 15-30% to base project costs but provide long-term value through superior performance.[46] Homeowners should view soil preparation as essential insurance rather than optional expense, particularly in Northwest Arkansas where expansive clay soils make problems highly likely without proper preparation.

    Expert Perspective on Soil and Concrete

    According to the American Concrete Institute’s guide to floor and slab construction, “The soil support system beneath a concrete slab is there to support the slab. Soil must be properly identified, compacted, and tested to provide adequate support.”[47] This fundamental principle underscores that concrete’s long-term performance depends entirely on the foundation it rests upon.

    Dr. Debakanta Mishra, a geotechnical engineering researcher, notes that “the critical saturation degree has been proposed to depict the influence of internal saturation on freeze-thaw damage development” in concrete exposed to challenging soil conditions.[48] His research emphasizes that moisture management—controlling how much water remains in soil beneath concrete—determines freeze-thaw resistance in regions like Northwest Arkansas that experience temperature fluctuations around freezing.

    Conclusion

    Local soil conditions fundamentally determine whether concrete installations perform reliably for decades or develop problems within the first few years. For Fayetteville homeowners planning driveways, patios, or other concrete projects, understanding your specific soil type and taking appropriate preparation steps makes the difference between a wise investment and an expensive mistake. Arkansas’s expansive clay soils, seasonal moisture variations, and freeze-thaw cycles create challenges that proper soil testing, preparation, and drainage solutions can effectively address. Working with experienced contractors who understand Northwest Arkansas soil conditions ensures your concrete project receives the foundation it needs for lasting performance. Don’t let poor soil preparation undermine your investment—insist on professional soil evaluation and proper base preparation that protects your concrete for the long term.

    Local Soil Conditions Affect Concrete Installations FAQs

    How do local soil conditions affect concrete installations?

    Local soil conditions directly affect concrete installations by determining load-bearing capacity, influencing moisture management beneath the slab, and causing seasonal expansion or contraction that can crack concrete. Clay soils common in Arkansas expand when wet and shrink when dry, creating pressure that damages concrete, while sandy soils drain well but may erode and create voids. Proper soil testing and preparation address these conditions to ensure stable, long-lasting concrete performance.

    What type of soil is best for concrete slabs in Fayetteville?

    Loam soil is ideal for concrete slabs in Fayetteville because it balances sand, silt, and clay content, providing both stability and adequate drainage. Sandy soils also work well due to excellent drainage, though they require proper compaction to prevent settling. Expansive clay soils common in Northwest Arkansas require special preparation—including removal and replacement with select fill, or chemical stabilization—to prevent seasonal swelling and shrinking that cracks concrete.

    How deep should soil be excavated for concrete driveways in Arkansas?

    Arkansas concrete driveways typically require excavating 8-12 inches below the finished grade to remove organic topsoil and reach stable subgrade. In areas with expansive clay like much of Fayetteville, excavation depth increases to 12-18 inches or more to remove problematic soil and allow installation of 4-6 inches of compacted gravel base beneath the 4-6 inch concrete slab. Properties with very poor soil may require deeper excavation based on geotechnical recommendations.

    Can concrete be poured directly on clay soil?

    Pouring concrete directly on clay soil is not recommended in Arkansas due to the expansive nature of local clays, which swell when wet and shrink when dry. This movement causes concrete cracking and structural failure over time. Professional installations remove at least 12 inches of clay and replace it with compacted gravel base, or they stabilize the clay using lime treatment and moisture control methods that reduce expansion potential before placing concrete.

    How does soil compaction prevent concrete problems?

    Proper soil compaction removes air voids and increases density, preventing settlement and ensuring uniform support beneath concrete. Contractors achieve 95% of maximum dry density through mechanical compaction in 6-8 inch lifts, dramatically increasing bearing capacity from 500-800 pounds per square foot in loose soil to 2,000-3,000 pounds or more when properly compacted. Without adequate compaction, soil gradually settles under concrete weight, creating uneven surfaces, cracks, and structural problems that require expensive repairs.

    Local Soil Conditions Affect Concrete Installations Citations

    1. Stratum Repair – The Role of Soil Composition in Concrete Settling and Leveling
    2. Venture Concrete Technologies – How Soil Conditions Affect Concrete Footing Stability
    3. Barrow Mix Concrete – Pouring Concrete Over Soil: A Comprehensive Guide
    4. Concrete Network – Does Expansive Clay Soil Cause Foundation Problems?
    5. Arkansas Geological Survey – Expansive Soils in Arkansas
    6. Airlift Concrete Experts – How Arkansas Soil Types Affect Your Home’s Foundation
    7. Leveled Concrete – Types of Soil for Building Foundation
    8. UltraTech Cement – Types of Soil and Their Properties
    9. Arkansas Geological Survey – Expansive Soils: Porters Creek Clay
    10. Mintek Resources – Dealing with Expansive Soils in Construction
    11. Structured Foundation Repairs – Preventing Foundation Problems in Expansive Clay Soil Environments
    12. Parrot Bay Pools – Arkansas Soil Types and Swimming Pool Construction
    13. Baird Foundation Repair – Foundation Problems Due to Expansive Soils
    14. NHI Foam – Types of Soil and Your Concrete
    15. Leveled Concrete – Best Soil Types for Foundations
    16. Stratum Repair – Soil Erosion and Concrete Stability
    17. UltraTech Cement – Rocky and Gravelly Soil Properties
    18. Withers Lumber – Why Soil Moisture Matters When Pouring Concrete Footings
    19. Concrete Network – Maintaining Moisture Balance in Expansive Soils
    20. DPS Construction – Freeze-Thaw Cycle Effects on Concrete
    21. A-1 Concrete Leveling – A Homeowner’s Guide to Freeze-Thaw Cycles
    22. G3 SoilWorks – Soil Compaction Test Methods
    23. Mintek Resources – Soil Compaction Test for Construction
    24. BigRentz – Proctor Compaction Test: Procedure and Tools
    25. Cat Rental Store – How to Measure Soil Compaction
    26. ACS Services – 4 Critical Things to Know About a Compaction Test
    27. GEO Forward – Soil Compaction Testing and Soil Density Testing
    28. Mintek Resources – Atterberg Limits Test for Expansive Soils
    29. GEO Forward – Geotechnical Testing Methods
    30. Mintek Resources – Proctor Compaction Testing Standards
    31. ACS Services – Geotechnical Evaluation Costs
    32. Wafflemat Foundation Systems – What Is the Best Fill Under Concrete Slab?
    33. Hello Gravel – What Type of Gravel Is Best to Use Under a Concrete Slab?
    34. Concrete Network – Best Fill Under Concrete Slabs
    35. Parrot Bay Pools – Pre-Wetting Soil Before Construction
    36. Mintek Resources – Chemical Stabilization of Expansive Soils
    37. Hello Gravel – Drainage Solutions for Concrete Slabs
    38. Slabjack Kings – Causes of Sunken Concrete and Prevention
    39. Arkansas Geological Survey – Porters Creek Clay Distribution
    40. Airlift Concrete Experts – Arkansas Seasonal Soil Conditions
    41. AR Concrete Fayetteville – Fayetteville Freeze-Thaw Cycles
    42. National Institutes of Health – Air-Entrained Concrete for Freeze-Thaw Resistance
    43. ACS Services – Soil Testing Cost Estimates
    44. TractorByNet – Gravel Base Material Costs
    45. Everything About Concrete – Concrete Replacement Costs
    46. Wafflemat Foundation Systems – Cost-Benefit of Soil Preparation
    47. American Concrete Institute – Soil Support System Requirements
    48. National Center for Biotechnology Information – Freeze-Thaw Deterioration Mechanisms in Concrete
  • What is the Best Time of Year to Pour Concrete in Arkansas?

    What is the Best Time of Year to Pour Concrete in Arkansas?

    Key Takeaways:

    • The best time to pour concrete in Arkansas is during spring (late April through early June) and fall (late September through November) when temperatures consistently range between 50°F and 70°F
    • Concrete poured during these ideal seasons develops superior long-term strength and requires fewer protective measures than summer or winter pours
    • Arkansas summers with temperatures exceeding 85°F cause rapid moisture evaporation that weakens concrete, while winter temperatures below 40°F can stop hydration and cause permanent damage
    • Proper timing reduces project costs by minimizing the need for temperature control equipment, specialized admixtures, and extended curing protection
    • Fayetteville’s Ozark Mountain microclimate creates unique seasonal windows that optimize concrete performance when matched with proper pour scheduling

    For Arkansas homeowners planning concrete projects, timing determines whether your driveway, patio, or slab develops maximum strength and durability over decades of service. The best time of year to pour concrete in Arkansas is during the mild seasons of spring and fall, specifically from late April through early June and late September through November. These periods provide the stable temperature range of 50°F to 70°F that concrete needs for proper curing, helping your investment achieve full structural potential while minimizing risks of cracking, scaling, or premature deterioration.

    Understanding Why Temperature Matters for Concrete in Arkansas

    Concrete doesn’t simply dry like paint—it undergoes a chemical reaction called hydration where cement particles bond with water to form crystalline structures that give concrete its strength. This hydration process is highly temperature-sensitive, and getting it right means the difference between concrete that lasts 30 years versus concrete that cracks within the first winter.

    The American Concrete Institute (ACI) establishes that concrete temperatures should remain above 50°F during the curing period to ensure proper strength development[1]. When temperatures drop below 40°F, hydration slows dramatically and can stop entirely if freezing occurs. The Portland Cement Association emphasizes that concrete must reach at least 500 psi strength before exposure to freezing conditions, otherwise ice formation in the cement paste causes irreparable loss of up to 50% of ultimate strength[2].

    On the opposite extreme, when temperatures exceed 85°F to 90°F, concrete faces different challenges. High heat accelerates water evaporation from the surface faster than the concrete can use it for hydration. This rapid moisture loss creates shrinkage cracks, a weaker surface layer, and reduced long-term durability[3]. Research by the Portland Cement Association demonstrates that concrete cured at elevated temperatures achieves lower ultimate strength compared to concrete cured at moderate temperatures, even though early strength may appear higher[4].

    How Arkansas Climate Creates Unique Concrete Challenges

    Arkansas experiences four distinct seasons with significant temperature swings that directly impact concrete performance. Fayetteville’s location in the Ozark Mountains creates a humid subtropical climate where average temperatures range from 28°F in January to 90°F in July[5]. This dramatic variation means that concrete poured during different seasons faces vastly different curing conditions.

    The state’s central location allows weather systems from all directions to influence its climate, creating rapid temperature changes that can catch contractors off-guard[6]. Spring months bring the highest rainfall, with April averaging the wettest conditions, while summer months from July through August frequently see temperatures exceeding 90°F with humidity levels that reach 72%[7]. These extreme conditions make strategic timing essential for successful concrete projects in Arkansas.

    Spring: The Prime Season for Pouring Concrete in Arkansas

    Late April through early June represents the optimal spring window for concrete work in Northwest Arkansas. During this period, Fayetteville experiences average high temperatures ranging from 65°F to 75°F with lows between 45°F and 55°F[8]. These moderate conditions allow concrete to cure at an ideal pace, developing maximum long-term strength without requiring extensive protective measures.

    Spring offers Arkansas homeowners the perfect combination of stable temperatures, moderate humidity, and predictable weather patterns that minimize concrete project risks. The gradual warming trend means that unexpected cold snaps become less likely as the season progresses, reducing the chance of frost damage to fresh concrete. By late April, Fayetteville typically sees consistent temperatures above 50°F at night, meeting the critical threshold that ACI standards establish for proper concrete curing[1].

    Why Late Spring Beats Early Spring

    While March signals the beginning of spring in Arkansas, it’s too unpredictable for concrete work. March commonly delivers one last snowfall in Fayetteville, and overnight temperatures frequently dip below 40°F[6]. This variability creates substantial risk—if concrete freezes within the first 24 to 48 hours after placement, the expanding ice crystals disrupt the cement paste structure and cause permanent weakness[2].

    Late April through May provides more stability. The weather has transitioned definitively toward warmer patterns, and the risk of freezing nighttime temperatures diminishes significantly. May is particularly favorable because trees have leafed out, providing natural shade that protects fresh concrete from direct sunlight during the warmest part of the day. This natural protection reduces surface evaporation and helps maintain even moisture distribution throughout the curing period.

    Managing Spring Rain During Concrete Pours

    Arkansas spring brings substantial rainfall, with April and May averaging the highest precipitation of the year[7]. While rain presents challenges for concrete work, proper planning and weather monitoring make spring pours highly successful. Professional concrete contractors monitor the 72-hour forecast before scheduling pours, ensuring at least two to three days of dry weather for initial setting.

    If light rain occurs after concrete has begun setting (typically 4 to 6 hours after placement), it actually benefits curing by maintaining surface moisture. However, heavy rain on fresh concrete can damage the surface, wash away cement paste, and create a weakened layer. For Arkansas projects, contractors often have protective plastic sheeting on standby during spring months to quickly cover concrete if unexpected rain arrives before adequate setting has occurred.

    Fall: Arkansas’ Second Prime Concrete Season

    Late September through November offers Arkansas homeowners another excellent window for concrete projects. As summer heat dissipates and before winter cold arrives, fall delivers consistent temperatures ideal for concrete curing. Fayetteville experiences average highs between 60°F and 75°F during this period, with nighttime lows comfortably above 40°F through mid-October[8].

    Fall conditions in Northwest Arkansas rival spring for concrete work quality. The season brings lower humidity than spring, reducing concerns about excessive moisture interference. September through November also features less rainfall than spring months, providing more predictable dry stretches for scheduling concrete pours[7]. These stable conditions allow concrete to cure methodically, developing the dense crystalline structure that ensures decades of performance.

    The Advantage of Fall Temperature Patterns

    Unlike spring’s warming trend, fall brings gradually cooling temperatures. This cooling pattern actually benefits concrete strength development. Research from the Portland Cement Association shows that concrete cured at around 55°F for the first 28 days ultimately reaches higher strength than concrete cured at 73°F, provided moisture is maintained[4]. Fall’s moderate temperatures fall perfectly within this optimal range, allowing the hydration process to progress thoroughly without the weakening effects of high-temperature curing.

    October stands out as particularly favorable in Arkansas. The month delivers gorgeous weather with peak fall colors, temperatures ranging from 50°F to 70°F, and the lowest humidity of the year at approximately 72%[7]. These conditions provide an excellent environment for concrete curing while making the construction process more comfortable for contractors and homeowners alike.

    Planning Around the Approaching Winter

    The primary consideration for fall concrete work is the approaching winter. As November progresses, overnight temperatures begin dipping closer to 40°F, and the risk of early frost increases[6]. Concrete poured in early to mid-October has ample time to develop adequate strength before winter arrives. Projects completed in late November should incorporate cold-weather protection measures like insulated blankets if temperatures are forecast to drop below 40°F within the first three days after placement.

    Light frost becomes common in Arkansas during late October[6]. While frost itself doesn’t damage concrete that has cured for several days, it signals that contractors must be more vigilant about temperature monitoring and protection protocols as the season advances toward winter.

    SeasonBest MonthsTemperature RangeKey AdvantagesPrimary Considerations
    SpringLate April – Early June50°F – 75°FStable warming trend, natural shade, optimal curing paceHigher rainfall requires weather monitoring
    FallLate September – November50°F – 70°FLow humidity, stable weather, gradual cooling enhances strengthMust complete before winter cold arrives

    Summer Concrete Challenges in Arkansas

    July and August present significant challenges for concrete work in Arkansas. Fayetteville temperatures frequently reach 89°F to 90°F, with many days exceeding 95°F[5]. The combination of intense heat, direct sunlight, low humidity, and wind creates conditions where water evaporates from concrete surfaces faster than the hydration process can utilize it.

    When concrete temperature at placement exceeds 90°F to 95°F, multiple problems compound. The ACI specifies maximum concrete temperatures of 95°F for general construction, recognizing that higher temperatures accelerate setting too rapidly and reduce workability[9]. Hot concrete becomes difficult to finish properly, develops a weaker surface layer, and often shows plastic shrinkage cracks—those characteristic spider-web patterns that appear within hours of placement.

    The Science Behind Hot Weather Concrete Failure

    High temperatures create a cascade of issues. First, they accelerate the cement hydration reaction, causing concrete to set faster than contractors can properly finish it. This rushed timeline leads to cold joints where separate concrete placements don’t bond properly, creating structural weak points. Second, rapid surface drying causes the top layer to shrink while the bottom remains plastic, generating internal stresses that manifest as surface cracks[3].

    Research consistently demonstrates that concrete cured at elevated temperatures achieves lower ultimate strength. While hot-cured concrete may reach 70% of design strength faster, its 28-day and long-term strength remain inferior to concrete cured at moderate temperatures. One study showed that concrete cured at 120°F was initially strongest but weaker than 73°F-cured concrete by 28 days[4]. For Arkansas homeowners seeking maximum durability, summer heat undermines the long-term investment.

    Can Summer Pours Succeed in Arkansas?

    Professional contractors can successfully pour concrete during Arkansas summers by implementing protective measures, though these increase project complexity and cost. Strategies include scheduling pours for early morning (before 8 AM) when temperatures are coolest, using chilled mixing water or ice to reduce initial concrete temperature, applying evaporation retarders to the surface, and maintaining continuous moisture through misting or wet burlap[10].

    Some contractors use retarding admixtures that slow the setting process, extending the working time in hot conditions[11]. Sun shades and windbreaks can also reduce surface evaporation. However, all these measures add cost, require specialized expertise, and still don’t match the quality achieved by simply waiting for fall’s moderate temperatures. Unless project timing absolutely demands summer completion, Arkansas homeowners benefit significantly by scheduling concrete work during the ideal spring or fall windows.

    Winter Concrete Considerations for Arkansas

    December through February presents the most challenging conditions for concrete work in Northwest Arkansas. Fayetteville’s average January temperatures range from 28°F at night to 44°F during the day[8], consistently falling below the 40°F threshold that ACI identifies as requiring cold-weather protection[1]. January also brings the highest snowfall and frequent ice storms, creating hazardous conditions that extend beyond just temperature concerns[6].

    When concrete freezes before reaching adequate strength, the results are catastrophic. Water in the fresh concrete expands by 9% as it turns to ice, creating internal pressure that disrupts the cement paste matrix[2]. This freeze damage is permanent and irreversible—the concrete will never achieve its intended strength even with subsequent proper curing. The Portland Cement Association states that concrete must reach a minimum of 500 psi strength to resist freeze damage, which typically requires maintaining temperatures above 50°F for 2 to 3 days after placement[2].

    The True Cost of Winter Concrete in Arkansas

    While modern construction techniques allow winter concrete placement, the process requires significant additional investment. Contractors must use heated enclosures, insulated blankets, ground heaters, and sometimes heated mixing water. Non-chloride accelerating admixtures help speed strength development, but quality control becomes more difficult[12]. Forms must remain in place longer, extending project timelines. All these measures substantially increase costs—often 20% to 40% above spring or fall pricing for the same project.

    Arkansas’ unpredictable winter weather compounds these challenges. A mild day in the 50s might suddenly give way to freezing rain or a cold front dropping temperatures into the 20s overnight. This variability demands constant monitoring, immediate response to weather changes, and contingency plans that further increase complexity. For residential projects like driveways, patios, or walkways, the enhanced expense and risk rarely justify winter scheduling when spring is just months away.

    Emergency and Essential Winter Concrete Work

    Some situations require winter concrete placement in Arkansas—foundation repairs that can’t wait, emergency infrastructure work, or commercial projects with fixed deadlines. When winter work is unavoidable, professional contractors follow strict ACI cold-weather protocols[1]. This includes maintaining concrete temperature at or above 50°F for at least 3 days (7 days for standard strength mixes), protecting concrete from freezing for the first 24 hours minimum, and using air-entrained concrete to improve freeze-thaw resistance[12].

    Ground preparation becomes critical in winter. Frozen ground must be thawed, and heated subgrade maintains proper conditions for slab-on-grade work. Heated water for mixing raises the initial concrete temperature, buying time for the hydration process to generate its own heat. Despite these precautions, winter concrete work remains a specialized undertaking best left to experienced contractors with proper equipment and expertise.

    Optimal Concrete Pouring Conditions for Arkansas Projects

    Understanding the ideal conditions helps Arkansas homeowners and contractors make informed decisions about project timing. The American Concrete Institute and Portland Cement Association provide clear guidelines that align perfectly with Arkansas’ spring and fall seasons.

    Temperature Requirements

    The optimal temperature range for pouring and curing concrete is 50°F to 70°F, conditions that Arkansas experiences consistently during late spring and fall months. Within this range, the hydration reaction proceeds at a steady pace that produces strong, durable concrete without requiring intervention. The ACI specifies that ambient temperatures should remain at or above 50°F during the curing period, with some specifications requiring 40°F minimum[1].

    For Arkansas projects, contractors should verify that forecasted temperatures will stay above 40°F for at least 48 hours after placement, preferably 72 hours. This buffer ensures that concrete develops enough strength to resist freeze damage even if unexpected temperature drops occur. The ideal scenario provides consistent temperatures between 50°F and 65°F for the first week, conditions that Arkansas springs and falls reliably deliver.

    Humidity and Moisture Conditions

    Concrete needs adequate moisture to cure properly, but excessive humidity can interfere with finishing operations. Moderate relative humidity between 40% and 60% works well for most concrete applications[13]. Arkansas’ fall season typically provides these conditions, with September through October showing lower humidity than spring or summer[7].

    Low humidity combined with wind and high temperatures creates the dangerous trifecta that accelerates surface evaporation. If evaporation exceeds 0.2 pounds per square foot per hour, contractors must implement protective measures like windbreaks, sunshades, or evaporation retarders[10]. Arkansas’ spring and fall conditions rarely reach these critical thresholds, naturally providing the moisture balance that concrete needs.

    Weather Stability Requirements

    Concrete requires 2 to 3 days of dry weather after placement for initial setting. Rain within the first 24 hours can severely damage fresh concrete, washing away surface cement, creating a weak layer, and introducing excess water that reduces strength. The 72-hour forecast should show stable conditions with no significant precipitation expected.

    Arkansas’ weather variability makes this planning essential. Spring thunderstorms can develop quickly, though they typically follow predictable afternoon patterns. Fall provides more stable extended dry periods, making weather planning slightly easier. Professional contractors monitor local weather radar continuously during the 48 hours before scheduled pours, ready to postpone if conditions threaten to deteriorate.

    Critical FactorOptimal RangeArkansas SpringArkansas Fall
    Air Temperature50°F – 70°F✓ Late April – Early June✓ September – November
    Minimum TemperatureAbove 40°F for 48-72 hours✓ Consistent by late April✓ Through mid-November
    Humidity40% – 60%Moderate to high✓ Ideal levels
    Precipitation2-3 days dry after pourFrequent rain requires monitoring✓ Lower rainfall, more predictable

    Special Considerations for Fayetteville’s Ozark Microclimate

    Fayetteville’s location in the Ozark Mountains creates unique microclimatic conditions that affect concrete work differently than other parts of Arkansas. The elevation and topography influence local temperature patterns, precipitation distribution, and weather system behavior in ways that savvy homeowners can use to their advantage.

    The Ozark Plateau remains the coolest and driest part of Arkansas[14]. While this provides benefits during summer—slightly lower peak temperatures than southern Arkansas experiences—it also means that fall and spring cool more quickly in the mountains. Projects in Fayetteville might need cold-weather protection a week or two earlier in fall than concrete work in southern Arkansas cities like El Dorado or Texarkana.

    Elevation Effects on Concrete Timing

    Fayetteville sits at approximately 1,400 feet elevation, enough to create noticeable temperature variations from lower elevations. Nighttime temperatures drop more significantly in the Ozarks, and frost arrives earlier in fall and lingers later into spring. This elevation effect means that optimal concrete windows in Fayetteville might be slightly narrower than other parts of Arkansas—perhaps starting a week later in spring and ending a week earlier in fall.

    The upside of elevation is more comfortable summer conditions. While Little Rock frequently sees 100°F temperatures in July and August, Fayetteville typically peaks in the low 90s[5]. This modest difference makes early summer (early June) slightly more viable for concrete work in Northwest Arkansas than in central or southern parts of the state, though moderate spring and fall remain far superior choices.

    Arkansas River Valley and Surrounding Influence

    Fayetteville sits between the Ozark Plateau to the north and the Arkansas River Valley to the south, a position that exposes the area to weather systems from multiple directions[14]. Cold fronts sweeping down from the plains, warm moist air from the Gulf of Mexico, and mountain effects on precipitation all converge in Northwest Arkansas. This creates the region’s characteristic weather variability—a factor that makes reliable extended forecasts more challenging and reinforces the importance of scheduling concrete work during the most stable seasonal windows.

    Local contractors familiar with Fayetteville’s patterns know that fall generally provides more predictable weather than spring. The transition from summer to fall follows a steadier cooling pattern with fewer dramatic weather system conflicts. Spring’s transition involves more volatile weather as winter systems battle incoming warmth from the south, creating the conditions for rapid changes that can catch concrete contractors off-guard.

    Planning Your Arkansas Concrete Project Timeline

    Successful concrete projects require planning that extends beyond just picking a season. Arkansas homeowners should begin the planning process months in advance to secure the best contractors during peak spring and fall seasons and to ensure project completion during optimal weather windows.

    Contractor Availability and Scheduling

    Professional concrete contractors book spring and fall schedules early because these seasons represent their busiest periods. The combination of ideal weather conditions and homeowner demand means that reputable contractors often have 4 to 8 week lead times during May and October. Homeowners planning concrete projects should contact contractors in late winter to schedule spring work or in mid-summer to reserve fall time slots.

    This advance scheduling provides benefits beyond just securing a spot. It allows time for proper site preparation, obtaining necessary permits in municipalities that require them, and coordinating with other aspects of landscaping or construction projects. Arkansas homeowners investing in significant concrete work—such as driveways or large patios—benefit from this planning timeline by ensuring that contractors can devote appropriate attention to their projects rather than rushing to fit them between other commitments.

    Project Size and Complexity Considerations

    Larger or more complex concrete projects require more extended favorable weather windows. A simple 10×12 walkway might need only a single dry day for placement plus 2 to 3 days of good curing weather. A large driveway, multiple patios, or stamped concrete installation might require several pours scheduled across multiple days, meaning that week-long stable weather becomes essential. When planning driveway projects, coordinate seasonal timing with proper driveway thickness for Arkansas conditions to ensure your concrete performs optimally throughout its service life.

    For substantial projects, the optimal windows narrow slightly. Late May through early June and late September through mid-October provide the most reliable extended stable periods in Arkansas. Projects requiring multiple pours benefit from scheduling all concrete work within a 2-week window during these prime periods, ensuring consistent conditions across all phases.

    Preparing for the Unexpected

    Even with careful planning, Arkansas weather can surprise. The state’s central location and exposure to multiple weather systems mean that forecasts beyond 72 hours carry significant uncertainty[6]. Homeowners should discuss contingency plans with contractors before project start—what happens if rain forces postponement, how quickly can work be rescheduled, and what compensation arrangements apply for weather delays.

    Professional contractors build flexibility into their schedules during spring and fall, knowing that some projects will need rescheduling. This flexibility is another reason to book early—contractors can more easily accommodate weather-related changes for projects scheduled well in advance than for last-minute bookings where the calendar offers fewer alternative dates.

    Comparing Spring vs. Fall for Arkansas Concrete Work

    Both spring and fall offer excellent conditions for concrete in Arkansas, but subtle differences might make one season preferable depending on specific project requirements and homeowner priorities.

    When Spring Has the Advantage

    Spring works best for projects where subsequent landscaping or outdoor construction will follow the concrete work. Completing a driveway or patio in May leaves the entire summer for additional yard improvements, pool installation, or outdoor living space finishing touches. Spring completion also means that homeowners can fully enjoy their new concrete features throughout the summer and fall outdoor season.

    For homeowners planning to reseed lawns or plant landscaping disturbed by concrete work, spring timing aligns with optimal growing conditions. Grass establishes better when seeded in late spring, and perennials planted in spring have the full growing season to develop strong root systems before winter.

    When Fall Has the Advantage

    Fall generally provides slightly more predictable weather patterns in Arkansas, with less rainfall and more stable extended forecasts than spring offers. For large or complex projects where multi-day pours are required, fall’s greater weather stability reduces the risk of mid-project delays. The lower humidity also benefits finishing operations, allowing contractors to achieve better surface textures on decorative or stamped concrete[7].

    Fall timing works well for projects that homeowners want completed before the holidays or as preparation for the following spring. A driveway or patio completed in October has months to fully cure and develop maximum strength before experiencing its first freeze-thaw cycles. This extended low-stress curing period before winter can enhance long-term durability.

    From a practical standpoint, fall often offers better value. Concrete contractors entering their slower winter season may offer more competitive pricing in October and November than during the high-demand spring months. Scheduling flexibility also improves as contractors balance finishing the season’s work before winter rather than managing the constant demand of peak spring season.

    Extending the Concrete Season: Early Spring and Late Fall

    Arkansas’ moderate climate allows for successful concrete work beyond the peak spring and fall windows, but projects during these shoulder periods require additional planning and sometimes enhanced protection measures.

    Early April and Late March Concrete Work

    Late March and early April fall into the marginal period where concrete work is possible but requires careful weather monitoring. Fayetteville often experiences temperatures in the 50s to 60s during these weeks, but nighttime lows can still drop to the upper 30s[8]. The risk isn’t extreme cold—it’s the unpredictability of late-season cold fronts that can push temperatures below 40°F for extended periods.

    Professional contractors can successfully pour concrete during these weeks by monitoring 5-day forecasts carefully and being prepared to implement cold-weather protection if unexpected temperature drops occur. Insulated concrete blankets, held on standby, can be deployed quickly if forecasts change. Non-chloride accelerating admixtures can speed early strength development, providing additional protection against cold damage[12].

    Late November and Early December Options

    Similarly, late November represents the tail end of ideal concrete weather in Arkansas. Many contractors successfully complete projects through Thanksgiving, especially during years with mild early winter patterns. The key consideration is that concrete placed in late November needs adequate protection if temperatures suddenly drop, and homeowners must accept that project delays become more likely as winter approaches.

    For homeowners with fixed project deadlines extending into early winter, experienced contractors can provide detailed cost estimates that include cold-weather protection measures. These measures add 15% to 30% to project costs compared to peak season work, but they allow project completion when waiting until spring isn’t feasible. The success of late-season work depends heavily on contractor expertise—this is not the time for budget contractors without experience in cold-weather concrete practices.

    Technology and Techniques for Non-Ideal Seasons

    Modern concrete technology provides tools that extend the practical working season in Arkansas, though these solutions add cost and complexity that reinforces why spring and fall remain optimal choices for most homeowners.

    Chemical Admixtures for Temperature Control

    Accelerating admixtures speed hydration in cold weather, allowing concrete to develop protective strength faster. Non-chloride accelerators are preferred because chloride can corrode reinforcing steel over time[12]. These admixtures can reduce the time needed to reach 500 psi strength from 3 days to 24-36 hours, significantly reducing vulnerability to freeze damage. However, they cost $15 to $30 per cubic yard and require precise dosing based on ambient temperatures.

    Retarding admixtures slow hydration in hot weather, extending the working time and reducing the risk of thermal cracking. Mid-range water reducers can lower the water requirement, producing stronger concrete that’s less susceptible to hot-weather problems[11]. These chemical solutions add cost—typically $10 to $25 per cubic yard—and require contractors with expertise in admixture use to achieve proper results.

    Physical Protection Methods

    Insulated concrete blankets maintain temperature during cold weather, trapping the heat generated by cement hydration and protecting against ambient cold. Quality blankets provide R-values of 3 to 10, enough to maintain proper concrete temperature even when air temperatures drop to 20°F or below[15]. Blanket rental typically costs $50 to $150 per project depending on size, a modest investment that provides substantial protection for late-season pours.

    Sun shades and evaporation retarders protect concrete during hot weather. Evaporation retarders form a temporary film on the surface, dramatically reducing moisture loss during the critical initial hours after placement[10]. These products cost approximately $30 to $60 per thousand square feet but can prevent plastic shrinkage cracking that would otherwise ruin the concrete surface.

    When Technology Makes Sense

    For Arkansas homeowners, these technologies primarily benefit projects where timing flexibility doesn’t exist—needed foundation repairs, commercial commitments with fixed deadlines, or emergency infrastructure work. For discretionary residential projects like new driveways or patios, the additional cost and complexity of working outside ideal seasons rarely makes economic sense. Waiting a few weeks or months to catch the optimal spring or fall window produces better results at lower cost with less risk.

    Common Mistakes in Seasonal Concrete Planning

    Arkansas homeowners often make timing decisions that undermine their concrete projects. Understanding these common mistakes helps avoid costly problems and ensures that concrete develops full strength and durability.

    Rushing Summer Projects

    The most frequent mistake is scheduling concrete work during July or August simply because homeowners want immediate completion. The combination of vacation time availability and the desire to complete projects before school resumes drives many homeowners to push for summer pours. However, Arkansas summer heat creates conditions where concrete simply cannot perform optimally without expensive protective measures and intensive oversight[3].

    A driveway poured in July with inadequate hot-weather precautions will show plastic shrinkage cracks, have lower ultimate strength, and require more frequent maintenance than the same driveway poured in October. The patience to wait 8 to 10 weeks for fall saves money, produces better results, and avoids problems that cannot be corrected once they occur. For substantial concrete investments, seasonal timing is not optional—it’s essential.

    Underestimating Winter Risks

    Some homeowners schedule concrete work in late December or January because contractors offer attractive off-season pricing. While experienced contractors can execute cold-weather concrete successfully, the combination of additional protection costs, extended timelines, and weather-related uncertainty often eliminates the apparent savings. A delayed project that requires multiple reschedulings, cold-weather admixtures, and extended blanket protection may cost more than simply waiting for spring.

    The greater risk is hiring inexperienced contractors who lack proper cold-weather expertise and equipment. Concrete that freezes before developing adequate strength suffers permanent damage that no amount of subsequent care can repair[2]. For homeowners, this means either accepting a substandard driveway or fighting for expensive removal and replacement. The legal and financial complications far exceed any savings from off-season scheduling.

    Ignoring Curing Time Before Use

    Another common mistake is scheduling concrete work too close to dates when the surface must bear loads. A driveway poured on October 15 should not have vehicles driving on it by October 20, regardless of how hard the surface feels. Concrete requires at least 7 days before light traffic and 28 days to develop design strength[16]. Homeowners should schedule concrete projects with adequate buffer time before the surface must be fully functional.

    This timing consideration particularly affects driveways where homeowners need vehicle access. If a family has only one driveway access point, concrete work effectively blocks that access for a week. Planning alternative parking arrangements and ensuring the project occurs during a period when this inconvenience is manageable prevents the temptation to drive on concrete prematurely and cause permanent damage.

    Long-Term Benefits of Optimal Seasonal Timing

    The investment in proper seasonal timing pays dividends throughout the concrete’s service life. Arkansas homeowners who schedule projects during ideal spring or fall windows benefit from multiple long-term advantages that far outweigh the inconvenience of waiting for optimal weather.

    Maximum Strength Development

    Concrete cured at moderate temperatures develops denser, more uniform internal structure than concrete subjected to temperature extremes. Research from the Portland Cement Association demonstrates that concrete cured at 55°F ultimately achieves higher strength than concrete cured at 73°F or higher[4]. For a driveway or patio expected to serve 30 to 50 years, this enhanced strength translates to better performance under freeze-thaw cycles, reduced cracking from settling or thermal movement, and extended intervals between major maintenance.

    Arkansas homes with concrete poured during optimal seasons typically require 30% to 50% less maintenance over the first decade compared to concrete placed during temperature extremes. This reduced maintenance need means fewer expenses for sealing, crack repair, and surface restoration—savings that quickly exceed any premium that homeowners might have paid for spring or fall contractor scheduling.

    Reduced Cracking and Durability Issues

    Plastic shrinkage cracks from hot-weather placement and freeze damage from cold-weather exposure create entry points for moisture, de-icing salts, and freeze-thaw cycles that progressively deteriorate concrete. These early-life problems accelerate long-term degradation even if immediate damage appears minor. Concrete with surface cracks allows water penetration that undermines the subbase, creates additional cracking, and reduces structural integrity over time.

    Concrete properly cured during Arkansas’ moderate spring and fall seasons develops a dense, low-permeability surface that resists these degradation mechanisms. The investment in proper timing creates a protective barrier that maintains concrete appearance and function decades longer than compromised concrete requires. For Arkansas homeowners, this extended service life represents substantial value—a patio lasting 40 years without major repairs versus 25 years with multiple interventions clearly justifies waiting a few months for optimal pour conditions.

    Aesthetic Quality and Finish

    Beyond structural considerations, concrete poured during moderate temperatures achieves better aesthetic results. Surface finishing operations proceed more smoothly when concrete sets at a natural pace without the complications of rapid hot-weather setting or delayed cold-weather hardening. Decorative elements like stamped patterns, exposed aggregate, or colored concrete develop more uniform appearance when ambient conditions support consistent finishing operations.

    For Fayetteville homeowners investing in decorative concrete features—stamped patios, colored driveways, or textured walkways—seasonal timing directly affects the final appearance. Fall’s lower humidity particularly benefits these applications, providing the stable conditions that allow contractors to achieve the artistic quality that homeowners envision. The difference between mediocre and exceptional decorative concrete often traces directly to whether the project occurred during optimal weather conditions.

    Conclusion

    For Arkansas homeowners planning concrete projects, seasonal timing represents one of the most important decisions affecting long-term success. The best time of year to pour concrete in Arkansas is unquestionably during the mild, stable weather of late spring (late April through early June) or fall (late September through November). These periods provide the 50°F to 70°F temperature range that concrete needs for optimal hydration, strength development, and long-term durability.

    While modern technology allows concrete placement during other seasons, the combination of higher costs, increased risks, and compromised performance makes spring and fall the clear choice for discretionary residential projects. Arkansas’ climate creates distinct seasonal windows that professional contractors and informed homeowners leverage to produce concrete installations that serve reliably for decades with minimal maintenance.

    The patience to schedule concrete work during optimal seasons pays immediate dividends through lower costs and smoother project execution, and long-term benefits through superior strength, reduced cracking, and extended service life. Whether you’re planning a new driveway, patio, walkway, or slab, timing your project to match Arkansas’ seasonal patterns ensures that your concrete investment achieves its full potential and continues delivering value for generations.

    Best Time of Year to Pour Concrete in Arkansas FAQs

    What is the best time of year to pour concrete in Arkansas for a driveway?

    The best time to pour a concrete driveway in Arkansas is during late spring (late April through early June) or fall (late September through mid-November) when temperatures consistently range between 50°F and 70°F. These periods provide optimal curing conditions that allow concrete to develop maximum strength without requiring extensive protective measures, and Fayetteville’s climate during these months offers stable weather patterns that minimize project delays.

    Can you pour concrete in Arkansas during summer months?

    You can pour concrete during Arkansas summers, but temperatures exceeding 85°F to 90°F create challenges requiring protective measures like early morning pours, chilled mixing water, evaporation retarders, and continuous moisture maintenance. These hot-weather precautions add cost and complexity while still producing concrete with lower ultimate strength than spring or fall pours, making summer the least favorable season for Arkansas concrete work unless project timing demands immediate completion.

    What happens if concrete freezes after pouring in Arkansas?

    If concrete freezes before reaching at least 500 psi strength (typically within the first 24-48 hours), the expanding ice crystals permanently damage the cement paste structure and cause up to 50% loss of ultimate strength that cannot be recovered. This is why the American Concrete Institute requires maintaining concrete temperatures above 40°F during the protection period, and why Arkansas homeowners should avoid concrete work during the December through February winter season unless proper cold-weather protection is provided.

    How long does concrete need to cure in Arkansas before I can use it?

    Concrete requires at least 7 days before bearing light foot traffic and at least 28 days to develop design strength for full vehicle loads, though Arkansas’ moderate spring and fall temperatures support steady curing that typically allows driveway use after 7 to 10 days for passenger vehicles. For optimal long-term durability, limiting heavy loads and de-icing salt exposure during the first 30 days allows concrete to fully cure and develop the dense internal structure that ensures decades of reliable performance.

    Is fall or spring better for pouring concrete in Fayetteville?

    Both seasons offer excellent conditions, but fall (late September through November) provides slightly more predictable weather with lower rainfall and humidity than spring, making it marginally better for large or complex projects requiring extended stable conditions. Spring works well for projects where homeowners want to enjoy the concrete throughout summer and fall, while fall timing benefits from contractors’ end-of-season flexibility and sometimes more competitive pricing as the busy season concludes.

    Best Time of Year to Pour Concrete in Arkansas Citations

    1. Fox Blocks – Understanding Concrete Temperature Limits
    2. National Institutes of Health – Concrete Construction Precautions during Cold Weather
    3. Concrete Captain – Optimal Temperature For Pouring Concrete
    4. Powerblanket – Concrete Curing Temperature Makes a Difference
    5. Weather Spark – Fayetteville Climate
    6. Arkansas.com – Arkansas Average Weather by Month
    7. Weather US – Fayetteville Arkansas Climate
    8. US Climate Data – Fayetteville Weather Averages
    9. Civil Engineering Tech – The Critical Role of Temperature in Concrete
    10. Concrete Network – Concrete Pouring Tips Weather Map
    11. American Concrete Institute – Guide to Hot Weather Concreting ACI 305R-20
    12. ECS – A Guide to Working with Concrete in Cold Weather
    13. Advance Roofing – Concrete Curing Charts for Managing Temperature
    14. Encyclopedia of Arkansas – Climate and Weather
    15. Federal Highway Administration – Guide for Curing Portland Cement Concrete Pavements
    16. California Custom Coatings – Does Concrete Make Heat While Curing